Water Leaking from Stovepipe

  • Active since 1995, Hearth.com is THE place on the internet for free information and advice about wood stoves, pellet stoves and other energy saving equipment.

    We strive to provide opinions, articles, discussions and history related to Hearth Products and in a more general sense, energy issues.

    We promote the EFFICIENT, RESPONSIBLE, CLEAN and SAFE use of all fuels, whether renewable or fossil.
20180314_194548.jpg

Hi, new to wood stoves so I hope this isn't too obvious.

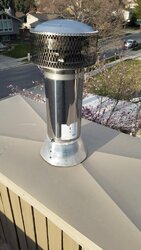
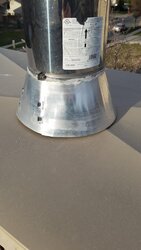
Our wood stove pipe is leaking water when it rains. I got up on the roof and took the following pictures. I assume the leak is caused by the large gap between the skirt thing and the metal thing. Any suggestions how I can fix this? Thank you. Craig
20180405_190427.jpg 20180405_190510.jpg
 
Last edited by a moderator:
Not too sure about the improvised flashing, but it looks like this needs a storm collar on the pipe above the flashing. Put a generous bead of silicone on the storm collar around the chimney pipe and finger trowel it in. I'd also put a dab of silicone on each of the tab slots on the flashing.
https://www.northlineexpress.com/6-selkirk-storm-collar-206810.html
 
Everything appears to be correct. They did an absolutely terrible job of sealing the storm collar to the pipe. It needs a generous amount of silicone added above the collar and down the seams in it. Having that locking band right there makes it kind of tough, I’d seal over the top of it too.
The chase top should have a flange around the pipe preventing water finding a way in under the storm collar, that’s why it’s got a gap on the bottom side.
 
That storm collar either needs to be above the locking band or below it... or you're going to need a lot more silicone! If this a new install by a contractor, make HIM come back and fix it. I'd like to see a picture of the flashing under the storm collar - bet there isn't an upstand around the opening. If that's the case, you'll have driven rain under the collar and leaks will appear somewhere else.
 
  • Like
Reactions: webby3650
That storm collar either needs to be above the locking band or below it...
That's why I suggested adding a storm collar above the flashing and locking band.
 
Thank you all for the responses. Two more questions:

1. Before I add silicone should I remove the storm collar and take a picture and post what's there? So far the only leaks are what I posted.
2. Is the silicone just the regular kind or is there a heat tolerant type?

Craig
 
It would be nice if you took the collar off just to see.
Any silicone works fine in this location, it doesn’t get very hot at all.
 
Remember to tool the silicone with your finger. It’s very important! It won’t hurt you, you can touch it. So many people pump it on, and that’s it. It won’t adhere properly unless you work it in.
 
Great. I will do this. Thank you very much.

Also, should I add another collar as begreen suggested?

Craig
No, just get a better storm collar, or silicone it better. Dura-vent collars are my favorite.
 
Either way, I’d put silicone on the top side of that locking band.
 
The tape came into play when I'd find water spots on the top of the stove. The chimney in question is open to wind blown rain coming down a few miles of lake and smacking my chimney. I wanted to rule out wind pushing rain up under the collar.
 
  • Like
Reactions: Jan Pijpelink
Thank you all for the responses. Two more questions:

1. Before I add silicone should I remove the storm collar and take a picture and post what's there? So far the only leaks are what I posted.
2. Is the silicone just the regular kind or is there a heat tolerant type?

Craig
You have to move it or add one, might as well take it off and see what's under it...pics please!
 
No raised lip to divert the water from the pipe, just more sloppy caulking.
 
Last edited:
I used a hammer and tapped around the hole before inserting the pipe to raise the lip up some so water doesn't flow into it. Not sure how you would do it with the pipe installed.
 
Is this a new installation that was paid for recently? If so, they should come back and make this right. If is and older install then you'll have to decide whether to fix short term or permanently. It's not ideal but to get through the season you could clean off the old caulk then lay a very thick bead of good quality silicone and finger trowel it smoothly about 1/2" high.
 
Is a raised lip something I can buy or am I just going to have to trowel in a bunch of silicone?
Pull the chase cover and use a ball peen hammer to make a lip. Unlessit is a new installation then make the contractor do it right
 
The install was three years ago. Tried to contact the installer but he's long gone. I will do as you have suggested and form a lip then caulk the dickens out of it.

Thank you all for your very helpful responses.

Craig