Hello everyone,
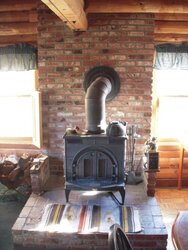
I have purchased the Englander 30NC from Home Depot (at this forum's suggestion) and had it delivered. It sits in my garage currently, and I will soon be moving it into position to replace the old stove (see photo). I have purchased side heat shields and it came with the rear heat shield installed. I will end up having a 8-9" clearance in the back of the stove and my "CTC" table states I can use a single wall stove pipe, which is what I would prefer to use (rather than double walled).
So my next set of questions are related to stove pipe!
I started looking at single walled stove pipe at the box stores (generally 24 gauge), and also on the Internet at various retailers (22 gauge). Wow, there are a lot of different options! Based on my installation, I believe I need the following pieces:
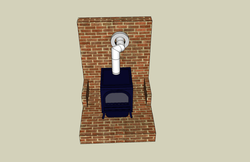
(1x) 6" x 16" (approx) straight piece crimped at stove end that will come out of the stove
(2x) 6" adjustable 90 degree pieces connected to the straight piece
(1x) 6" to 8" increaser (that is crimped on both ends) to connect to the thimble
Questions/suggestions:
1. Suggestions on brand of single walled stove pipe?
2. Best place to purchase product?
3. I am seeing conflicting info on whether I need to seal the stove pipe joints. To seal or not to seal? If so, what type of sealant and where to buy?
4. I have a crimper and sheet metal cutter. Can the 22 gauge stove pipe be easily crimped and cut?
5. How do I attach the crimped end of the 8" increaser to the thimble in the wall? I don't see how I can screw it. Can it just be shoved in and expected to be safe, secure, and not leak?
6. Any other questions, comments, or concerns that I am not thinking of?
My wood burning stove expertise consists of 14 posts (make that 15) to this forum and a lot of reading (on this forum), but I am excellent at following instructions and looking forward to installing this myself.
Thanks for all of the help so far and in advance for future help!
Bill
I have purchased the Englander 30NC from Home Depot (at this forum's suggestion) and had it delivered. It sits in my garage currently, and I will soon be moving it into position to replace the old stove (see photo). I have purchased side heat shields and it came with the rear heat shield installed. I will end up having a 8-9" clearance in the back of the stove and my "CTC" table states I can use a single wall stove pipe, which is what I would prefer to use (rather than double walled).
So my next set of questions are related to stove pipe!
I started looking at single walled stove pipe at the box stores (generally 24 gauge), and also on the Internet at various retailers (22 gauge). Wow, there are a lot of different options! Based on my installation, I believe I need the following pieces:
(1x) 6" x 16" (approx) straight piece crimped at stove end that will come out of the stove
(2x) 6" adjustable 90 degree pieces connected to the straight piece
(1x) 6" to 8" increaser (that is crimped on both ends) to connect to the thimble
Questions/suggestions:
1. Suggestions on brand of single walled stove pipe?
2. Best place to purchase product?
3. I am seeing conflicting info on whether I need to seal the stove pipe joints. To seal or not to seal? If so, what type of sealant and where to buy?
4. I have a crimper and sheet metal cutter. Can the 22 gauge stove pipe be easily crimped and cut?
5. How do I attach the crimped end of the 8" increaser to the thimble in the wall? I don't see how I can screw it. Can it just be shoved in and expected to be safe, secure, and not leak?
6. Any other questions, comments, or concerns that I am not thinking of?
My wood burning stove expertise consists of 14 posts (make that 15) to this forum and a lot of reading (on this forum), but I am excellent at following instructions and looking forward to installing this myself.
Thanks for all of the help so far and in advance for future help!
Bill