woodgun owners

  • Active since 1995, Hearth.com is THE place on the internet for free information and advice about wood stoves, pellet stoves and other energy saving equipment.

    We strive to provide opinions, articles, discussions and history related to Hearth Products and in a more general sense, energy issues.

    We promote the EFFICIENT, RESPONSIBLE, CLEAN and SAFE use of all fuels, whether renewable or fossil.
Status
Not open for further replies.

mark123

Member
Jan 27, 2009
174
PEI, Canada
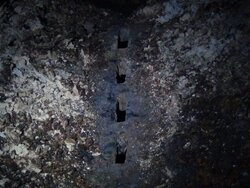
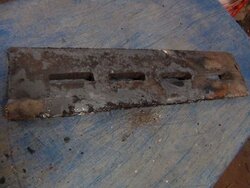
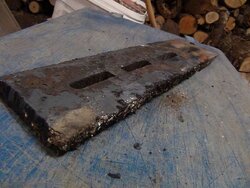
I am just going to pass this along but the other day I thought I would try and make my own center brick out of 1" X 4" steel, I have been using them for approx. 2 weeks with zero signs or erosion and also I noticed my chugging problem has greatly improved. My old brick had been in such bad shape that a golf ball could pass through the slots. It seems the wider the slots become the worse the chugging becomes, I have been burning with the air damper wide open with the new steel center bricks and before it would still chug with the damper all the way closed. It will be interesting to see how these steel center brick hold up over time. I have an oxyacetelyne torch and got the steel at the scrap yard so it cost me around $10.00 and around 15 minutes of work.
 
Thanks for the info Mark. That is some thick steel. Is there one long slot in your fabrication? Or did you make several like the original nozzle? Pic?
 
Gotta have pics!! I will want to know what your long tem performance has been. The center bricks are not cheap(but then, what is from AHS?) and after 3 seasons I think we'll be replacing ours this summer. How many cords of wood do you think the originals lasted?
 
I 4 slots in each, same as the originals, except my slots are straight through , not tapered. I figured theirs are tapered simply for easier removal of the mold. My slots are approx 7/16" - 1/2" wide. I will let the boiler burn out today and get some pictures for you. I burnt around 18 cord since dec 2010 all year round and these probably should have been replaced a couple of months ago but I was trying to stretch the dollar.
 
How do I resize the picture, hearth is telling me size cannot exceed 1305 X 1305, my camera is broken I am took these pictures with my sony hd handycam
 
Here you go, that worked great
 

Attachments

  • DSC00154.jpg
    DSC00154.jpg
    169.5 KB · Views: 474
  • DSC00155.jpg
    DSC00155.jpg
    133.8 KB · Views: 491
  • DSC00156.jpg
    DSC00156.jpg
    146.5 KB · Views: 459
Nice work on cutting those slots with a torch Mark! You say you have been burning through them for a few weeks. It will be interesting to see them after 7 or 8 cord of wood has been burned through them. But, at that price, I would say you did very well. Thanks for sharing. That may save a lot of wood gun owners some money. I appreciate it.
 
I thought about doing this for my next replacement. Glad you did. Did you go with a full inch on the thickness? And do you have 2 center bricks? I have a short and a long centerbrick.
 
I have 2 equal length center bricks and yes I used 1" thick steel, the scrap steel I got was a piece of I beam with 1" thick flanges and I cut these out of it.
 
Thanks mark123! I can't see how they'd not last close to forever. The really hot stuff is down below and I think that the "erosion" is really just that from the coals and such passing through and wearing on it. (the brick) Not too far from the function of a fireplace grate or "andirons" as I see it.
 
Good stuff! I ordered replacements from AHS 2 years ago when they were having a 15% off sale but I'm going to keep this in mind for the future 4 sure!
 
Mark,

I forgot to ask you this. Do you have your plate steel sitting on top of your ceramic nozzle with slots over the same spots? Or did you take the ceramic nozzle out and stradle your side ceramics with the plate steel you fabricated?
 
Or did you take the ceramic nozzle out and stradle your side ceramics with the plate steel you fabricated? I did this
 
Mark,
Was the weight of the steel more than the refactory? Just wondering if the refactory ledge the steel would sit on would be able to take the extra weight.

Terry
 
It is a bit more but I don't how much maybe a pound or two. when I removed my old nozzle brick I noticed some of the ledging had already been broken away from the main refractory, probably from loading wood a bit to roughly and cracking the nozzle brick in turn putting pressure on the ledge below, I think this may help because it will spread the weight over a larger are than a cracked ceramic nozzle would.
 
Status
Not open for further replies.