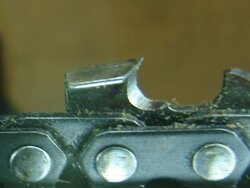
Lee, here's a shot of one of my modded chains. Even though this is a relatively new chain, you can see that I get some of that hump even with a file. That tells me I'm not bearing down and am actually sharpening the top of the cutter plate. I don't grind the rakers at as fine an angle as I've seen some guys do, and I don't get them "razor" sharp, but they do slice into the chip pretty well. You ought to give it a try on an old chain and see how it does. I ordinarily wouldn't recommend anybody using chain like this with a regular bar, but you certainly have the experience to assess its safety for your uses.
You can also see how I have to grind the back of the cutter plate until it is at the back of the rear rivet. That's so the back corner doesn't pound against the wood on plunge cuts. The narrow tip on the carving bars have such a tight radius that the backs of the cutter plates push the chain away from the wood before the chip is completely formed. I stopped using Stihl chain and went to Oregon 91VX because it already has a shortened cutter plate. Either way, lots less sharpenings, but you have to do it to get it to plunge well with those narrow tips.
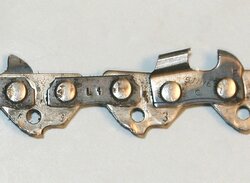
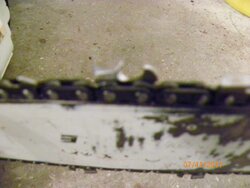
Check out the damage on the drive links. That's from running 3/8 lo-pro on a regular 3/8 rim sprocket. You have to grind it away or it jams in the bar groove. It comes back again, but not as bad. On more powerful saws (this was only on a 346), the tips of the drive links eventually get ripped right off and the chain is then trashed. It happens well before you get to the back of the cutter plate, so having that shorter plate with fewer sharpenings isn't really the problem after all. A carving buddy carves with a 7900 that was woods ported by Ed Heard (the race saw guy) in Canada. He trashes his drive links on a new chain within a month or so, but he makes about $10K worth of bears in that time, so the extra speed gotten by using that monster saw for roughing out pays off, at least for him.
There is a lot of confusion about the use of 3/8 regular rims to drive 3/8 lo-pro (Stihl EP) chain, but Ed Danzer from Dansko explained the problem to me. Even though both 3/8 regular and 3/8 lo-pro have the same pitch, the drive links on the lo-pro chain are significantly smaller. He actually ground off half of an Oregon PowerMate rim and mounted it on a saw with lo-pro wrapped around it. He discovered that only one pin at a time was ever in contact with a drive link with this combo. He makes special balanced rim racing sprockets to address the problem, but they only come in 8-tooth, not the normal 7-tooth. Oregon is now aware of this problem, and Allison at tech support told me they are coming out with a new (slightly larger) cast rim for lo-pro, but she has no idea when that will be. Stihl has always been aware of this problem, and their 3/8 EP 7-tooth rims are about 1/8" larger than their 3/8 regular 7-tooth rims. Problem for the rest of the world is that they don't match the drums machined for the Oregon small spline rims.

 ! = No effect on cutting.