How to relocate a fireplace for under $1000

  • Active since 1995, Hearth.com is THE place on the internet for free information and advice about wood stoves, pellet stoves and other energy saving equipment.

    We strive to provide opinions, articles, discussions and history related to Hearth Products and in a more general sense, energy issues.

    We promote the EFFICIENT, RESPONSIBLE, CLEAN and SAFE use of all fuels, whether renewable or fossil.
Status
Not open for further replies.

mpjmeyer

New Member
Dec 19, 2014
6
St. Louis, MO
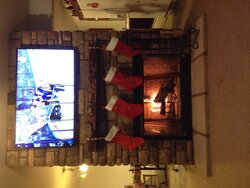
We moved into our house with the fireplace located in the center of the floorplan between the kitchen and livingroom.
image_zpsff862434.jpg


Of course with the Blues game on. That picture was last Christmas in 2013. We liked the idea but realized the location of the fireplace took up a lot of potential real estate. I got a few quotes on the cost to relocate the fireplace, but those numbers weren't even worth mentioning to the wife (thousands of $$). After a month of convincing and a presentation, she finally o.k'd my idea to get out the chisel and start our project!!

Here's the picture right before I started:
image_zps0a86c36f.jpg


It's getting ready to be VERY messy in the living room. I highly suggest clearing as much furniture and getting drop cloth to try and control the dust as much as possible. No matter how clean you are, the house will need a major dust job. The first bricks take the longest, but you will get a steady rhythm as you figure it out. The square hole is where the outlet was for the tv.

image_zps0ab311c0.jpg


Where the fireplace will be:

image_zps3c47b1a2.jpg


Outside the house where the chimney will be built

image_zps781c9698.jpg


Getting a bit farther

image_zps9e5e79f8.jpg


Finally all the stones are off

image_zps0c62afa2.jpg


And placed neatly on the garage floor where I went through each brick, cleaning off excess concrete. I gotta say I seem to be pretty good at tetris.

image_zpsdb1879fd.jpg


Removing the plywood that was under the stone is revealing the flu

image_zps279bbca6.jpg


image_zps12acff0d.jpg


No more framing

image_zpse58e71ea.jpg


image_zps8c3e8f83.jpg


All the piping out and stored in the garage.

image_zps23def585.jpg


After patching the hole in the roof, I started cutting out the drywall where I will be installing the fireplace.
image_zps088cf830.jpg


2x12's running along the joists of the existing framing to support the chimney stack
image_zps59925ea8.jpg


image_zps7bbfc689.jpg


Framed out the wall ready for the fireplace. You may also notice the outlets had to be spread farther apart
image_zpscd6125ea.jpg


Doesn't seem to mad about the new hole in her house lol. I think she's started getting excited with how nicely I was making everything for her.
image_zps7a480991.jpg


Framing up and started adding flu piping back to the firebox.

image_zps5e5d36d8.jpg
image_zps2f11aafd.jpg


Attachments

  • image.jpg
    image.jpg
    207.5 KB · Views: 3,006
The firestop:
image_zps3110c5ca.jpg


image_zps93ca935d.jpg


Added the insulation:
image_zpsad9dfac9.jpg


image_zps7d9923c9.jpg


Framing up:

image_zps7c41b80c.jpg


image_zps67871606.jpg


image_zpse5d18b8c.jpg


image_zps3da5fbf0.jpg


Getting closer. We mounted the mantel higher than it was before since there will no longer be a tv mounted above it. This time it is at eye level which is perfect for pictures or candles.

image_zpsd90988d0.jpg


We have always liked the idea of a raised hearth which is great for additional seating for guests or your cat who lays there every fire:

image_zpsc2d0336e.jpg


Mounted all the wire to support the masonry stone

image_zps5124bb11.jpg


This next step is the ONLY time where I had help. Luckily my uncle owns a roofing/siding company which allowed me to pay cost for siding material. He was very generous as well by not charging me labor.

image_zps405428fb.jpg


image_zps424f42c2.jpg


Here is a final picture:

image_zpsd9854b49.jpg


My new view of the tv. My couch is farther back against the wall where the fireplace used to be located. It's mounted lower which is much easier on the neck and no distraction to the eyes with a fire underneath.

image_zpsc2a1f8c2.jpg


Christmas 2014

image_zpsfe1e8ad5.jpg


The entire project from chipping the bricks off to lighting the first fire took about 3 weeks. Unfortunately my profession has me working 50+ hours/week and also has nothing to do with construction. Before I started, I read up as much as I could on fire code and installation of the flu and more. If you put your mind to something, it can be done. The hardest part of the entire project was probably the masonry work which took my entire Sunday. Hope you enjoyed the pictures.

Expenses: Siding material, lumber, hardware, insulation, chimney chase cover and cement

Reused items: Firebox, flu, stones, hearth stone, mantel
 
Beautiful job! Your job has nothing to do with construction, but it seems like you must have a lot of construction experience to tackle such a difficult job.
Very nicely done!
 
And the Hearth.com "He-Man Fire Maker" award goes to.....

VERY nice job! And I liked how you placed the stockings back onto the mantle just in time for Christmas.

Have you measured (with an Infra Red gun) any noticeable heat loss on the backside? I am guessing no, since you seem to have done a great job.
 
Awesome job! Did you cover the bottom of those bump out joists? Bump outs can be easy places for mice to enter!
 
3 weeks! Doesn't sound like you have kids, but I see 4 stockings. Huge feat nonetheless. It sounded like a mistake till I realized it wasn't a solid masonry chimney. We have a 13" wide floor to ceiling chimney separating LR and family room. We have TV's and inserts on both sides mounted up high.

So you reinstalled the same appliance, did you think about changing while it was out?
 
That was a big job, nicely done.
 
The firestop:
image_zps3110c5ca.jpg


image_zps93ca935d.jpg


Added the insulation:
image_zpsad9dfac9.jpg


image_zps7d9923c9.jpg


Framing up:

image_zps7c41b80c.jpg


image_zps67871606.jpg


image_zpse5d18b8c.jpg


image_zps3da5fbf0.jpg


Getting closer. We mounted the mantel higher than it was before since there will no longer be a tv mounted above it. This time it is at eye level which is perfect for pictures or candles.

image_zpsd90988d0.jpg


We have always liked the idea of a raised hearth which is great for additional seating for guests or your cat who lays there every fire:

image_zpsc2d0336e.jpg


Mounted all the wire to support the masonry stone

image_zps5124bb11.jpg


This next step is the ONLY time where I had help. Luckily my uncle owns a roofing/siding company which allowed me to pay cost for siding material. He was very generous as well by not charging me labor.

image_zps405428fb.jpg


image_zps424f42c2.jpg


Here is a final picture:

image_zpsd9854b49.jpg


My new view of the tv. My couch is farther back against the wall where the fireplace used to be located. It's mounted lower which is much easier on the neck and no distraction to the eyes with a fire underneath.

image_zpsc2a1f8c2.jpg


Christmas 2014

image_zpsfe1e8ad5.jpg


The entire project from chipping the bricks off to lighting the first fire took about 3 weeks. Unfortunately my profession has me working 50+ hours/week and also has nothing to do with construction. Before I started, I read up as much as I could on fire code and installation of the flu and more. If you put your mind to something, it can be done. The hardest part of the entire project was probably the masonry work which took my entire Sunday. Hope you enjoyed the pictures.

Expenses: Siding material, lumber, hardware, insulation, chimney chase cover and cement

Reused items: Firebox, flu, stones, hearth stone, mantel
Great job !!
 
Very impressive move and restoration. Thanks for the visual documentation.
 
I am impressed. I thought mine was a lot of work but nothing compared to this. We finally got the stone dust off our windows yesterday and today. That alone took hours.
Amazing job.
 
The one thing that I would have done differently would be putting a couple layers of cement board under the stove and the hearth. And make sure there is a proper cap on the chase stove to prevent any possible leakage into the chase.
 
Here is your final exam, as a fireplace builder. Did you make a cricket?
 
Yes I did build a cricket on the roof for rain water. I apologize I didn't snap a picture of it but I believe I went about 16" high from the roof up the chimney stack. Probably should have went higher but it seems to work. I haven't noticed any heat loss, but in fact the opposite. I guess it's a good thing I insulated the framing on the outside but fires actually heat the room much better with the fireplace at the new location than before.

Thanksgiving 2014


christmas2_zpsf17347f2.jpg


christmas1_zpsdfb35c27.jpg
 
Last edited:
  • Like
Reactions: fox9988
You made a cricket? Good God, you get 5 gold stars. I see lots of chimneys made by professional masons that need a cricket and don't have it; in fact, I have retrofitted 2 of the fiancee's rental houses with crickets.

Fess up, now, how much construction experience do you have?
 
I build little things like that smokehouse you can see in one of the pictures and a table in my garage for the mini fridge and storage but those are simple 2 hour projects. I have 0% construction experience but I do as much research as I can before I start anything, especially with this project. Never made a dime in construction my whole life.
 
I'll snap a pic of the cricket when I hop on the roof to take the Christmas lights down. I built the flu 2ft. higher than the tallest point of the roof within 10ft.
 
Dude awesome job man. You remind me of my childhood buddy who was just a natural at building and construction even when we were kids. The guy could just say he was gonna build something and Bam! It turned out incredible. Very nice job though, you'd be great in the general contracting or construction field.
 
  • Like
Reactions: mpjmeyer
Status
Not open for further replies.