P61 installed with Pics

  • Active since 1995, Hearth.com is THE place on the internet for free information and advice about wood stoves, pellet stoves and other energy saving equipment.

    We strive to provide opinions, articles, discussions and history related to Hearth Products and in a more general sense, energy issues.

    We promote the EFFICIENT, RESPONSIBLE, CLEAN and SAFE use of all fuels, whether renewable or fossil.
  • Hope everyone has a wonderful and warm Thanksgiving!
  • Super Cedar firestarters 30% discount Use code Hearth2024 Click here
Status
Not open for further replies.

rap69ri

Minister of Fire
Hearth Supporter
Feb 23, 2008
734
Middle of RI
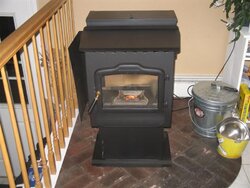
I picked up a used, and pretty rough looking, Harman P61 last week. My brother and I tore it apart, cleaned all the fines, dust bunnies, and thick buildup of carbon on and in the burnpot. We also had to drill out about half of the holes in the burnpot that were clogged with carbon. Over the weekend we sanded it, painted it, and put stove ink on the inside to make it black again. While the stove looked bad when I checked it out, all of the main components worked so I knew it was worth a few dollars.


After the cleanup and painting, it was time to burn off the new paint. All I can say is holy s@#t this stove burns hot.
We installed the stove last night in the spot where my Englander 25-PDVC had been. The PDVC is going into another family members home so I didn't feel too bad about removing the old girl, and I know I'll be the one fixing her if/when anything goes wrong.

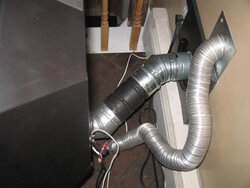
The wire behind the stove is a thermostat wire that I have in series with the Room Temp Probe. Hopefully it works out well.
 

Attachments

  • [Hearth.com] P61 installed with Pics
    Front 1 (Medium).webp
    49.6 KB · Views: 489
  • [Hearth.com] P61 installed with Pics
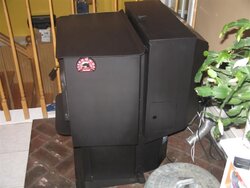
    Side (Medium).webp
    37.8 KB · Views: 430
  • [Hearth.com] P61 installed with Pics
    Rear (Medium).webp
    33.6 KB · Views: 460
Fianlly got the camera working to take pics of the new girl churning away.
 
Cell phone pics? They're blurry so I'm assuming.

Stove looks good from what I can tell but I'm
wondering why you put it so close to the railing.
If you ever need to open that side panel for
something minor you'll wind up having to yank
the entire stove over to do it.


Enjoy!
 
Yes cell phone pics, sorry for the blur.

I'm waiting for different piping to come in so I can center the stove on the Hearth. It just meets the 10" minimum with the side shield as it is.
 
From what I see the stove looks like a new stove, nice work.

Do you have any before pics?
 
Natuarally I though about that after I painted it. Duhhhhh!!! Maybe with my next beater I'll think to take pics first, and thanks for the compliment. It's amazing what 10 hours of medium duty can do.
 
Broke down and used the wife's camera for decent pics, sorry for the earlier blur. Damn phone cameras!!!
 
Nice job Rap....the stove looks like new! Although I didn't have as much work, I also bought a used stove (from dealer), and cleaned it up. The town inspector thought it was brand new.

Yep, the new pics are 200% better. Are you going to shorten the OAK tubing once you get the stove in it's final position? Shortening the tubing (and straightening somewhat) should help it draw better, I would think.

All in all, though, a great job!
 
Nice to see pics of a Harman brought back to life.
Looks like new again.
 
macman said:
Nice job Rap....the stove looks like new! Although I didn't have as much work, I also bought a used stove (from dealer), and cleaned it up. The town inspector thought it was brand new.

Yep, the new pics are 200% better. Are you going to shorten the OAK tubing once you get the stove in it's final position? Shortening the tubing (and straightening somewhat) should help it draw better, I would think.

All in all, though, a great job!

Thanks for the kudos, but it was a fun project. I'm already searching for my next beater to beatify.

The OAK isn't connected yet, I'm waiting for an adapter to be made at a local muffler shop to go from 2 7/8" to 2 1/4". Once it's ready I'll shorten the OAK as much as I can, while still being able to move the stove to work on it if necessary.
 
Nice Job !! I also did the same with a P61 I picked up last year. Liked it so much I sold my Advance and burning the 61.
 
Very nice - great job on the paint!
 
nice, that looks as new as my P61a.
 
Thanks for the thumbs up from all. I can't wait to do it again ;-)
 
Status
Not open for further replies.