Rainwater "Harvesting"...

  • Active since 1995, Hearth.com is THE place on the internet for free information and advice about wood stoves, pellet stoves and other energy saving equipment.

    We strive to provide opinions, articles, discussions and history related to Hearth Products and in a more general sense, energy issues.

    We promote the EFFICIENT, RESPONSIBLE, CLEAN and SAFE use of all fuels, whether renewable or fossil.
Status
Not open for further replies.

keyman512us

Member
Feb 27, 2007
804
North Worc. CTY MA
...Hey all.

Well I always said when the warmer weather arrived I would share a few pics' of the "rainwater system".

Now that the warm weather has arrived...and the "rainy season" has come again it's time to do the warm weather "rituals" once again. I just did some "regular upkeep" on my rainwater system (for irrigation,washing the vehicles etc) and just in time! I went through the motions of cleaning the incoming/holding tank (275gallon 'tote')and rinsed it all down...just in time for the recent heavy rains.

Here's a pic of a "normal" flow rate. Keep in mind the piece of wood is a 2x4...the 'tube' is 4" corrugated HDPE...and in 1" per hour rains...the 'stream' from the 4" tube is a "solid flow"...Thanks to the rain...the system is back up above 1500 gallons. :)
 

Attachments

  • IM002601.JPG
    IM002601.JPG
    59.7 KB · Views: 635
Good collection system there, Key. Using for irrigation, outdoor uses - that should work out very well. I'm sure you thought of if, but with those semi-transparent totes, it would probably be best to keep them in a pretty shady location to limit the amount of algae that may try to grow in there. The spores do get airborne, and likely get washed in as part of the collection system, but if kept shady and cool, they may not grow.

And if you need some more totes to add onto the system - just let me know - got plenty of them here.
 
Harley...Thanks!
...I've gotta get some more things "taken care of around the homestead first" (i.e. make more room)lol. Long range...I definately want to add to the system...I'll let ya know (soon) :)

Thanks also for pointing out the algae problem..(learned that one the hard way). The tank is located under the porch...and also when things "go right" the water doesn't stay in the tank long. I use another tote that has been modified for "filtering use", either to filter rainwater from the roof or from the "drainage drywell"....It works pretty good at separating things from the water. The "filter bag" in the picture is a long strand poly/fiber...filled with pea stone. This is what it separated from the tank after it was washed out:
 

Attachments

  • IM002595.JPG
    IM002595.JPG
    42.6 KB · Views: 634
At the risk of asking stupid questions, I'm going to ask some.

1) Is all of the water coming from your roof?

2) What are you using for your storage tank? How much did it cost?

3) More pics?

:)

We're going to be breaking ground on a new house either this fall or next spring. This is interesting stuff to me.
 
This is a great idea that frankly has never occurred to me before. Now you guys have started the wheels turning in my head...since I have a seriously deep well and have to run an electric pump to get water out of the ground and onto my lawn it makes all the sense in the world to me to just setup a couple 275 gallon storage tanks and use gravity to feed the water instead of electricity. I've got a pretty big stretch of roof that I could use to collect water off...a few good storms and I'm there.

You guys want to feed the noobs here more info on what parts you've used, how you setup the system and maintenance tasks?
 
I have an array of 6-55 gal barrels for watering the garden, the giant pumpkins get thirsty. I tied the barrels together using pvc adaptors, cut a 1" hole in each barrel around 6" up from the bottom. I ran the gutter from the house into the first barrel, also blocked the other down spot so that all water off that side of the house drains into the first barrel which in turn is hooked to the other barrels. Then I stubbed out another pvc adaptor a bit higher on the first barrel, ran some flex tubing from that to a $30 clear water electric pump from Northern Hydraulic. I adapted the outflow from the pump to a garden hose. The barrels are white plasctic covered with plywood and do algae up some, but the garden likes that. It's a good off season use of my winter corn storage barrels, and an easy way to broadcast fertilizer and such by isolating the first barrel and adding and using the mix from there. All told, I probably spent $50, it's amazing how quickly the system fills with little rain, and how seldom I use residential water for the garden now.
 
There are folks that use large 1500 gallon tanks, basicly a big septic tank for this. Research cisterns. A large tank costs about 1$ per gallon of storage. Besides using clean rainwater for irrigation there are folks using grey water from their waste stream. The more ideal rainwater collection systems that I've seen installed are jsut a tank in line between the roof downspout and the city storm main. The tank fills up and then overflows to the storm main. The tank is kept full this way and a plain old sump pump is used to distribute the water.

I have a sump pump at home that will draw down the tank to 1/8" from the floor and discharges through a garden hose. Available at the HD for 70$ or so.
 
Problem for us is that when we need water, in summer, we have no rain, sometimes for a couple months at a stretch. This year may be a bad one. We've had just .36" in June, 1.2" in May and only .7" in April. For us a grey water capture system makes more sense. But it would have lots of maintenance issues of its own and there would be a significant cost for installing a 1500 gallon tank in the ground.
 
My house is set up to direct rain water into a tank except it doesn't have the tank right now... I'm currently shooting it down a hill. I originally had my gutters directly hooked into 4" PVC smooth drain pipe. Going directly into the drain pipe was a big mistake, gutters collect crap and it went directly into my drain system and gunked up the works. Worse, I had to disassemble the drains on my house to get access to the clogged pipes. I found the answer by adding catch basins, where the water from my gutters would go into them first and from there go down the pipes into the system. My catch basins have a grate that filters the major crap, and the sand & dirt particles left go into the catch basin and settle on the bottom when it rains, and clean water goes out the drain pipe. I remove the crap the grate collects now and then and once a year remove the dirt/sand collected on the bottom. Drill two small holes in the bottom of the catch basin so water doesn't sit in it, mosquito's would love that. I've seen some with barrels under each downspout, in that configuration make sure the overflow outlet of each barrel has a tube or something to carry the overflow water some distance away from your house before dispersing.

Don't take this personally keyman I'm not a fan of the corrugated black pipe in particular if it's going to be buried or permanent. If not, it's fine. The corrugations collect debris and make it difficult to clean if clogged, but it does let you maneuver and bend it. Smooth PVC pipe is difficult to clog as stuff just slides right through it, if it does clog take a hose to it, it's so smooth you'll blast it out of there. You won't need as many catch basins as I show in my setup, I have a house on a hill with a driveway below street level. The catch basin in the center is where I tie the trench drains of my driveway into the system that collects my gutters. I used http://www.acehardware.com/product/...kw=nds&parentPage=search&searchId=17304582913 catch basin kits, but honestly you could just make them out of a small bucket with larger sized holes drilled in the lid, 2 small holes drilled in the base, and cut a hole for PVC pipe and caulk it permanent afterward. My system is rather elaborate, I opted for it after I had extensive damage done when one of those 100 year rain storms hit and my house being below street level and the bump of my driveway not high most of the water from the street went down my driveway, combined with what was coming off my roof also goes into my driveway, combined with what my driveway collected combined part of my driveway and walkway washed away and I probably lost 25-50 yards of dirt in my back yard. I'm now ready for another 100 year rain storm!

I spent about $175 for 5 catch basins, $50 on PVC Pipe, and $375 for a 20' driveway trench drain and, really just need to find a tank and get a pump but, honestly we must be getting the rain the west isn't because it's been extremely wet around here the past couple years. I only had to water my plants about half a dozen times a year for the past few years, this year doesn't look any different.
 

Attachments

  • catchbasin.gif
    catchbasin.gif
    4.7 KB · Views: 535
northwinds said:
At the risk of asking stupid questions, I'm going to ask some.

1) Is all of the water coming from your roof?

2) What are you using for your storage tank? How much did it cost?

3) More pics?

:)

We're going to be breaking ground on a new house either this fall or next spring. This is interesting stuff to me.

Northwinds,
...First off let me reply with my favorite saying of all time "The only stupid question...is the one you don't ask".

I don't find your questions "stupid" at all.

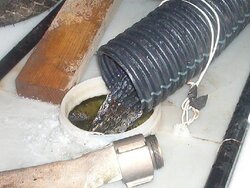
The water you see entering the storage tank...comes from...get this...my neighbors' roof! (long story). The surface area of the roof is aproximately 1000 sq/ft. (flat roof, one drain) a "three decker". The drain exits the SIDE of his building. Previously, (in the 'old' days this drain, was tied into the city sanitary sewer). It was "punched" through the foundation to exit and dump on the ground. And over the years, it worked it's way through the foundation...and would flood his basement...as well as mine. Being a good neighbor...I installed a 4" HDPE drain line from his drain...to my dry well. I had enough sense when installing it to "put in a loop". The drywell is 11 feet deep, "cone shaped" to a point at the bottom and roughly has a ten foot radius, two feet below grade. It is filled with various stone material...including 9 tons of 3/4 stone. It can hold 300 gallons for seepage. It also has a "sump shaft" made from a piece of 12" diameter, SDR-17 (green plastic sewer pipe). When initially installed it could disperse the 300 gallons within 15 minutes...today, 10 years later, it retains this water for anywhere from 3-5 days. The water contained in the drywell is often used to water the lawn without filtering.
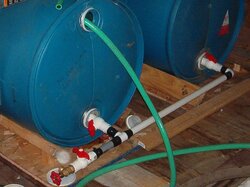
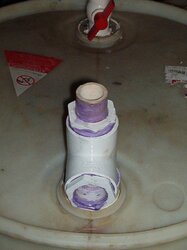
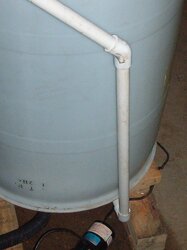
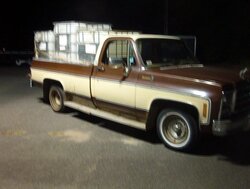
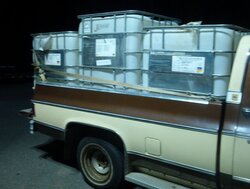
The tank you see being filled in the picture is a 275 gallon "tote" often used in industry. They can be found for "short money", anywhere from free to up-wards of $75.00, they have a 2" bottom discharge, as well as a 6" fill neck (seen in the picture).
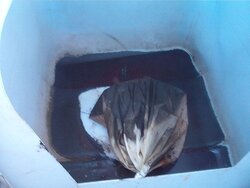
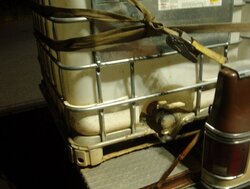
The second picture is the HDPE "insert" of a tote...oddly cut (found in the neighborhood). I use this as a filter basin/backup storage vessel. Between these two totes...and various 55 gallon drums (from a local car wash) which I have installed in various locations around the home (in,under around the back porch...and a few in the attic) ;) I have roughly built my system up to almost 2000 gallons! Out of pocket $ wise...I probably have $200.00 invested (for pipe, fittings, valves etc) and numerous hours I won't even begin to try to tally. I started simple and worked my way up. It's a hobby...that saves me money, conserves energy...and natural resources. I look at it as "practice" for someday "when I move to the woods up north".
I'll try to gather some pictures...I'm working on so many different aspects of the system so it's hard to pick the best ones...lol ;)

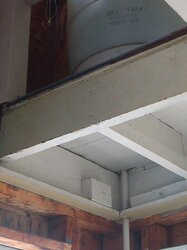
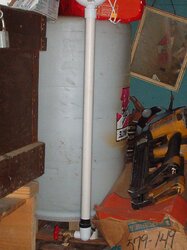
This is one of the barrels: "Pumped storage", elevated 12ft above discharge spigot, "semi-permanently installed, inverted,natural vent". This is an 'oversized' 55 gallon...for the 'Mrs.' to water hanging pots and the small flower garden. It is "hard piped" and is used for a wand type sprayer. There are no "modifications done to the barrel". Interesting to note...keep in mind 55+ gallons of water get's pumped into this barrel...through the bottom!
 

Attachments

  • IM002766.JPG
    IM002766.JPG
    67.5 KB · Views: 468
  • IM002767.JPG
    IM002767.JPG
    73.7 KB · Views: 475
Rhonemas said:
Don't take this personally keyman I'm not a fan of the corrugated black pipe in particular if it's going to be buried or permanent. If not, it's fine. The corrugations collect debris and make it difficult to clean if clogged, but it does let you maneuver and bend it. Smooth PVC pipe is difficult to clog as stuff just slides right through it, if it does clog take a hose to it, it's so smooth you'll blast it out of there. .

...Naaghh, Nothing personal. Good observation...and worthy of mentioning. For "ordinary drains" it does have some limitations. The corrugated in the picture is a "dedicated" drain pipe. It handles ONE roof drain of aprox. 1000 sq/ft. Very little 'debris' enters into it.

The 4" corrugated HDPE has 1000+ uses and is nice...because it's cheap! ($38.50 for 100ft 'coil') ;)

Long range (when I have extra $$$) I plan to install a 2" HDPE "Poly pipe" (sprinkler tubing) inside the 4" as a 'liner'...and downgrade the 4" to a "seepage line". When I first installed the 4" it was solid...over three years it now "leaks" (wasting rainwater)lol. Light rains it has little to no flow...but heavy rains??? It still dumps a good solid stream.
 
Some more pictures and descriptions of "test designs":

Vertical (30 gallon) test design for pumped storage (via conventional sump pump)...proof of concept still sitting in the corner on the work bench.

Second picture is Proof of concept...Tandem, Horizontal 110 gallon storage,natural vent with provisions for overflow drain lines to connect...portable, incorporates "weight distribution bearing plates" for attic installs. "First generation design" :) Note the black tape...joints are not glued for ease of dismantling. They are however "watertight", even with a shallow well pump forcing water into them.

Both basically thrown together "On rainy Sundays" :)
 

Attachments

  • IM002772.JPG
    IM002772.JPG
    83.6 KB · Views: 470
  • IM002784.JPG
    IM002784.JPG
    85.7 KB · Views: 478
The first picture is a "two pipes through a single barrel opening". Came up with this idea for a "circulating line" setup. When inverted, the outlet on the side draws from the bottom, the other from the middle of the barrel. A matching "black barrel" would be installed outdoors, in direct sunlight. A circulating pump would be installed between...whala, a small solar hot water heater...made out of rainwater barrels.

The second is a picture of a vertical, "radiant barrel" filled, one gallon in by gravity...one gallon out by gravity.
 

Attachments

  • IM002782.JPG
    IM002782.JPG
    70.1 KB · Views: 471
  • IM002781.JPG
    IM002781.JPG
    65.1 KB · Views: 455
"Barrel Conversion Items"

Second picture shows shows a "draw-off" for horizontal use. Allows for barrel to be emptied to less than two gallons.

Just a few "designs" I came up with so the average person can "put something together" with a minimal amount of tools or knowledge. Highly doubt anyone would buy any of these items...but the 'net' is quite a big place...lol :)

Just a rather 'inexpensive hobby'.
 

Attachments

  • IM002777.JPG
    IM002777.JPG
    83.6 KB · Views: 471
  • IM002775.JPG
    IM002775.JPG
    79.3 KB · Views: 461
Harley said:
Good collection system there, Key. Using for irrigation, outdoor uses - that should work out very well. I'm sure you thought of if, but with those semi-transparent totes, it would probably be best to keep them in a pretty shady location to limit the amount of algae that may try to grow in there. The spores do get airborne, and likely get washed in as part of the collection system, but if kept shady and cool, they may not grow.

And if you need some more totes to add onto the system - just let me know - got plenty of them here.

Once again Harley...Just wanted say Thank You.

With the three totes you got for me now my rainwater system capacity (soon) will be around 2,500 gallon capacity...Definately wanted to go past the 2,000 gallon mark.

I got back to G-Vegas about twenty minutes ago and decided to download the digi-camera. I took the highway vs. the 'back roads'... truck rode fine and the straps didn't loosen one bit...

Next time I venture down your way I'll be bringing beverage... ;)

Quite the operation you work for and thanks for the tour. Wish I had called earlier in the day.

Definately a nice way to end (a rather eventfull) weekend.

Good to get out for a ride every once in awhile...
 

Attachments

  • IM003773wr.jpg
    IM003773wr.jpg
    47 KB · Views: 387
In case anyone is wondering "just what is a 'tote'..." here is a couple pictures of just how big they are. The "two end ones" are something like 1046liters (275 gallons +/-) and the middle one is something like 1245 liters (roughly 330 gallons +/- fully filled).

Some serious water storage none the less... :
 

Attachments

  • IM003771wr.jpg
    IM003771wr.jpg
    43.4 KB · Views: 380
  • IM003772wr.jpg
    IM003772wr.jpg
    44.7 KB · Views: 381
Like 'the future firewood hauler'??? First thing carried rainwater tanks... firewood in the future.

79' Chevy C10 350CID...needs some gaskets but rides pretty nice for a 79'...

Whoever owned it before had my kind of sense of humor... The hood ornament makes the truck complete...lol
 

Attachments

  • IM003764wr.jpg
    IM003764wr.jpg
    34 KB · Views: 256
Status
Not open for further replies.