St. Croix SCF 050 Pot Overflowing

  • Active since 1995, Hearth.com is THE place on the internet for free information and advice about wood stoves, pellet stoves and other energy saving equipment.

    We strive to provide opinions, articles, discussions and history related to Hearth Products and in a more general sense, energy issues.

    We promote the EFFICIENT, RESPONSIBLE, CLEAN and SAFE use of all fuels, whether renewable or fossil.
Status
Not open for further replies.

nthurber79

New Member
Dec 3, 2014
36
Central Wisconsin
Hello everyone, I have been following this forum for a long time and this is my first post. I am posting this as I am at the point of defeat with my St. Croix SCF 050 pellet furnace. Wife and I purchased rural home early spring '14 and inherited a 2005 model SCF 050 with fuel Oil furnace. Since last spring I have had so many issues and have made it my personal project to successfully get this thing running optimally but I am about to throw in the towel. I had a pellet stove professional inspect the unit about 2 months ago and spent 500 for a very through cleaning as I was constantly having issues with the burn pot overflowing. During this time he mentioned my exhaust run was to long (it had a 3 feet vertical rise and about 12 feet horizontal run out the side) so I paid a HVAC contractor to move the furnace closer to the wall and shorten the run (now 1 foot out to a clean out tee then three feet vertical rise then three feet horizontal out the side of the home) I was feeling I may have finally solved the problem as the exhaust was much stronger outside after these changes but woke up this morning to a major mess pot was overfull and fire burning in the ash pan unspent pellets all over the side of the burn pot, just a complete mess.. I have spent countless hours cleaning this thing reading on tips spending so much money on trying to get this to work that I just feel so defeated.. I am new to the pellet world but have spoken and know many users of other pellet stoves and they do not have this issue.. I stocked up on Hardwood pellets this year (4 tons and 1 ton of super premium pine pellets) and it seems like even if running the pine pellets I have the problem though not as much, I have been mixing half and half to try and see if that helps.. but no luck. I do not have a OAK installed and talking with the expert who cleaned it doesn't sound like he thinks would be the issue, I know its a airflow problem and have the damper in the back set wide open. My wife and I are expecting are first child here any day and I just so badly want to have this working before she is here as I know I will be occupied with that.

Also just as tidbit - the fire burns excellent for about 4-6 hours before the burn pot overflows.

Sorry for the rant and lengthy post I am just looking for direction / advice with the experts here on this forum..

Thanks in advance....
 
Last edited:
First thing that comes to mind is that the 050 is designed as a corn furnace, but will burn pellets pretty well with a different burnpot ........... if you still have the original pot, might want to think about changing it.
Do you have a manual? Available on the St. Croix/ Even Temp website, trust me, you DO want one ..........................
Thanks for reading my post.. I do have the Retro-Fit burn pot and have the manual as well and I think it may be ingrained in my head as well :) I have read and re-read that thing so many times.. I had read about it being a corn furnace but don't want to get into burning corn as the technician really advised against it for corrosion reasons and mess.
thank you
 
Thanks for reading my post.. I do have the Retro-Fit burn pot and have the manual as well and I think it may be ingrained in my head as well :) I have read and re-read that thing so many times.. I had read about it being a corn furnace but don't want to get into burning corn as the technician really advised against it for corrosion reasons and mess.
thank you

Well, then .......................... 7 years after installing my Revolution, I still keep the book right beside it.......
What are you running for exhaust? 3" or 4"?
Have you tried closing the damper some? Sounds wrong, but too much air can be as bad as not enough ..........
I know you said cleaned by a pro, but ............. did he pull the covers over the traps behind/below the burnpot? Beat on the back wall? (I use a piece of hardwood, not metal) ....
What heat level are you running ? Can you drop it down, or kick it up?
Can you trim feed rate or blower speed on the 050, or is that just the Revolution?
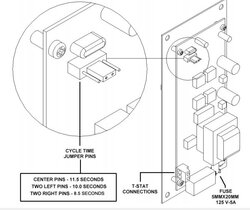
I have 4" exhaust and to be honest I haven't closed the damper it is wide open... I was just doing some reading on here about that and was thinking about giving that a try (closing it some) I just never tried it due to the fact I thought I was lacking air flow but you are right could be to much air. He did get every knick and cranny at least that I know of... I use a small rubber mallet to tap along the back to knock some ash and clean it out of the two ash traps on the side then go up with a dryer vent brush. I have messed with the draft trim SCF 050 does have that as well and been running it with +5v as seems to help a little.. I have changed the jumper as well on the control board to the longest setting 11.5 seconds for auger on time thinking might help. With the settings it seems to be a issue with anything 3 and up.. 1 and 2 run good no pile up but as soon as push it past that things get rocky after a few hours..

I appreciate your help and input
 
Ash pan ? Another of the ash trap doors behind that on the Revolution ............
 
There are actually 3 Doors on this furnace. One for the firepot, one for ash pan and the one in the middle is secured with 2 screws. I would check the gaskets carefully on all 3 of these.
Next on the list is the middle door allows you to pull the bottom of the firepot out. Take out this door and the bottom of the firepot and you will see some small retangular holes that allow combustion air to come in, check and see if they are clear.
Check the upper fire rake and make sure that it is sliding out completely out of the firebox.
Another area to take a close look at is above the baffle plate are some heat exchanger tubes. a light and a mirror will let you look at them, Not much room around them so they can easily be clogged up.
This has a combustion blower with 3 wires the Black and White are the correct ones to use.
There is a trim adjustment for the Combustion Blower and this can be adjusted for more air flow, Sorry I can't remember how to do this at the moment I believe it is in the manual.
Finally there is an adjustment on the circuit board that needs to be set on the middle 2 pins. see attachment.
As far as the firepot it seems to burn corn better than pellets however either one seems to work fine after the stove is cleaned and adjusted.
When I got my St Croix the heat tubes and heat exchanger was so plugged with carbon that I ended up cleaning the firepot with a pressure washer I did this as a last resort, The Previous Owner put some wet corn in it and sure made a mess of things.
 

Attachments

  • apins.jpg
    apins.jpg
    44.2 KB · Views: 280
Great, somebody that has one ............. nthurber79, I'm sure Arti can be a lot more help than me .............. be patient, the learning curve lasts for a long time .................
 
Great, somebody that has one ............. nthurber79, I'm sure Arti can be a lot more help than me .............. be patient, the learning curve lasts for a long time .................
Thank you for everyone's help I just did a thorough cleaning and set the jumper to the middle 11.5 and also closed the air damper to 4 o'clock postion so far on level 3 going through each heat level to see how it goes. From what I can tell seems like the flame is shorter but burning better and the pot is staying low. Real test is if it can stay that way overnight. I left draft trim at default this time as well.

Thanks for the advice will keep you posted.
 
The damper doesn't need to be open by very much. I'm thinking a 5 o'clock position (or as others have said, place a #2 pencil in there and close the damper to that point and run it) would be more like it. But then I have a different model St. Croix than you do.
 
The damper doesn't need to be open by very much. I'm thinking a 5 o'clock position (or as others have said, place a #2 pencil in there and close the damper to that point and run it) would be more like it. But then I have a different model St. Croix than you do.
As a update I woke several times in the middle of the night and needed to poke the pot and stir it up as I could tell it was starting to overfill again with all the adjustments made (air damper, pin set to middle, etc.) and when I left for work this morning I decided to shut it down as I knew I would come home to a mess. As I was pulling away I noticed my clothes dryer vent was missing on the house and got out to find it in the snow and had figured I should go take a look at the termination cap for the pellet stove since I was out and there was sunlight, it was completely plugged. Monday I had just had the stove moved physically in the basement to drastically reduce the exhaust length as the pervious owner had a horizontal run over 14 feet it had crossed my mind to check the term cap but I was really sure that it would be fine as everything was just cleaned out and I had quite a bit more flow (felling with hand) then I did before with the long run so assumed everything was good. I plan on cleaning it out tonight and giving it another go I am hoping that is the cause of the issue of overflowing. In regards to the air damper please advise what you think I should do if I should set it wide open like it has been in the past or start off with more of a 5 o'clock position and go from there? Appreciate everyone's help this has been a challenge but hoping it pays off in the end.

thanks
 
I suspect that the stove was full of ash and when it was moved and cleaned it blew it out the exhaust.
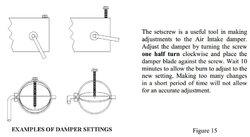
There is a fairly detailed explanation on how to setup the draft damper it would be advisable to do that at this time.

Procedure for adjusting the damper when burning Pellets:
When burning pellets in the Furnace, the adjustment to the damper will most likely need to be made
when the Furnace is running in the pilot mode.
a. If a heavy black shiny build (difficult to wipe off) up is noticed, on the glass and inner
surfaces, after the furnace runs on the low (pilot) setting for extended periods of time, the
damper must be closed some. This may require the Furnace to run in pilot mode for a while
to become noticeable. If this build up is noticed, close the damper 50% to start out with, and
place the setscrew against the damper blade. Use this as the starting point to make additional
adjustments with the setscrew. Some build up is normal and may be removed during the
maintenance schedule.
b. Once the adjustment has been made for the pilot setting slowly advance the Furnace to the #5
Heat Level and observe the flame. If black soot (wipes off easily) builds up on the glass and
black smoke is visible at the tips of the flames turn the setscrew one ½ turn counterclockwise
and bring the damper blade up against the screw. Wait 5 – 10 minutes before attempting
another adjustment. An occasional wisp of black smoke is normal every now and then.
 

Attachments

  • aDamper.jpg
    aDamper.jpg
    50.7 KB · Views: 254
As a update I woke several times in the middle of the night and needed to poke the pot and stir it up as I could tell it was starting to overfill again with all the adjustments made (air damper, pin set to middle, etc.) and when I left for work this morning I decided to shut it down as I knew I would come home to a mess. As I was pulling away I noticed my clothes dryer vent was missing on the house and got out to find it in the snow and had figured I should go take a look at the termination cap for the pellet stove since I was out and there was sunlight, it was completely plugged. Monday I had just had the stove moved physically in the basement to drastically reduce the exhaust length as the pervious owner had a horizontal run over 14 feet it had crossed my mind to check the term cap but I was really sure that it would be fine as everything was just cleaned out and I had quite a bit more flow (felling with hand) then I did before with the long run so assumed everything was good. I plan on cleaning it out tonight and giving it another go I am hoping that is the cause of the issue of overflowing. In regards to the air damper please advise what you think I should do if I should set it wide open like it has been in the past or start off with more of a 5 o'clock position and go from there? Appreciate everyone's help this has been a challenge but hoping it pays off in the end.

thanks
Was it plugged with snow, or with ash???? If it was snow, might want to bring the termination up a ways, or build a roof for it ...........
 
Was it plugged with snow, or with ash???? If it was snow, might want to bring the termination up a ways, or build a roof for it ...........
It was plugged with ash, i never checked on it due to just having it cleaned and always being dark out by time i get home.. i couldn't tell you honestly how long it has been plugged but my thoughts are it is related to the changes made this week.
 
It was plugged with ash, i never checked on it due to just having it cleaned and always being dark out by time i get home.. i couldn't tell you honestly how long it has been plugged but my thoughts are it is related to the changes made this week.
Probably right, I'd start with a pencil width open to start, and go by the manual to adjust it, only a little bit at a time, be patient ........... looks like it should be under control now, good luck, keep us posted ......
 
  • Like
Reactions: bogieb
Probably right, I'd start with a pencil width open to start, and go by the manual to adjust it, only a little bit at a time, be patient ........... looks like it should be under control now, good luck, keep us posted ......
That sounds like good advice as it seems a lot of st. croix users have their air dampers set at a pencils width with success. I have just had so many obstacles that i am hoping i am getting somewhere after all of this :) your help has been greatly appreciated. I am curios from another st croix furnace owner is how do you get the two ash traps (side of burnpot) cleaned? I use a dryer vent brush which seems like it extends up the entire area but i do not have a way to necessarily vacuum up there as i do not have any type of small flexible hose to reach, is that even necessary?

thanks
 
My Rigid shop vac has a 30 degree or so attatchment for the end of the hose that is just the right size to go in there 3-4 inches .................. stick it in one side, beat on the back wall with my whuppin' stick, put that cover back on, take off the other one and stick it in there, beat it some more ............ put the cover back on, do the same with the one behind the ash pan ................................ I've used a bottle brush before, not sure if it helps or not, but a PITA ............................ I'll take a pic of the hose thingy this weekend when I clean it if ya want ......................
 
My Rigid shop vac has a 30 degree or so attatchment for the end of the hose that is just the right size to go in there 3-4 inches .................. stick it in one side, beat on the back wall with my whuppin' stick, put that cover back on, take off the other one and stick it in there, beat it some more ............ put the cover back on, do the same with the one behind the ash pan ................................ I've used a bottle brush before, not sure if it helps or not, but a PITA ............................ I'll take a pic of the hose thingy this weekend when I clean it if ya want ......................
that would be great... i need to find a attachment like that for my shop vac.. i use the dryer vent thing which is pretty much like the bottle brush and your right its a pain... and i dont know if it really got clean or not. thanks again.
 
I use a mirror and flashlight to look up above the ash traps, and on my stove, I can remove the baffle plate and look down at the same area from above. A few taps brings down any stuck ash on mine, and very little of that is in there.
 
I use a mirror and flashlight to look up above the ash traps, and on my stove, I can remove the baffle plate and look down at the same area from above. A few taps brings down any stuck ash on mine, and very little of that is in there.
Just as a update - I cleaned the exhaust last night and removed the buildup that was clogging the term cap.. I set the air damper to the #2 pencil width as recommended and fired it up.. The glass got dark (on the sides) pretty quick but the fire was strong and balanced. I ran it on level 3 for several hours and it looked very good no overflowing and very balanced, around 11:00pm i turned it up to level 4 and came back to check at 2:00am. I was pretty happy with what i saw the pot wasn't overflowing as I am used to but was getting a little full / lazy but much better, i stirred it up with a long pry rod i use and then decided to move it up to level 5 just to see what would happen. I checked again at 6:00 this morning and there was a little bit of overflow but still much better so i think I am on the right path with your guys advice... Looking at the manual it looks like i want to make a adjustment of a 1/2 turn counterclockwise and move the damper blade up, so going to make that adjustment tonight and see how it runs on the higher heat settings. Question i have as looking at the manual is do i want to ultimately open it to allow more air or close it to let in less air? it states to move the set screw counterclockwise to close the damper, but states i will need to use the damper handle to bring the damper to the set screw, so in my mind it seems like i would be opening up the damper hence allowing more air in.. am i wrong in my logic? Appericate the help
 
Last edited:
Glad you are on the right track with the end cap cleanout! If it is getting lazy on #4, then you may want to open just a tinge (not even 1/2 a turn). But if you run it mostly on 1-3, then maybe you don't want to touch it at all.

My manual states:

Once the damper is fine tuned for settings 1, 2, 3 and 4 the stove will run fine without having to make a change to the damper setting unless the stove is run on 5 or 6 for extended periods of time.

So, I wouldn't change it unless you use the #5 setting a lot (I don't even get close to the top setting in my small house).

Since I don't have a screw in mine (it was a used stove and apparently they took it out and lost it), and I can't tell where the screw actually hits the damper plate, I have always looked at the damper adjustment directions and just said "Huh", because they don't make sense to me. However, the gist is that whatever way you turn the screw, make sure the damper followed; if you open it up with the screw, pull up on the damper handle - if you turn the screw to close the damper some, push down on the handle.
bogieb - thank you for your reply... My stove has settings 1-5 and i typically run it on 3 or 4 myself. I do not have a large home only 1200 sq. feet but i do have very tall ceilings 14ft in all but bedrooms which are 10ft so i know i lose a lot of heat up there, i do run ceiling fans on reverse to try and bring that air back down. I would really like to get this unit to be able to run level 4 optimally if possible.. so i will very slightly open the damper a tick and see how it goes.. In the past i have always had the damper wide open as that is how I inherited it and the service pro that came out didnt make any changes so i assumed was correct and never really dinked with it. I am running "super premium pine" pellets right now and i am hoping that once i get it tuned that it will still burn the premium hard wood pellets well also as i have 3 tons of hardwood and 1 ton of the pine pellets on hand.. might try mixing them one bag of pine and one bag of hardwood to spread them out to.. not sure yet..
 
I suspect that the stove was full of ash and when it was moved and cleaned it blew it out the exhaust.
There is a fairly detailed explanation on how to setup the draft damper it would be advisable to do that at this time.

Procedure for adjusting the damper when burning Pellets:
When burning pellets in the Furnace, the adjustment to the damper will most likely need to be made
when the Furnace is running in the pilot mode.
a. If a heavy black shiny build (difficult to wipe off) up is noticed, on the glass and inner
surfaces, after the furnace runs on the low (pilot) setting for extended periods of time, the
damper must be closed some. This may require the Furnace to run in pilot mode for a while
to become noticeable. If this build up is noticed, close the damper 50% to start out with, and
place the setscrew against the damper blade. Use this as the starting point to make additional
adjustments with the setscrew. Some build up is normal and may be removed during the
maintenance schedule.
b. Once the adjustment has been made for the pilot setting slowly advance the Furnace to the #5
Heat Level and observe the flame. If black soot (wipes off easily) builds up on the glass and
black smoke is visible at the tips of the flames turn the setscrew one ½ turn counterclockwise
and bring the damper blade up against the screw. Wait 5 – 10 minutes before attempting
another adjustment. An occasional wisp of black smoke is normal every now and then.
As a SCF 050 owner i am curios as to your cleaning schedule... I am hoping after everything is working correctly on my unit to be able to have less hands on time with mine. I have been having to clean / scrape mine every 2-3 days at about a hour to hour and half each time... It just been such a mess and the ashpot was full at that time (thinking this will be better now) so just curios as another owner how often you shut it down to clean it thoroughly.

thank you for your help
 
. . . . In the past i have always had the damper wide open as that is how I inherited it and the service pro that came out didnt make any changes so i assumed was correct and never really dinked with it. I am running "super premium pine" pellets right now and i am hoping that once i get it tuned that it will still burn the premium hard wood pellets well also as i have 3 tons of hardwood and 1 ton of the pine pellets on hand.. might try mixing them one bag of pine and one bag of hardwood to spread them out to.. not sure yet..

The manual states if you have a long horizontal run, then you will need more to open the damper. If I remember correctly, your horizontal run used to be quite long but you got it shortened up. If that is the case, you probably won't need as much air as it used to take.
 
Status
Not open for further replies.