
Hello,
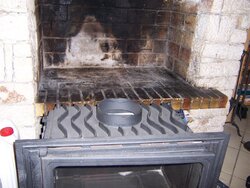
I have a new insert (see attached photos) that I am going to be installing into an open hearth. I'm just getting ready to install everything now, and have a few questions.
(This is a bit tricky for me, because I live in France and I don't speak French.. and there are no chimney/stove specialty stores here where I can get help since I'm actually in a tiny little village about 300 people. I have to order everything from catalogues.)
OK.. here goes:
1) The current chimney is 8x8 clay tile and goes up about 3 floors out to the roof. (I'm in the bottom floor of an apartment building.) Do I really need to install a flue liner all the way up to the top? Or can I just insert maybe 2 meters (about 6 feet) of liner up from the hearth and that is enough?
I'm trying to keep cost as low as possible (every 3 feet section of liner pipe costs about $60) and I also don't have roof access.
I understand that draft will be better if the liner runs all the way to the top, but I guess I'm trying to find the "minimum" that is necessary...
Temperature here is moderate. It only gets down to about 50 degrees at night. Maybe 45 on a really cold night.
2) The chimney flu goes straight up to the roof. There is no damper or smoke shelf or anything. I can look up the chimney stack from the hearth and see the sky. When I insert the pipe liner, is there any trick to "attach" it so it stays in the flue? Otherwise, it'll just come down when I let go after shoving the pipe up.
is it ok if the weight of all the pipe liner is "resting" on the insert, because otherwise I can't see any other way...
3) At the bottom of the pipe, between the insert and the pipe.. I don't understand how to make the connection between the insert and the pipe liner in the flue. Is it possible for someone to post pictures of the different "fittings" I need to use?
- The fitting to connect the smoke output from the insert (see attached photos) to a short flexible conduit piece (about 2 feet long). (I am using the flex conduit because I want to put the insert "as far to the front " of the hearth area as possible, and the smoke stack is all the way to the back...)
- The fitting to connect the flexible short conduit piece to the pipe liner in the flue.
The building supply store has about 10 different types of couplings available to purchase (all from catalogue) and nobody really seems to understand the differences between them. Some have "serated" edges, which I think are for attaching to flexible conduit? I don't know... I'm hoping that if I can see a picture of the pieces I need, maybe I can match it with what is in the catalogue.
Thanks!

 It isn't able to withstand the heat! At best it will melt out of the joint while emitting noxious fumes, at worst it can catch fire! Again, look at what your manual, or the manual for your particular brand of flue pipe calls for, but most typically you need to use refractory cement on the joints if there are any significant gaps. However I'd expect the factory clamps to do an adequate job of sealing between the pipe sections. You may need to put some stainless sheet metal screws into the joints between the liner and the pipe and on any joints with the flex pipe - typically three screws per joint, evenly spaced around it.
")