Doublewall pipe install questions

  • Active since 1995, Hearth.com is THE place on the internet for free information and advice about wood stoves, pellet stoves and other energy saving equipment.

    We strive to provide opinions, articles, discussions and history related to Hearth Products and in a more general sense, energy issues.

    We promote the EFFICIENT, RESPONSIBLE, CLEAN and SAFE use of all fuels, whether renewable or fossil.
Status
Not open for further replies.

joecool85

Minister of Fire
First, I have to laugh but it is frustrating. I bought the telescoping DVL Duravent pipe and figured I'd be able to hook it right up to my stove. Well, being new, I didn't realize I needed a DVL -> stove adapter. So now I'm waiting on that to come in, which is fine because I'm not done on the hearth yet anyway.

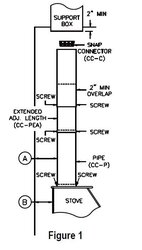
Now for my question, when I install the telescoping piece, do I screw it all together? There are holes at the top of the pipe where it goes to the adapter for the ceiling support box, there are holes in the middle of the pipe and there are holes at the bottom where it connects to the stove adapter. Do I need to put 3 screws in each of those areas? It came with 8 screws. I'm thinking it would probably be wise to at least screw in the part in the middle of the telescoping piece so as to "lock" it in the right length.
 
Me and my friend just got done installing double wall pipe on my stove earlier this week. I'm new to this too. We did put three screws in the middle of the pipe to lock it. Where it connects to the stove we drilled a hole through the pipe and put one of the exit collar bolts through the pipe and into the threaded hole in the collar. My friend text me later and thought that maybe we put the bolt in too far and bent the inner pipe to where it won't seal. I talked to my dealer about this and he said not to worry about it because if you have a good draft you shouldn't have problems. Time will tell i guess. At the top of the pipe where it connects to the class A adapter we did not put any screws in as it was a pretty snug fit. I'm no expert and am completely new to wood burning. I'm just saying what we did, what my friend who installed his own stove and pipe says, and what my Jotul dealer says.
 
The instructions on my ICC double wall say to secure it after it's installed with the supplied screws.
 
mhrischuk said:
The instructions on my ICC double wall say to secure it after it's installed with the supplied screws.

Ok, but secure it where? At the top adapter, in the middle of the pipe, at the stove adapter...all three locations?
 
Ok, I heard back from Englander. They recommend using RTV3 silicone to connect the stove adapter to the stove rather than screws. I was not feeling great about that (only rated to 450F) and asked if Rutland stove cement is ok (rated to 2000F) and they said that was ok.

Wouldn't silicone rated for 450F burn up? I figure the stoves normal operating range is 350-550 with 650 being an overfire. The chimney connector must get WELL above 450F.
 
I have a single section of telescoping simpson double wall between my stove and the ceiling support box. The install was done by a pro and inspected by my county inspector. I specifically asked and was told by each of these men independently that the only screws required are the ones in the center keeping the pipe opened.

If you end up using an appliance adapter then I would recommend one with a damper and also to install screws at the joint, it is really easy to install those screws at a pipe/pipe connection. Not so easy at the top or at the stove.
 
Highbeam said:
I have a single section of telescoping simpson double wall between my stove and the ceiling support box. The install was done by a pro and inspected by my county inspector. I specifically asked and was told by each of these men independently that the only screws required are the ones in the center keeping the pipe opened.

If you end up using an appliance adapter then I would recommend one with a damper and also to install screws at the joint, it is really easy to install those screws at a pipe/pipe connection. Not so easy at the top or at the stove.

I am using a stove adapter because I have to. I did not get one with a damper because the manual for my stove implicitly states not to. I will screw that into the telescoping pipe. Duravent did get back to me and said they recommend screwing together everything except the connection to the ceiling box - this includes drilling the stove and screwing the adapter to the stove. I emailed them back and asked if Englander's solution of stove cement (I left out the silicone bit since I don't feel safe about it anyway) and I'm awaiting a response.
 
joecool85 said:
Ok, I heard back from Englander. They recommend using RTV3 silicone to connect the stove adapter to the stove rather than screws. I was not feeling great about that (only rated to 450F) and asked if Rutland stove cement is ok (rated to 2000F) and they said that was ok.

Wouldn't silicone rated for 450F burn up? I figure the stoves normal operating range is 350-550 with 650 being an overfire. The chimney connector must get WELL above 450F.

Yes, it sounds like you spoke to a pellet stove person. Don't use silicone on a woodstove flue system, except on the storm collar or top flashing.
 
BeGreen said:
Yes, it sounds like you spoke to a pellet stove person. Don't use silicone on a woodstove flue system, except on the storm collar or top flashing.

That's what I was thinking. It was via email, but I did clearly state it was for a 17-VL. I did use 500F high temp silicone on the storm collar, but that's a whole other story than on the stove's chimney connector. Now it makes me wonder if they are actually ok with it not being screwed in or if that was just for pellet stoves....ugh.

**edit**
I emailed them back making sure that wasn't a recommendation for a pellet stove and they said that "it is used also to seal pipe joints for wood stoves."

I'm still going to use Rutland cement.
 
joecool85 said:
Duravent got back to me and said they do indeed recommend a "mechanical connection" (IE - screws) as opposed to cement. How important is it to screw the adapter to the stove as opposed to cementing it?

if you don't screw that adapter and go with only cement, it will not hold fast after all of the hot/cold cycles you will be putting it through....that stove cement degrades over time due to high heat.....I don't care what anyone says, you should definately secure it with screws.....
 
Flamegrower said:
if you don't screw that adapter and go with only cement, it will not hold fast after all of the hot/cold cycles you will be putting it through....that stove cement degrades over time due to high heat.....I don't care what anyone says, you should definately secure it with screws.....

Sounds good to me. I'll drill it and screw it in. It doesn't matter that the screws will be going into the ribbed part of the adapter?
 
joecool85 said:
Flamegrower said:
if you don't screw that adapter and go with only cement, it will not hold fast after all of the hot/cold cycles you will be putting it through....that stove cement degrades over time due to high heat.....I don't care what anyone says, you should definately secure it with screws.....

Sounds good to me. I'll drill it and screw it in. It doesn't matter that the screws will be going into the ribbed part of the adapter?

do you have a pic so I can see exactly what you got going on here?
 
Flamegrower said:
do you have a pic so I can see exactly what you got going on here?

I don't, but it's pretty basic. It's the collar coming off the top of my 17-VL, plate steel. Then the stove adapter sits inside of this, and the metal that fits in is ribbed/crimped.

**edit**
I should say I am assuming it will be since the single wall version is and that's what I have on hand - I'm waiting for the proper part to come in the mail.
 
joecool85 said:
Flamegrower said:
do you have a pic so I can see exactly what you got going on here?

I don't, but it's pretty basic. It's the collar coming off the top of my 17-VL, plate steel. Then the stove adapter sits inside of this, and the metal that fits in is ribbed/crimped.

**edit**
I should say I am assuming it will be since the single wall version is and that's what I have on hand - I'm waiting for the proper part to come in the mail.

Wait til you get yer parts and make sure before you do anything....you should be fine screwing into the ribbed part, as long as you have enough of the adapter into the stove...but like I said you def. want something more thant just cement......doesn't hurt to cement it, too, but you need to anchor that thing somehow.....keep us posted...
 
Scotty Overkill said:
Wait til you get yer parts and make sure before you do anything....you should be fine screwing into the ribbed part, as long as you have enough of the adapter into the stove...but like I said you def. want something more thant just cement......doesn't hurt to cement it, too, but you need to anchor that thing somehow.....keep us posted...

Sure, I'll take a pic when I get the adapter.
 
joecool85 said:
BeGreen said:
Yes, it sounds like you spoke to a pellet stove person. Don't use silicone on a woodstove flue system, except on the storm collar or top flashing.

That's what I was thinking. It was via email, but I did clearly state it was for a 17-VL. I did use 500F high temp silicone on the storm collar, but that's a whole other story than on the stove's chimney connector. Now it makes me wonder if they are actually ok with it not being screwed in or if that was just for pellet stoves....ugh.

**edit**
I emailed them back making sure that wasn't a recommendation for a pellet stove and they said that "it is used also to seal pipe joints for wood stoves."

I'm still going to use Rutland cement.

Did you get a name of the tech saying that? I would contact Mike Holton at Englander tech support. Sounds like there is some bad information going out here. You are doing it correctly. As for the screws, this is from the 17-VL manual:

• Use three sheet metal screws at each single wall chimney connector joint (check manufacturer’s
recommendations when double wall chimney connector is used).
• Drill three holes in the flue collar of the unit and attach the chimney connector to the unit using sheet metal
screws.


And this illustration is from the Duravent DVL installation guide.
 

Attachments

  • DVL connector install.jpg
    DVL connector install.jpg
    28.3 KB · Views: 394
Joecool, listen to BeGreen.....I haven't been on this site long but I can tell already he knows his stuff, and he included the illustration to back it.....make sure you follow the instructions, you def. want to screw that down....and I would definately call the Tech Support like he told you, someone is gonna get their house burnt down or worse with bad information like that goin around....
 
Thanks BeGreen, I had read that in the manual but wasn't sure if it applied to the DVL pipe. I'm definitely going to screw it down. The only question now is do I put in any screws at the TOP of the DVL pipe going to the adapter up there? It's a snap in connector so it's in pretty good. The Duravent support line said that it wasn't necessary, but I don't mind "over-doing" it. What do you guys think?
 
Instructions do wonders. Many of us who answer these questions simply ask what brand product and model, search the manufacturer's website, find the manual, read the directions, post the answers.
And we are happy to do it.

And yes, lot's of times it's hard to decipher the instructions.

I'm just sayin.
 
I had the same question for our installs. The little snap adapter collar is not designed to be screwed in place. I did it anyway in our house for peace of mind, but not in the greenhouse installation.
 
mhrischuk said:
Instructions do wonders. Many of us who answer these questions simply ask what brand product and model, search the manufacturer's website, find the manual, read the directions, post the answers.
And we are happy to do it.

And yes, lot's of times it's hard to decipher the instructions.

I'm just sayin.

Yeah, well it would help if Duravent put instructions in the **** box! No instructions for the Class A chimney either, but for that I was smart enough to download (and read) the instructions from their website.
 
I was able to fasten the telescopic piece directly to my stove. The internal section of pipe sits inside the stove collar, and the outer section of pipe goes over the outside of the collar. It is SNUG to the point of being difficult to get on, but I used some furnace cement for good measure....but not screws. It stays in place when I take the rest of the stove pipe apart to clean the chimney.

I placed 3 screws at the top of the telescopic piece, securing to the rest of the stovepipe sections. I also placed 3 in the middle to keep it from sagging.

I too thought I needed that adapter, but found later that I could get by without it. Might be worth another try...one less joint in your system. Like I said, it was snug, but once on there you get a nice tight fit.
 
It is great that these companies put the stuff up to download.
 
lukem said:
I was able to fasten the telescopic piece directly to my stove. The internal section of pipe sits inside the stove collar, and the outer section of pipe goes over the outside of the collar. It is SNUG to the point of being difficult to get on, but I used some furnace cement for good measure....but not screws. It stays in place when I take the rest of the stove pipe apart to clean the chimney.

I placed 3 screws at the top of the telescopic piece, securing to the rest of the stovepipe sections. I also placed 3 in the middle to keep it from sagging.

I too thought I needed that adapter, but found later that I could get by without it. Might be worth another try...one less joint in your system. Like I said, it was snug, but once on there you get a nice tight fit.

Yeah, it won't fit. For $20 it's worth it to me to do it the "right" way. I'll screw it in and it will be plenty solid.


mhrischuk said:
It is great that these companies put the stuff up to download.

It'd be better if they shipped the manual in the box, but you're right, at least they are easy to find online.
 
Status
Not open for further replies.