Advice / Review need: Regency CI2600 fireplace insert risky & costly?

  • Active since 1995, Hearth.com is THE place on the internet for free information and advice about wood stoves, pellet stoves and other energy saving equipment.

    We strive to provide opinions, articles, discussions and history related to Hearth Products and in a more general sense, energy issues.

    We promote the EFFICIENT, RESPONSIBLE, CLEAN and SAFE use of all fuels, whether renewable or fossil.
Status
Not open for further replies.
Well, the adventure continues... I tried the experiment of completely plugging the "boost air" outlet on the inside lower lip of the firebox. I had some Roxul Rockboard 60 mineral wool insulating/soundproofing panels and I cut a small square and just wedged it in front of the air outlet. The air nozzle is a semi-circular slit about 5mm high and 15-20mm wide so one could accomplish the same by wedging a piece of fiberglass gasket material in there. It's probably still not a 100% airtight seal, but pretty close. This definitely enhanced the overnight performance of the stove. I started at 7pm with a few leftover coals from the night before (20+ hours prior). I placed the piece of Roxul and put 3 3" diameter 16" logs on the coals. Within a few minutes fire was going and I closed the glass door. After about 10-15min I closed the bypass and shortly after the cat started a glow dull. I then damped the air control to about 2/3rds closed. Good steady small flames with glowing cat. Took a look outside - no smoke at all. 3 hours later there was still some of those logs left and spread out the remaining and loaded for overnight. This time I placed 8-10 3-4" diameter 16-18" logs (kiln "dried" about 15-17% on MM). I arranged the bottom layer EW and most of the rest either diagonal or NS. This had the firebox about 2/3-3/4 full. I did the same procedure as before and had the bypass closed within 10-15min with a brightly glowing cat. I slowly damped down the air control over 15-20 min from full open to fully closed. At that point there was hardly any primary combustion visible - just a few orange flickers here and there but the secondaries were going crazy plus the cat continued to glow very well. The secondaries were particularly mesmerizing - yellow/blue flames in the back of fire box, around the secondary airtubes near the catalyst flame guard, and from the air wash with secondaries right up against the glass (kept the glass quite clean). I watched it from 1030 to about midnight like this. At 5:30 this morning there was nearly an entire log left and still had some flames going. Heat output with fan on low was still hot. Overnight low was 42 and middle part of the house was 69 deg. I threw three large logs on the nearly-white-hot coals and flame took off in about 10 min. Closed bypass and left air control about 2/3 closed before leaving for work.

Up to now I had never maintained continuous flame activity overnight - I had always just seen the red coals in the morning. I am going to try this experiment a couple of times.


I might fashion a sort of pinhole primary boast air nozzle with a stainless steel washer and some high-temp silicone.
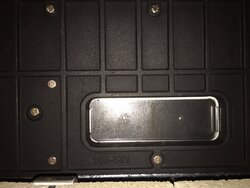
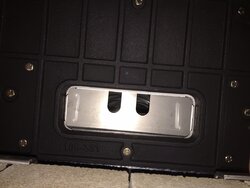
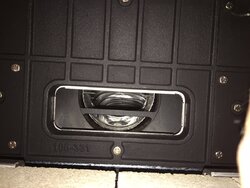
just a quick tip, if you want to reduce the primary air and the restrictor plate was shipped in your unit or added, you can slide the plate up a little and retighten the two bolts. Kc regency dealer
 
Hey guys,

So we are finally getting some warmer weather here in Massachusetts. It was definitely an "experience" with this stove this year. I managed to get a pretty good system going for keeping this stove running through the winter. For most of January and February I never needed to do more than rake up my coals in the morning and afternoon after work to get another fire going. I am getting about 8-9hrs each reload. It does need more attention than I was expecting to but I've come to accept it as comprimise for getting a flush mount insert. I'm OK with amount of wood I used, the heat output, and the cleanliness of the glass.

My BIG concern now is my crumbling cat and warped bypass plate. Others have mentioned they have had these issues and I now believe that this is another shortcoming of the stove. I followed the operating instructions to the letter and never thought for a moment during the entire winter that I was damaging the stove. Cat temps were always in a safe range <1300. Bypass was never left open longer than needed to get the wood up to temp.

Others will probably start reporting these same issues now that everyone is getting to the end of their first burn season. Check your stoves guys, if this is a common theme after only a year of use Regency is going to have a situation on their hands.
 
Hmmm... Is the bypass plate the moving part or the stationary part around it? I don't have the cat thermometer installed yet (I bought one from Condar) so I've been running mine without. Still cool enough to run the stove at night, so it finally warms up for good I plan to install the thermometer. I do not see any warping in the interior of the firebox or crumbling of the catalyst at this point. If there is warping and it affects stove function I would guess this ought to be covered by warranty, but who knows if they'd honor it...
 
Hmmm... Is the bypass plate the moving part or the stationary part around it? I don't have the cat thermometer installed yet (I bought one from Condar) so I've been running mine without. Still cool enough to run the stove at night, so it finally warms up for good I plan to install the thermometer. I do not see any warping in the interior of the firebox or crumbling of the catalyst at this point. If there is warping and it affects stove function I would guess this ought to be covered by warranty, but who knows if they'd honor it...
Sorry, im talking about the metal plate inside the firebox. It is bulging down slightly. Neither issue seems to be having an effect right now but imagine what it will it look like in a few more years...
 
My stove was delivered and installed without the reducer plate back in late November. I finally got around to asking my installer about getting one. Regency asked for the serial number of the stove. I looked through the materials from installation and it looks like it wasn't recorded before the install.

All I can figure is that Regency doesn't want to spend a buck sending out the reducer plate if we might actually already have it and not know it. Hopefully they'll be satisfied with a picture of the inlet because I don't want to take the fan out to get to the serial number.
Regency wants the serial # because after a specific number they retrofitted all unit in stock with the plate. The plate slides in with out removeing the two bolts, so just loosen them and see if a restrictor plate is present. It can be to be pulled up and has two tabs on it.
 
  • Like
Reactions: Grisu
Regency wants the serial # because after a specific number they retrofitted all unit in stock with the plate. The plate slides in with out removeing the two bolts, so just loosen them and see if a restrictor plate is present. It can be to be pulled up and has two tabs on it.

Yes, but I can tell that the plate isn't in there just by taking a picture from inside the firebox. Fortunately my installer was able to dig up the serial number from his paperwork so he's confirming that number is in the range that shipped without them.
 
  • Like
Reactions: fire245
It's been a while since I checked in, and it's been an interesting season with this insert. I've had problems with the install (insulation issues), and had an insert that didn't originally have the restrictor plate so it burned faster and hotter than it should have. Long story short, I just had a new liner, new insulation, and a new insert installed and I have a question.

I think back on page 14 or 15 or so there was talk about the bypass and how it works. I'm looking at my new insert and just want to make sure everything is okay before I do the break-in burn. Pushing the bypass rod in seems to successfully close the bypass. Pulling the rod out seems to pull the main bypass plate back but leaves a lighter plate in place. I can reach in and feel that the plate that doesn't get pulled back is just loose, and there's a lip on it that will push it closed when the main bypass is pushed closed, but it doesn't get pulled open. The three photos I'll attach here show the view from inside the firebox with the bypass closed, with it opened by the rod, and with that "loose" plate manually pushed back by me sticking my hand up in it.

I'm guessing it's probably correct and fine, but wanted to ask the collective first. I hadn't noticed this with my old stove, but to be honest, I hadn't looked.
 

Attachments

  • IMG_2848.JPG
    IMG_2848.JPG
    183.5 KB · Views: 779
  • IMG_2849.JPG
    IMG_2849.JPG
    127.6 KB · Views: 704
  • IMG_2850.JPG
    IMG_2850.JPG
    195.1 KB · Views: 665
If folks are reading this thread and are on the fence about this insert, I'm told that regency has started making them within the last month or so with some improvements incorporated into the design. They've been including the restrictor plate for a while now, but there was also a "fix" to the bypass plate (or somewhere in the vicinity of the bypass plate) to address an issue some customers had where the bypass didn't close properly. I didn't have that issue, but it certainly sounds like others have. I also noticed that the plate in the top of the firebox seems more robust (see the photos in my previous post). I'm not sure about any other changes, and not having even done the break-in burns with my new stove I can't speak for how it'll be. FWIW, after my restrictor plate was installed in my old insert I was getting pretty good burn times (12+ hours, sometimes even 14+) but by the time I got it the damage from overfiring was done.
 
It's been a while since I checked in, and it's been an interesting season with this insert. I've had problems with the install (insulation issues), and had an insert that didn't originally have the restrictor plate so it burned faster and hotter than it should have. Long story short, I just had a new liner, new insulation, and a new insert installed and I have a question.

I think back on page 14 or 15 or so there was talk about the bypass and how it works. I'm looking at my new insert and just want to make sure everything is okay before I do the break-in burn. Pushing the bypass rod in seems to successfully close the bypass. Pulling the rod out seems to pull the main bypass plate back but leaves a lighter plate in place. I can reach in and feel that the plate that doesn't get pulled back is just loose, and there's a lip on it that will push it closed when the main bypass is pushed closed, but it doesn't get pulled open. The three photos I'll attach here show the view from inside the firebox with the bypass closed, with it opened by the rod, and with that "loose" plate manually pushed back by me sticking my hand up in it.

I'm guessing it's probably correct and fine, but wanted to ask the collective first. I hadn't noticed this with my old stove, but to be honest, I hadn't looked.

So that lighter gauge steel piece is your upper shield. When installed correctly (this is based on the pre-improved inserts that you mention in your next post, please verify with your manual) this plate should be centered between two verticle pins from front to back. The upper shield actually "surrounds" the bypass plate on the top and sides (hope that makes sense). Looking at my manual, it shows the proper installation on page #11. My upper shield can be moved by hand as well, but it stays in place when I open/close the bypass. Hope that helps.

Matt
 
It's been a while since I checked in, and it's been an interesting season with this insert. I've had problems with the install (insulation issues), and had an insert that didn't originally have the restrictor plate so it burned faster and hotter than it should have. Long story short, I just had a new liner, new insulation, and a new insert installed and I have a question.

I think back on page 14 or 15 or so there was talk about the bypass and how it works. I'm looking at my new insert and just want to make sure everything is okay before I do the break-in burn. Pushing the bypass rod in seems to successfully close the bypass. Pulling the rod out seems to pull the main bypass plate back but leaves a lighter plate in place. I can reach in and feel that the plate that doesn't get pulled back is just loose, and there's a lip on it that will push it closed when the main bypass is pushed closed, but it doesn't get pulled open. The three photos I'll attach here show the view from inside the firebox with the bypass closed, with it opened by the rod, and with that "loose" plate manually pushed back by me sticking my hand up in it.

I'm guessing it's probably correct and fine, but wanted to ask the collective first. I hadn't noticed this with my old stove, but to be honest, I hadn't looked.
That's what I kept saying that it sounds like the bypass was leaking. It looks solid but you really can't tell till you build a fire. Please let us know how it goes. It does look like they made changes, it looks different to my stove but I didn't have any problem. I can't understand why some stoves are fine and some have a problem.
 
Glad to hear you've got your installation dialed-in. It was mentioned somewhere previously that the add-on restrictor plate for the primary "boost" air inlet in the front-middle of the stove can be adjusted. While doing my end-of-season cleaning I took a close look at this. Indeed, the restrictor plate has two tabs on the sides. One can loosen the two bolts holding the restrictor plate in place and you can raise it up or lower it down. The hole in the restrictor plate is about the size of a pencil eraser and it covers the nickel-size opening in the primary air manifold. By raising it up you can reduce the size of the opening to a pinhole, or close it off completely. This is actually quite a lot of adjustability. I reduced mine to about a 2mm opening so we'll see what happens next season. But this is definitely something people can experiment with, if you're into that sort of thing. Also there is stamped-steel nozzle that covers the opening which is probably intended to evenly distribute the incoming air across the width of the primary combustion zone. This nozzle has some adjustability right and left so those of you noting one side of your fire burns more than the other can experiment with moving it slightly off-center. Depending on your draft, you could make the opening bigger or smaller and adjust the nozzle right or left.

I also used a poly brush with drill extensions to clean my (non-insulated) liner. I went all to the top and got, well, pretty much nothing but some soot. I inspected the chimney as best I could from below (hard to get your head inside the firebox...) and from above and the liner did indeed look pristine. I went through only a cord of wood this season since I didn't have the stove installed until January. However in April I burned a lot of 'punky' wood I didn't want to keep till next season and some pieces with MC 20-25%. Still, virtually no creosote is darn good especially with a non-insulated liner in an external brick chimney. Should I bother insulating the liner if it's working this well?

My projects before next season with this unit are to insulate around the unit inside my masonry chimney and to install the Condar cat thermometer.

So far I have 2 cords of mixed Norway maple and Oak stacked for this fall/winter (MC 15-23% right now).

SB
Thanks for the tip on adjusting plate up or down. Can't wait till the next burn season to start testing.
 
Glad to hear you've got your installation dialed-in. It was mentioned somewhere previously that the add-on restrictor plate for the primary "boost" air inlet in the front-middle of the stove can be adjusted. While doing my end-of-season cleaning I took a close look at this. Indeed, the restrictor plate has two tabs on the sides. One can loosen the two bolts holding the restrictor plate in place and you can raise it up or lower it down. The hole in the restrictor plate is about the size of a pencil eraser and it covers the nickel-size opening in the primary air manifold. By raising it up you can reduce the size of the opening to a pinhole, or close it off completely. This is actually quite a lot of adjustability. I reduced mine to about a 2mm opening so we'll see what happens next season. But this is definitely something people can experiment with, if you're into that sort of thing. Also there is stamped-steel nozzle that covers the opening which is probably intended to evenly distribute the incoming air across the width of the primary combustion zone. This nozzle has some adjustability right and left so those of you noting one side of your fire burns more than the other can experiment with moving it slightly off-center. Depending on your draft, you could make the opening bigger or smaller and adjust the nozzle right or left.

I also used a poly brush with drill extensions to clean my (non-insulated) liner. I went all to the top and got, well, pretty much nothing but some soot. I inspected the chimney as best I could from below (hard to get your head inside the firebox...) and from above and the liner did indeed look pristine. I went through only a cord of wood this season since I didn't have the stove installed until January. However in April I burned a lot of 'punky' wood I didn't want to keep till next season and some pieces with MC 20-25%. Still, virtually no creosote is darn good especially with a non-insulated liner in an external brick chimney. Should I bother insulating the liner if it's working this well?

My projects before next season with this unit are to insulate around the unit inside my masonry chimney and to install the Condar cat thermometer.

So far I have 2 cords of mixed Norway maple and Oak stacked for this fall/winter (MC 15-23% right now).

SB
I think as long as there is terra-cotta flue the liner goes in, I don't think you need an insulated liner.
 
I think as long as there is terra-cotta flue the liner goes in, I don't think you need an insulated liner.
No that is not correct at all. The presence or condition has no effect on the need for insulation by code unless you have the required clearance (1" for and exterior chimney and 2" for an internal one) from the outside of the masonry structure to any combustible material you need insulation on a liner for a wood burning appliance. Also in order to maintain the ul listing for the liner when used for wood insulation is required unless the manufacturer tested it with proper clearances and no insulation which to my knowledge none have
 
No that is not correct at all. The presence or condition has no effect on the need for insulation by code unless you have the required clearance (1" for and exterior chimney and 2" for an internal one) from the outside of the masonry structure to any combustible material you need insulation on a liner for a wood burning appliance. Also in order to maintain the ul listing for the liner when used for wood insulation is required unless the manufacturer tested it with proper clearances and no insulation which to my knowledge none have
Sorry I did say I think, I guess I'm wrong.
 
Sorry I did say I think, I guess I'm wrong.
no problem It is a common misconception but it is not true at all so i had to correct you
 
Well I'm pretty excited to say that regency is going to be replacing my whole unit. I'm really looking forward to see how well this thing burns next season with the changes that have been made. That plate that surrounds the bypass looks a hell of a lot more larger and reinforced, which was one of the parts that warped and cracked on mine. Definitely siked to see how this burns with the restrictor plate along with the advise to adjust it as well. Got 4 cords all stacked and already seasoned ready to go.
 
We purchased this unit last October and upon cleaning it recently I discovered damage to the unit, specifically the catalytic converter, the plate around the bypass opening and the two welds located towards the top in back of the unit on both sides. I have posted pictures of the damage. I am very concerned as we operated the unit per the directions in the manual and we have an interior temperature probe which allowed us to accurately monitor the temperature. I saw a previous post of someone who also experienced similar damage. Just wondering if anyone else experienced this and what was the outcome? Any comments are welcomed.

View One.jpg View Two.jpg View Three.jpg View Four.jpg
 
Last edited:
We purchased this unit last October and upon cleaning it recently I discovered damage to the unit, specifically the catalytic converter, the plate around the bypass opening and the two welds located towards the top in back of the unit on both sides. I have posted pictures of the damage. I am very concerned as we operated the unit per the directions in the manual and we have an interior temperature probe which allowed us to accurately monitor the temperature. I saw a previous post of someone who also experienced similar damage. Just wondering if anyone else experienced this and what was the outcome? I have yet to call the company that installed the unit as we had a very poor experience with them. Any comments are welcomed.

View attachment 159418 View attachment 159419 View attachment 159420 View attachment 159421

I had the same exact same thing happen to my unit with the cat crumbled away and the plate around the bypass sagged and cracked. Looked identical to your pics. Contacted the place I bought it from and they were able to replace the whole unit free of charge through regency. Definitely go for the same thing. Your unit is one of the older ones like mine was. There has been several changes to the unit to beef it up and get it to run more efficient instead of firing with an inferno inside the firebox. Had my replacement unit installed this past week and am excited for the cool weather to come to try her out. Do yourself the favor by getting on that sooner than later before the fireplace companies get slammed with cleanings and installs in the fall.
 
I had the same exact same thing happen to my unit with the cat crumbled away and the plate around the bypass sagged and cracked. Looked identical to your pics. Contacted the place I bought it from and they were able to replace the whole unit free of charge through regency. Definitely go for the same thing. Your unit is one of the older ones like mine was. There has been several changes to the unit to beef it up and get it to run more efficient instead of firing with an inferno inside the firebox. Had my replacement unit installed this past week and am excited for the cool weather to come to try her out. Do yourself the favor by getting on that sooner than later before the fireplace companies get slammed with cleanings and installs in the fall.
Thanks for the reply, the manager from the company that installed it will be out next Monday to look at the unit. I will definitely pass this on to him, if you know of any others that have had this problem or any other links on the web related to this problem I would very much appreciate the info. I am hoping for the best. Thanks again for the reply.
 
Last edited:
I had the same exact same thing happen to my unit with the cat crumbled away and the plate around the bypass sagged and cracked. Looked identical to your pics. Contacted the place I bought it from and they were able to replace the whole unit free of charge through regency. Definitely go for the same thing. Your unit is one of the older ones like mine was. There has been several changes to the unit to beef it up and get it to run more efficient instead of firing with an inferno inside the firebox. Had my replacement unit installed this past week and am excited for the cool weather to come to try her out. Do yourself the favor by getting on that sooner than later before the fireplace companies get slammed with cleanings and installs in the fall.
Can you please post pictures of the inside of your new stove? Would love to see what changes they made. I have a hair line crack on two of the welding areas, but the stove worked great all winter. So not sure if I should ask for it to be replaced.
 
Status
Not open for further replies.