hoverp said:mine smokes when the stove is 450 degrees ... and the pipe is really hot
You open the door when it is 450 degrees?
hoverp said:mine smokes when the stove is 450 degrees ... and the pipe is really hot
SolarAndWood said:hoverp said:mine smokes when the stove is 450 degrees ... and the pipe is really hot
You open the door when it is 450 degrees?
 !
!SolarAndWood said:Gotcha. We were having the scheduling problem in the transition from 24 hour burn cycles to 12 hour cycles. I adjust what I put in the stove based on weather conditions to keep us on the 12 hr schedule.
hoverp said:SolarAndWood said:Gotcha. We were having the scheduling problem in the transition from 24 hour burn cycles to 12 hour cycles. I adjust what I put in the stove based on weather conditions to keep us on the 12 hr schedule.
Copy, I see your from S. NY ..
my whole family on my side is from upstate...Rochester and Syracuse Good people up there!
") THANKS I am in Canandaigua Right in the middle of the 2 LOL the pipe is now angled up with the actual hole of the cat bypass (when its open) and into a sloping up pipe into a nice 7 inch (insulated with fiberglass and aluminum tape) horizontal pipe tilted up much better than the 8 inch was, and only 16 inch to the entry of the clay liner of the chiminey. I know that was hard to follow with words but I will post pics tomorrow.
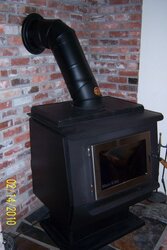
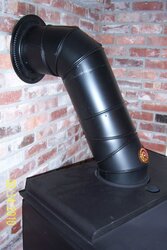
THANKS I am in Canandaigua Right in the middle of the 2 LOL the pipe is now angled up with the actual hole of the cat bypass (when its open) and into a sloping up pipe into a nice 7 inch (insulated with fiberglass and aluminum tape) horizontal pipe tilted up much better than the 8 inch was, and only 16 inch to the entry of the clay liner of the chiminey. I know that was hard to follow with words but I will post pics tomorrow.hoverp said:Ok here is a few pics... (one is of the old 16 inches straight up to a 90 then a real long run of single wall un insulated in the brick with a very tight(read heat absorbing) interference fit to the mortar.) Its hard to tell from the first picture but there is a long run of horizontal pipe comming out of the wall until it hits the 90 and starts the turn down. The first picture doesnt show the amount that I reduced but it was a good 15-16 inches in the re-design.
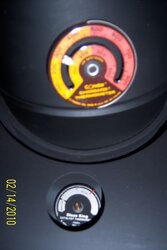
Re-design and first burn : I necked down at the wall right behind the 90 to 7 inch pipe wrapped in fiberglass and aluminum tape that goes through the masonry into the flu. Only about 18 total inches of 7 inch pipe. that gave me clearance enough to get a good heat shield on it (since it was a form fit 8 inch hole and the old 8 inch single wall pipe was a very tight fit.) It also let me angle up the 7 inch through pipe toward the roof (slope up) more than the 8 inch did because of the interference fit the 8 inch had with the almost level hole in the masonry. The bends are shallower and it seemas to draft better by watching the performance of the stove and the CAT...the flue pipe temp as you can see (not th best pic) is 300 (verified by my IR digital gun) at the bottom while the CAT is nice and hot(actually glowing) and this is on a setting of settled in 1.75 It was not like this prior....at the 1.5 setting after a few hours of burning the CAT was never that hot...more toward the 10-11 oclock position on the CAT temp guage.
Part of me having to reload in the middle of the burn is that It would cool off to much mid cycle and not keep the constant heat output...so far this has not happened today... the wood is getting down in size but the temp is staying exactly the same! First time for this. This I think is because of the improved draft.....Not that one burn is all inclusive but it seriously notice the difference in behavior.
The smoke still escapes out the front of the door but not as bad.... I think overall my draft has improved with this re-design and the insulated pipe seems to help keep it pulling better.
Prior to the re-design my flu pipe temp was also 50-75 degrees cooler 200-225 at this 1.75 setting and really setting up some creosote.
Thanks to Mark for helping me with this project!
Patrick