Botched install? How would you handle this?

  • Active since 1995, Hearth.com is THE place on the internet for free information and advice about wood stoves, pellet stoves and other energy saving equipment.

    We strive to provide opinions, articles, discussions and history related to Hearth Products and in a more general sense, energy issues.

    We promote the EFFICIENT, RESPONSIBLE, CLEAN and SAFE use of all fuels, whether renewable or fossil.
Status
Not open for further replies.

zknowlto

New Member
Hearth Supporter
Aug 1, 2009
68
Lansing, MI
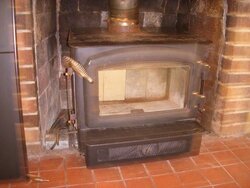
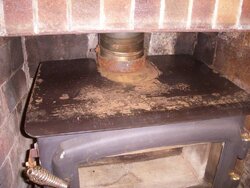
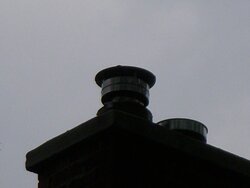
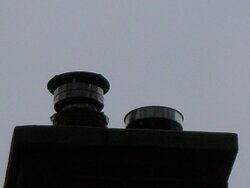
In August of 2009, I had a local company install a Regency I1200 insert and a flex liner. In the spring of 2010, I noticed that water was getting onto the top of the insert and that it was starting to rust up a little. When I later hired a chimney sweep to clean the liner (different company), I mentioned this. The sweep told me that he thought the chimney cap just needed some silicon caulk and did this for me. Assuming the problem was taken care of, I scoured and repainted the top of the insert, and didn't think anything more about it. I should have been more careful as this spring, I noticed again that water was leaking onto the insert and that the top was rusting up again. This time, I called the original company that did the installation. They charged me $133 to come look at the problem (the installation was "out of warranty") and initially told me, like the sweep, that it was a problem with caulking around the chimney cap.

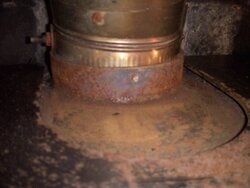
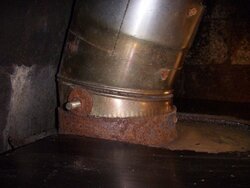
I've been keeping a very close eye on this now and noticed water leaking on the insert after every hard rain. I've subsequently had this same company out three more times to try and figure this out. After several different theories and failed attempts, the technician got a hose out and seemed reasonably confident that the liner was leaking as the chimney cap "wasn't seated right on the liner". Interestingly, this same technician has written a separate work order every time he's come out, but told me that he "wasn't going to bother with it this time". This perked up my BS detector, and I made him write one up anyway.

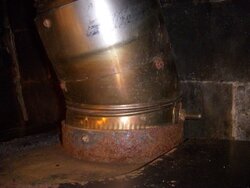
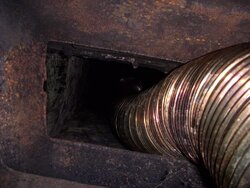
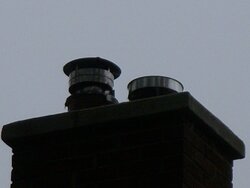
Attached are pictures of the water damage. Assuming the problem is fixed, how does everyone think I should proceed from here? Specifically I wonder:

1) Will this rust affect the integrity of the insert or is it purely cosmetic?

2) Is there anything after the installation that would cause the liner to "unseat" from the cap? Specifically, could this have been caused by one of the sweeps, wind or something else?

3) Does the installer have an obligation to make this right, or did I blow it by waiting too long after the initial installation.

4) I'm thinking about asking them to replace the flu offset at their expense and refinishing the other rusted spots myself. Does this seem reasonable?

My thanks in advance for the advice!
 

Attachments

  • phptvasJ7PM.jpg
    phptvasJ7PM.jpg
    96.8 KB · Views: 1,201
  • phphTBXIQPM.jpg
    phphTBXIQPM.jpg
    119.8 KB · Views: 1,205
  • phpgO5ynQPM.jpg
    phpgO5ynQPM.jpg
    61.4 KB · Views: 1,206
Don't know about the rest of your question, but i'd say it's only cosmetic. Structurally you should be good to go once the problem is fixed and the stove is cleanup up, AGAIN. That has got to be frustrating.
 
That is a shame. The top looks like it will clean up, but the pitting on the collar may not clean up so well. Is there usually a surround around the insert or has this damage always been visible?

A good photo or two of the chimney top, body and the liner cap may help spot something amuck up there.
 
Sometimes liner top plates do have a habit of unseating themselves and shifting which allows water to leak in. Most are just attached with silicone. (masonry screws do wonders to help hold them in place!!)

This may not necessarily be an issue with the liner itself. It's possible that you may have some sort of masonry issue allowing water to enter and seep into the flue itself and drip down onto the insert.

Hope this helps!
 
For one thing, am I the only one that wonders what the heck that bolt and washer are on the side of that pipe?

Second, making a probably very valid assumption, that is a elbow and it is attached to the liner with the male end of the elbow inserted with the congregations up into the liner. Then they stuck a male to male piece between it and the flue collar. If that is the case any rain that comes down that flue is gonna leak down onto the top of the stove. As it appears has happened. The corrugated ends of any connectors should be on the bottom of the connector piece. Not the top.

But that much water shouldn't be coming down in the first place.

ETA: If it is a hack job on the bottom then it is probably a hack job up top.
 
BrotherBart said:
For one thing, am I the only one that wonders what the heck that bolt and washer are on the side of that pipe?

Looks to me like more than just a bolt on one side. Looks like a shaft that goes all the way through...I think I see it sticking out on the other side...like a flue damper without a control. Wonder what's inside there? :roll:
 
I am betting that the bolt and washer is what they used to keep the elbow from sliding down inside the stove to far. I think that the rust is nothing more than cosmetic however the whole liner connection to the stove looks less than ideal as brother bart mentioned I would get it hooked up corretly inside as well as taking a real close look at what they did up top.
 
BrotherBart said:
For one thing, am I the only one that wonders what the heck that bolt and washer are on the side of that pipe?

No, you're not. What IS that??

As for the elbow, etc I can't really tell for sure form the pic, but to me it looks like a normal 15 degree appliance adapter, with the corrugation inside the flue collar.

Are there any better pictures of the bottom connection?
 
cmonSTART said:
As for the elbow, etc I can't really tell for sure form the pic, but to me it looks like a normal 15 degree appliance adapter, with the corrugation inside the flue collar.

If it is then somebody made one three quarters black pipe and one quarter stainless.
 
Thanks for the responses all.

Begreen: There is normally a surround on this, which is why I was so slow in noticing the water leaking on this. I'd love to give you a picture of the chimney cap, but, my ladder isn't big enough and I'm actually a little scared to be up that high (maybe 25 feet in the air, see picture). In fact, the unusual chimney is a big part of the reason I paid to have a "professional" installation.

cMon: Masonry problem is possible, however, the previous owners did a fair amount of work on the chimney. Specifically, the chimney top (not sure what this is called) was repoured, they did some tuck pointing. Additionally, we had new flashing put all around the chimney. When the tech came out, he kept claiming that the problem was the where the chimney met the roof. However, he was never able to make it leak with the garden hose and eventually abandon this idea.

Brobart / Fossil: There seem to be two bolts along the side of the pipe. After reading some stuff on here, I actually brought up the issue of the "directionality" of the liner with the tech that came out. He claimed that it there wasn't any and that it didn't matter which way the liner was installed. I should, however, say that the guy who came out doesn't seem to do the actual stove installations.

Judging by your comments, it sounds like this install is jacked up. What do you think I ought to ask them to do to fix it? I don't have much faith that if I tell these guys their installation was wrong, they'll actually fix it in an appropriate manner.

Thanks again.
 

Attachments

  • phpI38xtyPM.jpg
    phpI38xtyPM.jpg
    146.2 KB · Views: 1,087
It actually isn't a question of direction with the liner itself, just the connector. The liner should fit inside the connector that then fits inside the stove collar so that anything that drips down goes into the stove, not on it.

And I agree. I would not climb a ladder to the top of that chimney either.
 
I think you are perfectly justified in being a bit slow to report this considering the surround was masking the real problem. That's why I asked. Do you have a zoom (telephoto) on your camera. The chimney looks in good shape, but that cap is odd.

PS: You seem to have done all the right stuff. I totally understand your hesitance to check out the topside of the chimney.
 
I have ten bucks that says that is a regular clay tile cap up there. If so the water is coming down around the liner since there wouldn't be a top plate around the top of the liner.

The sweep that did the caulk job should be able to tell you if there is a top plate up there.
 
Looking back at the chimney, it appears that the offset for a fireplace smoke shelf is on the right in that pic. So, is the liner in the right or the left flue in the chimney in the picture?
 
Looking again at the photo of the front of the house, I think this was taken before I got the insert put in. I'll take some pictures of the chimney and the collar tomorrow when my camera battery recharges. The answer your question about the liner, if your looking at the house it's running up the left hand side of the chimney. The right side, now disconnected and capped off, once ran to the furnace in the basement.
 
Wow. From the picture it does look like your exterior masonry and crown look great. It would be very interesting to see some better pictures up and inside the firebox at the bottom connection.
 
Okay, here's a few more pictures of where the elbow meets the collar and the chimney caps. I should point of that the metal cap on the right side of the chimney was new as of yesterday and installed without charge in an attempt to stop the water. Today it drizzled for a little bit. While I don't think anything leaked onto the stove I could definitely here water striking, what I assume, is the inside of the liner. Is this normal? I'm not confident that this latest "fix" will keep out heavy rain.

Again, any thoughts you have are appreciated. My thanks in advance.
 

Attachments

  • phpyRmSPjPM.jpg
    phpyRmSPjPM.jpg
    110.9 KB · Views: 856
  • phpqxDnaTPM.jpg
    phpqxDnaTPM.jpg
    107.1 KB · Views: 874
  • phpwPPopIPM.jpg
    phpwPPopIPM.jpg
    132.6 KB · Views: 856
  • phpJEYfuIPM.jpg
    phpJEYfuIPM.jpg
    44.2 KB · Views: 861
  • phpduysjoPM.jpg
    phpduysjoPM.jpg
    45.6 KB · Views: 865
  • phpQgLOWVPM.jpg
    phpQgLOWVPM.jpg
    48.3 KB · Views: 870
OK. With that pic I can see that it is a stainless elbow all the way and the liner is installed IN it like it should be so cmonStART has better eyes than me.

You will hear the rain hitting the cap. Keep an eye out for water on the outside of that liner to see if they finally got it right.

I still wonder what the bolt is all about and how the heck you get a brush through there to clean the thing.
 
I was wondering if they used the bolt to pull the liner. Not condoning this practice, just trying to figure out what they did.
 
BeGreen said:
I was wondering if they used the bolt to pull the liner. Not condoning this practice, just trying to figure out what they did.

Nah. It and the elbow coming down the chimney would have been a nightmare. They had to have installed the elbow last. The only thing I can think of from the pics is that they used it to keep the elbow from dropping farther into the stove collar. But it isn't far enough in there in the first place and screws would have done the job.

I just don't know. Well, I do know. They didn't want to reach back there and drill two more holes in the stove collar. They drilled the one in the front. I wish to hell that all manufacturers would just go ahead and drill those things at the factory.

Listening Englander? It is code to use the screws pretty much everywhere in the country. Drill the three holes!
 
BrotherBart said:
It is code to use the screws pretty much everywhere in the country. Drill the three holes!

AMEN!
 
I'm with Begreen on the bolt thing. I think they attached a line to the bolt and pulled the liner down, then had a little wiggle room with the adjustable elbow to get the angle of the dangle. I don't think the bolt will hurt anything during cleanings and may prevent a brush from damaging the baffle if they forget to remove it before hand.
 
my observation: dont see any staining along the sides of that liner or the angle piece- suggests to me that there probably isn't a weird male-male connection hidden anywhere (I'd expect to see some sort of soot stain). That bolt has a very rusty nut and washer, and everything below that is rusty...maybe water coming down liner, hitting bolt and riding along the bolt itself to the collar?
 
So the sense I'm getting is that, other than the bolts, the install seems okay. Assuming the leak has actually been stopped, it sounds like I should just refinish the top and leave well enough alone.

Delta: I've really been paying close attention to the leaking over the last few rainstorms and water is definitely dripping from somewhere above the bolts.

Thanks again everyone.
 
I am wondering if this could be a common problem of a storm collar up top not being properly sealed. And sometimes depending on how/where the collar is installed, hard rains could be splashing underneath the storm collar and running down the sides of the liner. You have 3 areas up there that can leak, other than the masonry itself. The cap, which is rare, the storm collar , and the plate.
 
Status
Not open for further replies.