
I have a double door Bullard stove in my basement. These don't seem to be as well known as Fisher or Timberline, but are of the same basic old school heavy duty construction. The existing baffle/smoke shelf is hollow, and has a blower attachment that blows air from the back of the stove through the baffle and out the sides into the room, something the other manufacturers did not do. I have the original owners manual if anyone would like a copy. After reading a lot on secondary air retrofits, I decided to try a home project to install secondaries in the ol' girl. The pictures will help explain the text below.
Part 1: Materials and Construction
First off, I have to thank my friend Woody, who performed most of the welding and fabrication on this project. I supplied the materials and design (and Labatt Blue), he supplied his wire-feed welder, grinders, and skill. It turned out to be a pretty good after-work project.
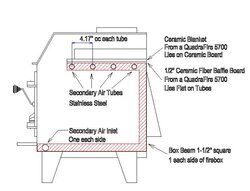
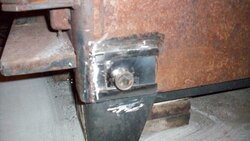
I used 1 1/2" square tube steel to form and weld the box beams on each side of the firebox; it's in a "C" shape if you were to look at the stove from the left side. Each end of the box beam has a cap welded on it. A 7/8" hole was drilled in each side of the stove and into the box beams near the bottom front of the firebox with a slider type mechanism on on the outside to control the amount of secondary air allowed into the boxbeam and the tubes. Holes were also drilled on the inside wall of the top box beam for secondary air tubing connection. The draft will pull the secondary combustion air through the exteriror hole into the front of the box beam, move it horizontally to the back of the stove, then vertically up the back wall, and then horizontally again where it enters the stainless tubes and spills out into the firebox. The surface of the box beam is exposed to the fire/coals/ash in the firebox for the entire length, superheating the secondary air before it exits through the tubing. The entrance hole at the bottom of the flow path does not allow smoke to come out when the doors are open for loading, as the smoke will not travel "downhill" through a path of greater resistance.
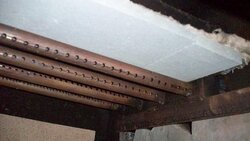
4 pieces of 3/4" stainless steel pipe was used for the secondary air tubes, the holes were sized and angled in accordance with the Englander 30-NC secondary air tube architecture (you can find this info on their website). These were tack welded onto the box beam on each side. They seem to fit tight enough in the box beam's drilled holes to prevent much air leakage around them. The holes were drilled 1/16" larger than the tubing.
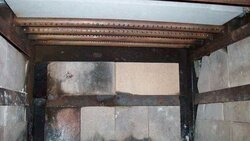
I purchased a baffle board for a Quadrafire 5700 and a piece of ceramic blanket from the local Quadrafire dealer, and fit them above the tubes. I reinstalled the existing firebrick, added some additional firebrick on the upper sides and upper back of the firebox for insulation to maintain the required box temps for secondary air ignition, and hooked the chimney connector back up.
Part 2: Firing
I started up the stove with the secondary air sliders closed and the door spinners (primary air) open. I burned down the first load of smaller starting wood and then put 6 splits on the coals, established a good fire with these, and let the stove surface temperature get up to about 550 degrees. There was a good amount of smoke coming out the chimney at this time. I then opened the secondary air sliders, fully shut the door spinners, then opened each door spinner 1 turn (this doesn't allow much air into the stove). I checked the secondary draft opening with a lit match, it sucked the match flame right out (apparently good draft was established)!
After 1 minute (or less), I looked at the chimney, NO VISIBLE SMOKE. I guess it works! The stove top climbed to over 700 deg, then settled back down to 650 deg. Two hours later, the stove top was still a solid 650 degrees, still no smoke. Six hours later the stove top temp had dropped somewhat, to just below 400, but there was still a pretty good amount of fuel left in the firebox. This scenario would not have played out like this prior to the retrofit.
The only thing is, as with most of these older units, it has solid cast doors and I cannot see what is happening, only via indicators from the chimney and the stove temp. I thought about making a new door opening and putting a big Blaze King glass door on it, but then I would have to come up with an all-new primary air inlet system. And air wash for the glass. Maybe next year...
Much thanks to this forum for all the topics and thoughts on secondary air, without it I probably wouldn't have attempted to build such a device. I'm very happy with the results and also with this superb site.
Part 1: Materials and Construction
First off, I have to thank my friend Woody, who performed most of the welding and fabrication on this project. I supplied the materials and design (and Labatt Blue), he supplied his wire-feed welder, grinders, and skill. It turned out to be a pretty good after-work project.
I used 1 1/2" square tube steel to form and weld the box beams on each side of the firebox; it's in a "C" shape if you were to look at the stove from the left side. Each end of the box beam has a cap welded on it. A 7/8" hole was drilled in each side of the stove and into the box beams near the bottom front of the firebox with a slider type mechanism on on the outside to control the amount of secondary air allowed into the boxbeam and the tubes. Holes were also drilled on the inside wall of the top box beam for secondary air tubing connection. The draft will pull the secondary combustion air through the exteriror hole into the front of the box beam, move it horizontally to the back of the stove, then vertically up the back wall, and then horizontally again where it enters the stainless tubes and spills out into the firebox. The surface of the box beam is exposed to the fire/coals/ash in the firebox for the entire length, superheating the secondary air before it exits through the tubing. The entrance hole at the bottom of the flow path does not allow smoke to come out when the doors are open for loading, as the smoke will not travel "downhill" through a path of greater resistance.
4 pieces of 3/4" stainless steel pipe was used for the secondary air tubes, the holes were sized and angled in accordance with the Englander 30-NC secondary air tube architecture (you can find this info on their website). These were tack welded onto the box beam on each side. They seem to fit tight enough in the box beam's drilled holes to prevent much air leakage around them. The holes were drilled 1/16" larger than the tubing.
I purchased a baffle board for a Quadrafire 5700 and a piece of ceramic blanket from the local Quadrafire dealer, and fit them above the tubes. I reinstalled the existing firebrick, added some additional firebrick on the upper sides and upper back of the firebox for insulation to maintain the required box temps for secondary air ignition, and hooked the chimney connector back up.
Part 2: Firing
I started up the stove with the secondary air sliders closed and the door spinners (primary air) open. I burned down the first load of smaller starting wood and then put 6 splits on the coals, established a good fire with these, and let the stove surface temperature get up to about 550 degrees. There was a good amount of smoke coming out the chimney at this time. I then opened the secondary air sliders, fully shut the door spinners, then opened each door spinner 1 turn (this doesn't allow much air into the stove). I checked the secondary draft opening with a lit match, it sucked the match flame right out (apparently good draft was established)!
After 1 minute (or less), I looked at the chimney, NO VISIBLE SMOKE. I guess it works! The stove top climbed to over 700 deg, then settled back down to 650 deg. Two hours later, the stove top was still a solid 650 degrees, still no smoke. Six hours later the stove top temp had dropped somewhat, to just below 400, but there was still a pretty good amount of fuel left in the firebox. This scenario would not have played out like this prior to the retrofit.
The only thing is, as with most of these older units, it has solid cast doors and I cannot see what is happening, only via indicators from the chimney and the stove temp. I thought about making a new door opening and putting a big Blaze King glass door on it, but then I would have to come up with an all-new primary air inlet system. And air wash for the glass. Maybe next year...
Much thanks to this forum for all the topics and thoughts on secondary air, without it I probably wouldn't have attempted to build such a device. I'm very happy with the results and also with this superb site.
 . It does this almost every time I use it, so it isn't a fluke one-time event. I know that seems like overfire, but the primary air is shut down almost completely and the stack key damper is shut. The secondaries ABSOLUTELY work (I just can't see 'em)! The 850 temp doesn't concern me, those old stoves were built extremely well with heavy, thick steel. Seems like the stack temp 2' above the collar is around 400 or so, but I don't specifically remember. This stove is installed in the garage and isn't used a whole lot. Straight chimney of about 16 -18 feet high.


