Snowey,
Let me see if I can describe my stove’s operation. I’m going to do my best (been working on it a couple of days) to get all the information you have asked for so please bear with me.
These are the controls: Main power switch, room air speed control, and pellet feed adjustment. There is also a red LED indicator light. I have also installed a remote wall mounted thermostat connected to the two control board thermostat terminals with standard thermostat control wire. That’s it.
The main power switch is mounted on the control board. When it is off, there is no power to anything in the stove. The pellet feed adjustment is also mounted on the control board that controls the time the auger motor runs and can be adjusted from low, 2, 4, 6, and hi, and anywhere in between (It is continuously variable, does not have “clicksâ€). As mentioned above there is also a red LED indicator. Here is a description of what happens when the feed control is set at the indicated points, but first some definitions:
(NOTE - all times are approximate, I did my best with a stop watch.)
• Fast blink-the LED is blinking so fast I can’t time it. A casual glance might leave the impression it is just dimly lit, but it is actually blinking very fast if you look closely.
• Slow blink- the LED is blinking on and off at about ½ second intervals. Much slower than the above fast blink
• On- the LED is on for aprox. 13 sec. continuously.
• Off- the LED is off for aprox. 13 sec. continuously.
• Idle mode- when the remote wall mounted thermostat is off or open and not calling for heat but the pellets are being fed just enough to keep the fire going or “keep fire†mode. A jumper is factory installed on the two thermostat terminals and replaced with the wire to the remote wall mounted thermostat if you decide to use one, which I did. If you just leave the jumper off the stove STAYS in “keep fire†mode.
So here is what happens at different settings of the pellet feed control:
-Setting = Lo: "Fast blink" LED and auger running = 3/4 second. "Slow blink" and auger not running = 36 seconds. Total cycle = 38 seconds, then the whole cycle repeats.
-Setting = 2: "Fast blink" LED and auger running = 2 seconds. "Slow blink" and auger not running = 36 seconds. Total cycle = 39 seconds, then the whole cycle repeats.
-Setting = 4: "Fast blink" LED and auger running = 4 seconds. "Slow blink" and auger not running = 36 seconds. Total cycle = 40 seconds, then the whole cycle repeats.
-Setting = Hi: "Fast blink" LED and auger running = 6 seconds. "Slow blink" and auger not running = 36 seconds. Total cycle = 43 seconds, then the whole cycle repeats.
-Idle mode (not on the feed control, just the t-stat is open): The wall mounted thermostat is open. This is pretty complicated so bear with me…. (In this mode the auger will always run for aprox. 5 seconds no matter when it begins to run.)
If you start the “Idle mode†cycle, the red LED "on" (the LED may be "on" or "off" when it starts) you will hear the auger begin the 5 second run. The LED will finish that 13 second "on" or "off" period and begin to "slow blink". There will now begin alternating 13 second cycles of "slow blink" (4 each) and "on" (4 each). There will only be "fast blink" of the LED if the auger runs for the 5 seconds during a "slow blink" 13 second period, however the auger may run for 5 seconds during "on" or "slow blink" periods. If the auger runs during the "slow blink", the LED will begin the "fast blink" until the auger stops the 5 second run, then back to the "slow blink".
There will be a total of 3 separate, 5 second runs of the auger during the 13 second cycles of "slow blink" (4 each) and "on" (4 each).
After the last run of the auger a period of alternating cycles between "off" and "on" modes begins. I counted 12 of these cycles at 13 seconds each. 12 x 13 = a total of aprox. 156 seconds. Then the whole process begins again as above where you hear the auger run again.
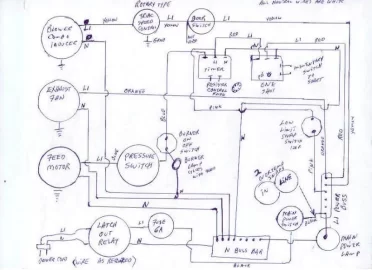
Note the manual also has info on what the LED and settings do and a WIRING DIAGRAM for the stove (not the control board). It is located on page 15 of the manual. The manual is for the FS-31 but uses the same board as my FS-3 and the stoves are virtually identical, just trim differences. This website:
http://api-assembled.com/support/martin/martin.htm has the manual that can be downloaded with one click. On the website scroll down about one page and the pdf file link is on the right side about half way down in blue. Click on it and when the pdf file is finished loading go to page 15. The wiring diagram is the bottom half of the page and worth more than many words I could type here. Please take a look at the diagram if you would.
It is a BOTTOM feed auger and has only one auger motor that is 6 RPM. It has 1 (one) over temp snap disk switch and no other snap disk switches what so ever. I note your diagram shows 2 high temp switches. There is no low temp switch on my stove.
It has a combustion air blower that is on all the time when the stove is on and there is no speed control for it.
There is a fan for room air circulation and a speed control for it mounted separately on the stove just above the control board. Here is the info for the speed control: KB Electronics (HK) LLC. Model KBMS-13 BVNS 3.0 amps FL 6.0 amps LR 120 volts AC
Power for both fans comes to them from the control board, but only the room air blower goes through the speed control. The two fans are 120 volts and 2.5 amps (room air blower) and 1 amp (combustion blower). Total about 3.5 amps.
(CONTINUED ON NEXT POST)


")
