Draft Modifications Revisited

  • Active since 1995, Hearth.com is THE place on the internet for free information and advice about wood stoves, pellet stoves and other energy saving equipment.

    We strive to provide opinions, articles, discussions and history related to Hearth Products and in a more general sense, energy issues.

    We promote the EFFICIENT, RESPONSIBLE, CLEAN and SAFE use of all fuels, whether renewable or fossil.
Status
Not open for further replies.
Reading the thread on Draft Modifications

https://www.hearth.com/econtent/index.php/forums/viewthread/88752/P0/

got me thinking again about my Buck Model 81. It always seemed that I didn't have enough control over the primary air. If the stove became too enthusiastic, I couldn't bring it under control. I also had to be sure it wasn't too wound-up before the overnight loading, otherwise it would overheat the house and die out too soon.
I got down on the floor and examined the intake controls. The problem was immediately obvious, the fit of the controls was very sloppy, leaving a large gap around the edge of the shut-off plates when fully closed. I fabricated some shims from an old hacksaw blade which took up the slop in the control linkage. It runs like a completely different stove! I now have no trouble controlling the burn and overnight burns are much easier. When I went out of town for a couple of days, Heidi noticed immediately how differently it behaved. Now the problem is finding the sweet spot on the adjustment, since you can't just close it all the way.

Know the equipment you depend on.
"Come to kindly terms with your ass, for it beareth you."
 
  • Like
Reactions: Swedishchef
You should share some pix of this if you can.
 
Thats exactly what happened to me! I couldn't believe the difference. Good job and I'll try and remeber to take some photos of my mod.
 
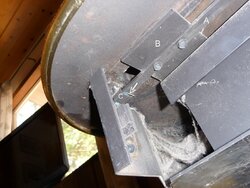
I managed to get a decent picture


A=actuating link
B=air control plate
C=link support bracket

The arrow points to the blue hacksaw blade shim, I installed one at each end of the link. The shims raise the entire assembly up against the bottom of the stove, closing the gaps.

Looks like I need to do a little cleaning. :red:
 
I can see how that would make a big diff! good job!
 
great idea on the shims, isn't it amazing what a little American ingenuity can do for ya? The real shame in all these little modifications is the fact that the manufacturer can't get it right to begin with. There's no reason that draft should have the slop in it from the factory. My Napoleon 1900, as well, had a draft issue for the 4 years I owned it. So after reading Napoleon Complex's post about the issues with his 1401 it got me thinking.......and I looked at my draft control and it wasn't even installed right! All kinds of slop. So I fixed the problem and it is running like a champ now! And it's amazing how much less wood I am using in that stove (easily a third less, maybe more). Congrats on your repair, keep us posted on the performance! I hope other Buck owners look at this post and determine if they may have the same issues with their stoves as well.
 
I will post this here as it pertains to the mfg and the same issue. I wanted to add pix but it is impossible to get them because my draft control is in the center bottom of the ash lip. I can't get good pix because I am working from a mirror but seeing exactly what MrWhoopee is seeing.

I had the same issue and it would go through alot more wood than I expected. Also the secondaries were great but could never just have a secondary burn with out alot of orange flames on the wood. Like MrW I could not get the air control to close all the way. And being an insert and it is really a pain to pull it out Igot my inspection mirror out and saw that when I thought the air was closed off. It i fact was about a quarter of an inch from completely closing off. The adjustment on mine is pretty simple: 2 tech screws and a bracket. I loosened them to pull the bracket down like a frog hair and bam! I get a crazy secondary light show and the burn times are a heck of alot longer! I keep checking the fire and smoke outside and all it has worked pretty darn well.

Thanx MrW!


MrWhoopee said:
I managed to get a decent picture


A=actuating link
B=air control plate
C=link support bracket

The arrow points to the blue hacksaw blade shim, I installed one at each end of the link. The shims raise the entire assembly up against the bottom of the stove, closing the gaps.

Looks like I need to do a little cleaning. :red:
 
I will post this here as it pertains to the mfg and the same issue. I wanted to add pix but it is impossible to get them because my draft control is in the center bottom of the ash lip. I can't get good pix because I am working from a mirror but seeing exactly what MrWhoopee is seeing.

I had the same issue and it would go through alot more wood than I expected. Also the secondaries were great but could never just have a secondary burn with out alot of orange flames on the wood. Like MrW I could not get the air control to close all the way. And being an insert and it is really a pain to pull it out Igot my inspection mirror out and saw that when I thought the air was closed off. It i fact was about a quarter of an inch from completely closing off. The adjustment on mine is pretty simple: 2 tech screws and a bracket. I loosened them to pull the bracket down like a frog hair and bam! I get a crazy secondary light show and the burn times are a heck of alot longer! I keep checking the fire and smoke outside and all it has worked pretty darn well.

Thanx MrW!

Hey, I just got a buck model 74. It's working great but i think i've been experiencing what you're talking about here. Do you have any more info on this? Any other operational tips on the buck 74? thanks!
 
Do you use it as an insert? The reason I adjusted mine was because I had pretty strong draft and just could not shut the air down enough. The main dog house air and secondary air are the same hole. If I remember correctly the slider covers the main Hole but leaves the opening open enough to make the secondaries work. I know terrible explanation but if you use a mirror and take the fan out(2 screws very simple) you will see for yourself. Once I saw what was happening I used a 5/16" spanner and loosed the screw(s) slid the cover a bit and done.

As for tips it's a very simple burn tube and baffle stove.
Obviously good dry wood CSS for 1 years for most species.
Get the fire raging then back it down in increments till the flames get lazy or slow until you are out of draft adjustment. From a cold start you I should be making real nice heat in about 30-40 mins if an insert on an outside wall.. If a stove I'd say much quicker!
If on a bed of coals, I usually get as hot as 650 no problem. And reload at 200-300 depending on demand. If I need 650 continuous to heat area quick I will reload at 450-500 but shut down waaaaaaaaaay quick cause the secondaries will go nuclear and that can be bad. I have had mine for 3+ years and it a very heavy duty simple heater. I think it's all 5/16" steal completely.....or maybe just the top......I know the top is will check the rest.

I hope that helps.
Thanks! Nice talking with someone with the exact same stove. Yeah I have it as an insert. I do not have a block off plate which i'm unsure how big of a difference that would make with putting off heat. It's been working good so far. I will have to take the cover off and check that out.

Do you burn wood facing front to back or sideways? They recommend front to back but 16in is short!
 
I managed to get a decent picture


A=actuating link
B=air control plate
C=link support bracket

The arrow points to the blue hacksaw blade shim, I installed one at each end of the link. The shims raise the entire assembly up against the bottom of the stove, closing the gaps.

Looks like I need to do a little cleaning. :red:

I'll re-post the picture since free Webshots went away.
2264799870052106007gbewQM_fs.jpg
 
Last edited by a moderator:
  • Like
Reactions: lbwalker
Front to back for heat then when wife is happy, east-west for longer burns. Definitely do the block off plate! Stuff some Roxul up there first and then hold it up with metal or do like I did. I stuffed Roxul up as much as I could, like two whole batts and then made a block of plate out of Roxul. Works like a charm and if you have outside wall fireplace and chimney it will definitely make a difference!
 
  • Like
Reactions: lbwalker
Status
Not open for further replies.