
Well, haven't had great luck with the door on my stove.... I had it installed on Wednesday and had noticed that the door wasn't sealing very tightly on the bottom. I noticed when the stove got hot and had a roaring fire, the air being introduced into the stove on the bottom would flare up. All this with the draft closed completely... I looked into the manual and it stated how sometimes the door needs to be adjusted from the factory so it seemed straight forward... Remove the latch on the stove and remove a small washer. Simple enough so I thought.... I took one of the three washers to adjust it in as small increments as possible. The door closed rather tightly after this and also still allowed air in the bottom. I looked at the gasket and it wasn't rolled and was in the correct location correctly adhered as well, so I just lit it up anyway to get some heat. I ended up getting the stove really hot to the point the secondaries were glowing and left the blower on high to cool things down a bit. We were home with it just slowly cooking much of the day. I had just some hot coals in the stove and closed things up before heading out for the night... I came home to a big split from top to bottom on the glass... It is definetly due to the way the door is closing as I haven't had this stove cooking very much at all. I'm hoping that Hampton does something about it... I'm going to see if I can get a replacement door as I'm not sure that this one is cast correctly... Has anyone every had any issues like this? I'm just curious also how square the hinges are.... They are welded on so there is no adjusting....
Hampton HI300 3 days old, broken glass
- Thread starter TTigano
- Start date
-
Active since 1995, Hearth.com is THE place on the internet for free information and advice about wood stoves, pellet stoves and other energy saving equipment.
We strive to provide opinions, articles, discussions and history related to Hearth Products and in a more general sense, energy issues.
We promote the EFFICIENT, RESPONSIBLE, CLEAN and SAFE use of all fuels, whether renewable or fossil.
You are using an out of date browser. It may not display this or other websites correctly.
You should upgrade or use an alternative browser.
You should upgrade or use an alternative browser.
- Status
- Not open for further replies.
danham
Burning Hunk
My very similar Regency i1200 insert was also allowing air around its door gasket. It was failing the dollar bill test in the lower left corner and barely passing in the top and bottom middle areas, which suggests to me a warped door or faulty gasket.
However, like yours, my gasket looks fine. So I moved two washers (one thin, one thicker) on the latch after trying just the thin one and the door closing feels much better now. But the tension on a dollar bill is still less at the lower left corner than elsewhere.
I haven't had a fire since the adjustment, but will definitely report if anything goes wrong (fingers crossed).
It seems odd to me that your latch would need adjustment so soon -- our insert was installed Dec. 6.
-dan
Backwoods Savage
Minister of Fire
I would think that Hampton would replace with no problem at all. Probably had something to do also with the glass being hot and then cooling. But it should not be a big problem. For sure double check everything once the new on is installed.
DanH said:My very similar Regency i1200 insert was also allowing air around its door gasket. It was failing the dollar bill test in the lower left corner and barely passing in the top and bottom middle areas, which suggests to me a warped door or faulty gasket.
However, like yours, my gasket looks fine. So I moved two washers (one thin, one thicker) on the latch after trying just the thin one and the door closing feels much better now. But the tension on a dollar bill is still less at the lower left corner than elsewhere.
I haven't had a fire since the adjustment, but will definitely report if anything goes wrong (fingers crossed).
It seems odd to me that your latch would need adjustment so soon -- our insert was installed Dec. 6.
-dan
Thanks for your reply Dan, I just can't see the door closing correctly with me removing washers.. I notice a metal binding feel in the handle as I close the latch. When I removed the washer, this feeling was alot worse.. I just put the washer back in and am going to call in the morning.
stejus
Minister of Fire
TTigano - Man, this really blows big time. I can't begin to determine what cracked that glass other than too much pressure (heat expansion then cooling). I haven't heard of any Hampton and or Regency owners report this happening. Sounds like a manufacturing defect to me. Right now it looks like you're in a position to check things out. I would remove the top surround piece by lifting straight up. Then take the top plate off by lifting it off. This will allow you to take a look at the top of the stove where you liner is connected. Look for warpage near the liner. Next shine a light in the area where the hot air exits. Look at the seams of the stove to be sure they look good. Also look for peeling paint in there. That would be an indicator that things got real hot. Let us know.
stejus said:TTigano - Man, this really blows big time. I can't begin to determine what cracked that glass other than too much pressure (heat expansion then cooling). I haven't heard of any Hampton and or Regancy owners report this happening. Sounds like a manufacturing defect to me. Right now it looks like your in a postion to check things out. I would remove the top surround peice by lifting straight up. Then take the top plate off by lifting it off. This will allow you to take a look at the top of the stove where you liner is connected. Look for warpage near the liner. Next shine a light in the area where the hot air exits. Look at the seams of the stove to be sure they look good. Also look for peeling paint in there. That would be an indicator that things got real hot. Let us know.
I will do that.... I did get the stove real hot yesterday but it only was for approx 3-4 mins... This all with the draft fully closed and blower on full blast. I haven't had luck being able to regulate the heat since I bought the stove due to the leak in the door. I hope they send me another door. Have you noticed a metal binding in the latch itself when you open and close the latch?
stejus
Minister of Fire
When you say metal binding, do you mean when you try to close the latch, you feel metal to metal grinding when you close the latch? When I close my latch, I get a nice "click" without a grinding sound. If you are getting a metal grinding sound, this may suggest you are too tight with the latch seating properly when closed.
How many washers did you take out? I do notice when the stove is up to temp, the latch is a lot more snug, meaning I need to apply more force to open or close the latch. I suspect this is due to expansion of the metal and cast around the latch.
How many washers did you take out? I do notice when the stove is up to temp, the latch is a lot more snug, meaning I need to apply more force to open or close the latch. I suspect this is due to expansion of the metal and cast around the latch.
stejus said:When you say metal binding, do you mean when you try to close the latch, you feel metal to metal grinding when you close the latch? When I close my latch, I get a nice "click" without a grinding sound. If you are getting a metal grinding sound, this may suggest you are too tight with the latch seating properly when closed.
How many washers did you take out? I do notice when the stove is up to temp, the latch is a lot more snug, meaning I need to apply more force to open or close the latch. I suspect this is due to expansion of the metal and cast around the latch.
Yes, when I close the latch... I get a grinding ad it closes then it clicks shut. I only took out one washer from top and one from the bottom... Even adjusted the height of the match so it wouldnt bind... No luck. Did you see the picture of the liner? Should that be like that and is it a problem?.. no signs of Leaking.
raybonz
Minister of Fire
I doubt expansion is the culprit as you can see from this info taken from online ceramic glass site..
"Strength and Durability
NeoCeram® can take the heat. Continuous temperatures up to 1470° F (700° C) can be withstood because this ceramic has an extremely low thermal coefficient of expansion. It doesn't run or swell at high temperatures the way normal glass does.
NeoCeram® can handle change. You wouldn't dare put snow or water on hot glass for fear that it would shatter or crack. Unlike glass, NeoCeram® can handle it."
Ray
stejus
Minister of Fire
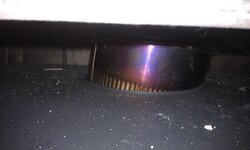
TTigano said:Here is a picture with the cast top off and trim plate. I noticed that the liner connection looks a little odd to me.... wouldn't you say?!
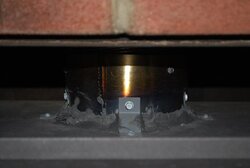
I really don't like the look of this. The installer did not connect the Flue Connect Bracket (pg 9 of manual) that came with your stove. Here's what it should look like. The problem with your install is the flex liner is just jambed in there without screws holding it in place. In my opinion, you run the risk of that popping out.
Attachments
I agree... I am going to have it looked at.. I know they needed to use a 45 to line up with the liner. Couldn't be a straight shot. I'm just very disapointed with everything so far... I can imagine if I sent a cleaning brush through that liner it could easily pop out.
I hate seeing this kind of carelessness. Don't they realize people's lives are depending on a totally safe installation? This should not happen. I can totally understand your concerns. What other shortcuts did the installer take? Did the dealer install the stove or was this installed by an independent contractor?
BeGreen said:I hate seeing this kind of carelessness. Don't they realize people's lives are depending on a totally safe installation? This should not happen. I can totally understand your concerns. What other shortcuts did the installer take? Did the dealer install the stove or was this installed by an independent contractor?
Long and short of it is.... Stove was installed by a contractor that comes recommended by the dealer. I work ad a truck driver for the dealer as we deliver unilock products and such. I got the stove at cost + shipping. I know they were having issues with making the connection and needed to use a 45. The fireplace opening doesn't allow for a lot of arm room. I am calling the installer in the morning to come by. This has yet to be inspected and I'm glad I caught this now. Are these slide in connectors even legit?
stejus
Minister of Fire
TTigano said:Long and short of it is.... Stove was installed by a contractor that comes recommended by the dealer. I work ad a truck driver for the dealer as we deliver unilock products and such. I got the stove at cost + shipping. I know they were having issues with making the connection and needed to use a 45. The fireplace opening doesn't allow for a lot of arm room. I am calling the installer in the morning to come by. This has yet to be inspected and I'm glad I caught this now. Are these slide in connectors even legit?
Did this stove come off a show room floor or was it in it's original package (created)? Look around for the Flue Connector Bracket and screws. The connector gets screwed onto the stove top (pre tapped) and then the liner gets screwed into the oonnector. Mine liner is off center a little, but it is connected properly by being screwed in properly. Your's can be done the same way and I would insist this gets done before inspection.
You may be getting extra draft from this as well because it may not be a tight seal.
stejus said:TTigano said:Here is a picture with the cast top off and trim plate. I noticed that the liner connection looks a little odd to me.... wouldn't you say?!
I really don't like the look of this. The installer did not connect the Flue Connect Bracket (pg 9 of manual) that came with your stove. Here's what it should look like. The problem with your install is the flex liner is just jambed in there without screws holding it in place. In my opinion, you run the risk of that popping out.
Agreed, they were supposed to use the "L" brackets and self-tapping screws to secure the flue to the stove.
I would be concerned about it pulling out when cleaning as well.
raybonz
Minister of Fire
stejus said:TTigano said:Long and short of it is.... Stove was installed by a contractor that comes recommended by the dealer. I work ad a truck driver for the dealer as we deliver unilock products and such. I got the stove at cost + shipping. I know they were having issues with making the connection and needed to use a 45. The fireplace opening doesn't allow for a lot of arm room. I am calling the installer in the morning to come by. This has yet to be inspected and I'm glad I caught this now. Are these slide in connectors even legit?
Did this stove come off a show room floor or was it in it's original package (created)? Look around for the Flue Connector Bracket and screws. The connector gets screwed onto the stove top (pre tapped) and then the liner gets screwed into the oonnector. Mine liner is off center a little, but it is connected properly by being screwed in properly. Your's can be done the same way and I would insist this gets done before inspection.
You may be getting extra draft from this as well because it may not be a tight seal.
You will get decreased draft if you have a leaking pipe joint.. Aside from that the connection looks poorly done to me..
Ray
stejus said:TTigano said:Here is a picture with the cast top off and trim plate. I noticed that the liner connection looks a little odd to me.... wouldn't you say?!
I really don't like the look of this. The installer did not connect the Flue Connect Bracket (pg 9 of manual) that came with your stove. Here's what it should look like. The problem with your install is the flex liner is just jambed in there without screws holding it in place. In my opinion, you run the risk of that popping out.
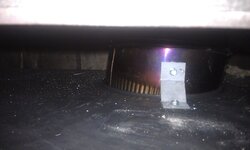
Can I ask why you cemented around the connection?.. installer came out today and looked at the connection and assured me it would not leak. He put 1 bracket and screwed it to the stove and the swivel 45 shown in the picture. Let me ask this question..... Is the swivel 45 that I have in my picture a correct and legit seal if positioned properly?. If I were to straighten it out and screw brackets to it and the stove, could I make that work? I know the fireplace opening was very tight which did not allow for much room to work but I'm willing to make it right myself in order to avoid disaster. I would appreciate your responses.
Also, as far as the door glass breaking... The sales rep for Regency contacted me today and said he will ship one right out to me (entire door). So I was at least happy with that.
stejus
Minister of Fire
TTigano said:Can I ask why you cemented around the connection?.. installer came out today and looked at the connection and assured me it would not leak. He put 1 bracket and screwed it to the stove and the swivel 45 shown in the picture. Let me ask this question..... Is the swivel 45 that I have in my picture a correct and legit seal if positioned properly?. If I were to straighten it out and screw brackets to it and the stove, could I make that work? I know the fireplace opening was very tight which did not allow for much room to work but I'm willing to make it right myself in order to avoid disaster. I would appreciate your responses.
The installer put rutland stove cement around the lip where the bracket connects to prevent any air leaks. He said it was not required but he likes to seal it up 100%.
It would be best to take a pic of what the installer did with the L bracket and screw so others can give feedback.
stejus said:TTigano said:Can I ask why you cemented around the connection?.. installer came out today and looked at the connection and assured me it would not leak. He put 1 bracket and screwed it to the stove and the swivel 45 shown in the picture. Let me ask this question..... Is the swivel 45 that I have in my picture a correct and legit seal if positioned properly?. If I were to straighten it out and screw brackets to it and the stove, could I make that work? I know the fireplace opening was very tight which did not allow for much room to work but I'm willing to make it right myself in order to avoid disaster. I would appreciate your responses.
The installer put rutland stove cement around the lip where the bracket connects to prevent any air leaks. He said it was not required but he likes to seal it up 100%.
It would be best to take a pic of what the installer did with the L bracket and screw so others can give feedback.
He said he does not like using these brackets as the swivel 45 can break by being held in place during cleaning. He put one bracket there to hold the 45 in. I just don't like having other people do things... I am sure it won't leak as it still had about an inch of pipe inside the colar but I would feel more comfortable if I at least straightened it and secured it that way.... Would I be causing harm if I later cemented around the connection?
Attachments
- Status
- Not open for further replies.
Similar threads
- Replies
- 2
- Views
- 382
- Replies
- 5
- Views
- 694
- Replies
- 8
- Views
- 909