Hearth update

  • Active since 1995, Hearth.com is THE place on the internet for free information and advice about wood stoves, pellet stoves and other energy saving equipment.

    We strive to provide opinions, articles, discussions and history related to Hearth Products and in a more general sense, energy issues.

    We promote the EFFICIENT, RESPONSIBLE, CLEAN and SAFE use of all fuels, whether renewable or fossil.
Status
Not open for further replies.

Snowy Rivers

Minister of Fire
Feb 7, 2010
1,810
NW Oregon
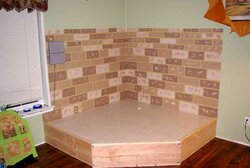
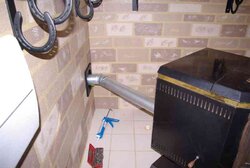
OK here it is folks, the real deal now and not a photshop mockup.

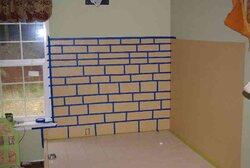
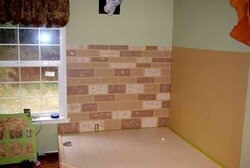
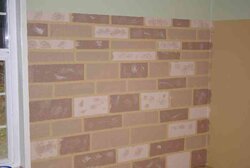
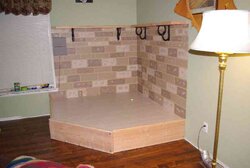
Got home a bit ago and went at the masking and sponge painting.

Got one side done. Will let that dry good so I dont get into it with an elbo or a shoulder when doing the other side.


Snowy
 

Attachments

  • masking done1.jpg
    masking done1.jpg
    21.2 KB · Views: 816
  • Stones painted1.jpg
    Stones painted1.jpg
    18.7 KB · Views: 814
  • Stones painted2.jpg
    Stones painted2.jpg
    13.6 KB · Views: 823
I am pleased so far.

Would really have liked to do the Stone look panels, but the cost was waaaaaaaaaaaay to much.

The paint trick is a simple way to add some Pizzaz to a corner hearth.

Snowy
 
That looks pretty cool. You definitely have some patience. Almost too pretty to cut a thimble hole in.
 
OK

Came home this eavening and put some serious whoopass on the last section of the Faux Rock wall.

Now its time to install the vent thimble through the wall and get ready to install the stove.

Need a little trim around the edges of the Faux rock to finish it up.

Looks like my goal of having the Advantage in within a week are gonna be close.

Here is a piccy of what was then and what is now.

Snowy
 

Attachments

  • WP50.jpg
    WP50.jpg
    18.8 KB · Views: 739
  • Finished rock.jpg
    Finished rock.jpg
    22.4 KB · Views: 753
UPDATE

Decided that the project needed a Mantel of some sort??? Shelf

Wanted something that looked western and was in the barn this morning cleaning horse stalls.

My eye fell on abucket of old horse shoes laying in the corner by the tack room.

HMMMMM headed off to the steel yard after breakfast and got some flat bar.

Headed down to the shop and cut and bent the bar and then welded in the old shoes to make some seriously rugged and quite western looking brackets.

A bit ot flat black paint and some holes to bolt the suckers to the wall.

Cut two pieces of 2X8 for the self, did a quicky run around with the router and Poof, shelf mantel or whatever ya want to call it.

It is my sincere hope that this project sparks ideas for others to follow or to see what can be done to make a pellet stove installation more than a very dull and rather boring thing.


Getting down to installing the vent thimble and the pipe and of course the stove now.

Snowy
 

Attachments

  • Mantel with horsie brackets.jpg
    Mantel with horsie brackets.jpg
    19.4 KB · Views: 701
  • Mantel2.jpg
    Mantel2.jpg
    16.7 KB · Views: 717
What's that gray box on the left side? Looks good like the idea you have there, nice to see people think outside of the box!
 
looks good snowy. now no one can say they have a shelf like that. i love ceative projects like this where people use their imagination and build things from scratch.. great job!
 
Definately unique for sure.

The gray box is (with your back to it) the LH rear speaker of the suround sound system for the home theater.

creative projects are sooooo much fun.

Sadly though, all I originally set out to do was to replace the old Earth stove with a Whitfield.

Looking forward to building the first fire in the Whitfield soon. :cheese:


Still have to remove the old vent stack from before. The current plan is to remove the pipe and then just block the thimble inside and out and ptobably hang a picture over the inside plate.

Never know when that thimble could come in handy.

Snowy
 
Ya dun good, Snowy!! Beautiful job. Love the mantle!!
 
Thanks for the Thumbs up :cheese:

Never been much into the interior decorating stuff but this oportunity just presented itself.

Maybe the piccy's and such can help someone else come up with an idea for their place.

With three stoves here I was just tired of the very dull looking installs with the stove sitting on a hearth pad in front of a plain painted wall.

Would like to do something with at least one of the other stoves to make things look better but for now this is the end of my indoor home improvement BINGE.

Got to wait for the wood I used to dry real good. Going to use a one step Urethane/stain material to finish things off.

The mantel still needs to be sanded and such but the wood is still a tad damp.

Getting materials from the depot at least the stuff is kept indoors.

I wanted to use rough cut lumber for the mantel but finding the stuff is tough and $$$$$$$$

So I settled for just regular 2X8

Great use for the old Horse shoes too. Been wondering what we were going to use them for.

We have 3 horses in the stable that get new shoes every so often once they get worn some.


Ahhhhh well and on it goes.


Next thing is to get the chimney thimble installed.

Tonight is Survivor night and we get together with friends to have dinner and watch the show.


Later troops

Snowy
 
Update Update Update

Friday the 5th of March

Good friend came over and we got the stove located on the new hearth.

If all goes well I may be able to try a fire by Sunday eavening.
Depends on other domestics.

Here are a couple piccy's


Snowy
 

Attachments

  • Stove in1.jpg
    Stove in1.jpg
    27 KB · Views: 570
  • stove in2.jpg
    stove in2.jpg
    30 KB · Views: 549
Awesome job, Snowy!!

Are you going to stain the wood around the base?
 
Thanks troops

Now i can get a real close locate on the pipe thimble.

Need to remove the old pipe but that can wait til the weather gets better.

Will leave the thimble in place and just cover it with a picture me thinks.

Plan is to stain tha wood using a single stage urethane once the wood is all dry.

Still too damp to take a chance quite yet..

I need to Urethane the grout lines in the tile too. Real soon on that stuff.

Just real happy with the overall look so far.

Snowy
 
GETTING CLOSE NOW

Got after it BIG TIME this morning about 7am

Got the thimble location pinned down and the hole cut in the sheet rock and the outer sideing.

Installed the inner thimble half and then did a trial fit on the pipe.
Sweeeeeeeeeeet, just a slight tweek on the stoves location and everything sits just fine.

Siliconed the quick disconnect to the exhaust outlet and then set the pipe assembly in the thimble.

Siliconed the appliance adapter (used on the pellet vent pro series pipe) to the quck disconnect.

I am going to let everything sit now for the day so the silicone can set up properly.

Just have to use some good all weather caulk on the outer thimble section to seal it to the house.

I want to place two screws in the appliance adapter just to make sure it can't wiggle on the quick disconnect.

Unfortunately there is little chance of getting any screws into the exhaust housing through from the quick connect.

I cleaned both parts real well with BrakeKleen so the silicone will stick like concrete there.

Very deep contact of about 1-1/2 inches.


The appliance adapter is not as deep so the screws will be a good idea.

Then the final assembly, tighten the nuts on the quick flange then silicone the thimble to pipe joints and its done.

Some final tid bits in a few weeks will finish the thing totally (stain the wood)


Weather man says Snow here by Monday, so it will be sort of a nice perk to be able to give the old girl her maiden flight in her new home.

Got to get ready for work now.


I open the shop at 11 am so need to get going.

Later

Snowy
 

Attachments

  • pipeinstall1.jpg
    pipeinstall1.jpg
    21.8 KB · Views: 465
  • pipeinstall2.jpg
    pipeinstall2.jpg
    17.7 KB · Views: 503
  • pipeinstall3.jpg
    pipeinstall3.jpg
    20.3 KB · Views: 463
Got home from the shop a tad early today and flew into the remainder of the final connection of the vent pipe.

Got the outside thimble all caulked. The appliance adapter got three little screw and some extra 500F temp silicone.

Assembled the entire vent and then siliconed the pipe into the outside thimble.

Even got the cool liitle vent twisted on too.

Going to wait until morning to silicone seal the inner thimble to the vent pipe so I dont wiggle the outer one and break the seal loose.

Anyway, with the bad weather a coming I will be ready by tomorrow to build a fire.

This afternoon when I got home it was 62F outside and 74F inside OMG, went and turned the Prodigy off until later this eavening.

When the house temp drops to about 68 give or take I will relight the fire for the eavening.

Need a setting lower than low I guess.

Later troops


Snowy
 
Thanks for the vote of confidence.

I decided esrly on to share this project, that others would find the entire process interesting and to show what can be done with a very boring corner of the family room/living room or ???

Even after seeing this (near completion) I am amazed at how much warmth and overall change it made to the whole room. Warmth--- No pun intended

For sure it has been a very fun project.

Just finished doing the silicone on the inside thimble where the pipe goes through.

By noon that will be cured well enough and a fire will likely get kindled to initiate the maiden voyage of our new little friend.

Still have some things to do to put the final touches on things though.

Maybe today I will head off to the hardware store and get the Urethane to finish the lower wood.

The Mantel pieces still need more time to dry real good.

Thanks to all that have looked at this thread over the last few weeks.


I do hope it has been interesting to others.

Snowy
 
Great job, Snowy!!


I know it will encourage others to use their imagination to do something different other than the plain wall behind their stoves! Gives me some ideas also!

Thank you for sharing this project!
 
You are welcome.

I have found over the many years of owning/using pellet stoves, that a great many folks buy pellet stoves to add a little ambience to the room.

There are those who just like the look of a fire buring in the stove for a few hours in the eavning or on a cold nasty day to help take the chill off, then there are those if us that are serious about these things.

Around here the Pellet stoves are an integral part of daily life. First thing in the morning (About 5:30am) its check the hopper, add nut shells and give the fire tray a quick scrapping with the long handled tool to clear the nights clinkers.

Before we leave for work, it's a quick check to be sure the hopper is full to the top.

Mid/late afternoon when I get in with the big rig its the same procedure, check the hopper, scrape the fire tray a tad and then off to the Gun shop to help with customers until closing time.

We use the Pellets stoves for 100% of our home heating needs, so they get plenty of attention.

With 3 in the house we can handle pretty much any weather situation that comes along.

Real cold weather will need at least two stoves running and if it REEEEEEEEEALLY gets nasty the Quad may kick on to take up any slack/

The Whitfield that this thread is about is far more efficient than the Old Earth Stove that was there.
The heat output on the Advantage 2T will make things far better me thinks.

The Old stove put out warm air but not HOT air.

Keeping the heat tubes clean on the Earth stove was near impossible without major shutdown and serious cleaning.

Another issue was the long turnaround time after a shut down, to be able to clean the thing and then get a fire back up and running.

The firebox in the old Earth stove was huge and basically worthless. The metal was very heavy and took a long time to heat up.

Most of the newer stoves are similar with only the front 8 inches or so of the stove being HOT

This fact makes the stove far more efficient heating wise as well as easier to clean.

The newer designs cool off quicker so you can get in and remove the ash and if need be vacuum the ash traps.

Having a REAL ash drawer/pan instead of having to get in with a small scoop and scrape the ash out is a real plus too.

BUTTTTTT the old shop vac makes quick work of the cleanout chores.

If I am doing a HOT clean (short shutdown) I will place some water in the shop vacs tank to take care of any left over embers.

I have an exhaust hose that I can stick out the window to keep any ash from coming into the room from the vacuum.


I guess I can make all sorts of excuses for the change over but I do think it will be for the better in the long haul, not to mention the esthetics. :cheese:

One last thought, having two Whitfields does make keeping spare parts a tad easier.

Unfortunately the only real interchangable part is the feed motor.

The Prodigy is a sort of Odd child compared to the others in the lineup.

The Old Advantage series was basically the same stove for many years.

Snowy
 
64" X 64" with the front sides being 40" to the point at which the corner is cut off.

The platform is about 11" high used 2x10 for the back two supports and 2x12 for the front edge to give a ledge.

2x6 joists across front to back on 8" centers to support the deck. 2 layers of OSB (7/16 each layer) then the tile over the non combustible cement.

I wanted it large enough that the stove could sit far enough from the wall to allow easy access for maintenance and or repairs without having to rip things apart.

Also leaves plenty of room for buckets of shells to burn too. :cheese:

Was a fun project for sure.

I want to do a wall treatment on the little Prodigy now. YESSSSSSSSSSSS fun never ends eh??

Maybe a gray rock look that gives the impression of a stone chimney /Hearth

Snowy
 
Thanks, is the "non-combustible" cement different than typical cement board used for tile jobs? If so, do you need to get this at a hearth store, haven't seen this at something like home depot or menards.
 
Status
Not open for further replies.