"I read your manual concerning floor protection. It confirms the R-2.5 with a stove having 6” legs and bottom heat shield. The stove with 4” leg options and no heat shield is R6.6
Couple of point about some of your purposed installations
Do not remove the main sub floor to the joist.. That plywood is sized to carry the floor load and weight. Cement board 1/4 or 1/2”
is not rated in the mid spands 16” on centering of joist, to carry and properly distribute the weight. The orriginal sub floor decking has to stay. The rug and pad should be removed and if there is a layer above the main sub flooring, that too can be removed.
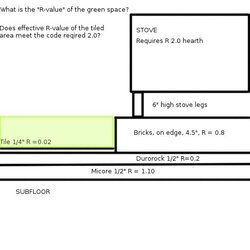
The instruction manual has done a very good job of explaining the required process of custom built pad ,including listing the r value properties of common materials,, for its construction. I would not use 1/4” cement board on the top layer it is not ridgid enough to be shifting the placement of a 400 lb stove, You run the risk of cracking it or breaking it even with it tiled. The .2R value of cement board is for 1/2” thickness. As for trying to make it flush with the rug, probably not going to happen. unless your rug has 2” pile.
Even with a bottom layer cement board two layers of micore and top layer cement board total R-2.6, tile in top, the finish product will be 2.25” thick from your sub floor. IF being flush is you biggest concern, You have one other option. Return the stove and buy another model or another manufacturer’s stove,that has the listed requirements for floor protection that will work.
Another note, floor protection is a tested process,, proven and becomes part of the stove installation and listing. This is the minium exceptable r-value. There is no penalty of exceeding the minium R-value.
Signature
Better Safe than Sorry "

") i guess the only things i can think of is possible a hearth fence (usually used with wee ones (kids)) or maybe installing some lighted strips around the edge of the hearth to light the way for wayward toes. other than that , im drawing a blank
i guess the only things i can think of is possible a hearth fence (usually used with wee ones (kids)) or maybe installing some lighted strips around the edge of the hearth to light the way for wayward toes. other than that , im drawing a blank