Hudson River WestPoint Burn Pot issues?

  • Active since 1995, Hearth.com is THE place on the internet for free information and advice about wood stoves, pellet stoves and other energy saving equipment.

    We strive to provide opinions, articles, discussions and history related to Hearth Products and in a more general sense, energy issues.

    We promote the EFFICIENT, RESPONSIBLE, CLEAN and SAFE use of all fuels, whether renewable or fossil.
Status
Not open for further replies.
Oh, Well I tried the $10.00 Damper just now and it works great!

You can really turn the intake air down to stop the popcorn effect so there are no more un-burned pellets popping out!

Works great on Lo now. Video below is running at Heat Level 3

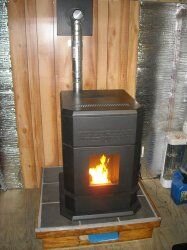
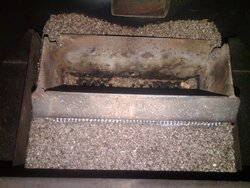
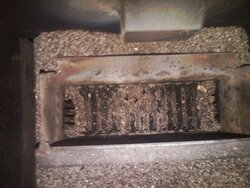
See video of stove Burning after air leak fixes with new updated modified burn pot with new gasket around burn pot and new air intake damper on back.


Attachments

  • Hudson River WestPoint Burn Pot issues?
    DSCN4289.JPG
    46.9 KB · Views: 200
Now what ya gonna do with that 3 bagger plus critter?

Well it is my shed warmer for now. Makes the shed into a Pellet Fired Sauna Bath!

After running it tonight for the test. It felt real cool outside and the outside temp is 83 Deg F ! ! !

I turned the stove off 2 hours ago and it is still 90 Deg F in the shed and 74 Deg F outside!
 

Attachments

  • Hudson River WestPoint Burn Pot issues?
    ShedSauna.jpg
    14.4 KB · Views: 182
Hello

Well it may be a good way to sell these darn things in the Summer!
Just picture this! Alot of people have sheds in their back yards, even close to their pools.

So at their next pool party be the Fancy and Envy of everyone on the block with a Pellet Fired Shed Sauna Bath! ! !

Shed + Vaporizer + Wood Pellet Stove = Shed Sauna Bath ! ! !

Why pay $4295 for a 3 person Sauna from A1 Chimney when you can by my 70K BTU wood pellet stove for $1595 and install it in your cedar shed!
Besides that Infrared Sauna is just a couple of heat lamps! My sauna has a nice honkin FIRE !
See.
http://newpelletstove.com/clearlight-three-person-cedar-sauna-p-16809.html
 

Attachments

  • Hudson River WestPoint Burn Pot issues?
    aShed.jpg
    57.5 KB · Views: 182
  • Hudson River WestPoint Burn Pot issues?
    AsPelletStove.jpg
    11.6 KB · Views: 205
  • Hudson River WestPoint Burn Pot issues?
    aShedSauna.jpg
    14.4 KB · Views: 193
  • Hudson River WestPoint Burn Pot issues?
    IMG02918-20120714-1856.jpg
    94.6 KB · Views: 187
Hello

Ok, So to show how the Burn Pot Fixes went, I took 2 pics of the ashes after a burn. Looking good. Only 1 partial un-burned pellet!

Here is a list of all the fixes!
1. Upgraded Burn Pot without the crisscross bars on the bottom so more air goes thru the pot!
2. New Gasket around the outside of the burn pot above the cradle lip.
No air goes around the burn pot anymore
3. New Air Damper on 3" Air Intake tube on back.
Now I can limit the air and stop the popcorn effect that leaves unburned pellets around the pot.
4. Back edge of burn pot is bent back at a 45 Deg angle.
This way no pellets fall behind the burn pot!
5. Cleaned Ash traps and Cut Gaskets from 1/8" thick High temp Orange Silicon Re-usable rubber! Durometer = 70A on the hardness scale.
Orange Hi Temp Silicon Rubber available from Amazon here. Nice and thick so it will last a long time!
http://www.amazon.com/dp/B005JFRB7Q/ref=biss_dp_t_asn
Also see ah trap pics > https://www.hearth.com/talk/threads...-traps-how-often-do-they-need-cleaning.88067/
The stove is burning like never before! Perfectly!
 

Attachments

  • Hudson River WestPoint Burn Pot issues?
    BurnAfterFix (1).jpg
    203.6 KB · Views: 276
  • Hudson River WestPoint Burn Pot issues?
    BurnAfterFix (2).jpg
    147.4 KB · Views: 243
I want to thank Don and Smokey for the help you have given me on this thread. I'm helping a widow lady with a westpoint and after posting problems and getting replies and reading this thread I think I have her stove working like it should. I added a little improvement to the gasket around the burn pot trick. Cut a piece of 1/4 inch rope gasket to the circumference of the pot plus about a 1/2 inch. Get a piece of 16 or 18 gauge stainless wire about 24 inches long and thread the wire up the middle of the rope. Once threaded space the rope evenly and to the length needed to go around the pot. Make the wire as straight as possible and bend it around the pot. Twist the wire together in the middle of the back and tighten as tight as possible with a pair of nippers. When done the gasket will stay on the burnpot nicely and allow it's removal with out coming off. It also seals nicely.
Ron
 
  • Like
Reactions: IHATEPROPANE
Status
Not open for further replies.