Install help

  • Active since 1995, Hearth.com is THE place on the internet for free information and advice about wood stoves, pellet stoves and other energy saving equipment.

    We strive to provide opinions, articles, discussions and history related to Hearth Products and in a more general sense, energy issues.

    We promote the EFFICIENT, RESPONSIBLE, CLEAN and SAFE use of all fuels, whether renewable or fossil.
Status
Not open for further replies.

SLOOC1

Member
Jan 7, 2008
32
MA-VT-RI
I've been attempting to install a wood burning insert for a few weeks now. The stove is a Sierra 4700TE. I got the stove for free & it has only been burned a few times. I have a number of issues that I'm dealing with mainly because the stove is used and the stove company has basically no customer service. If I go with a full chimney reline I will need a 6" minimum liner for my insert. The problem I have with that is my terra cotta chimney liner is 8x12 OD. With an ID of approx. 6.5" x 10.5". I already purchased a 6" stainless M Flex chimney liner kit. I really don't want to find out the hard way that the liner won't fit & I can't get my money back. Does anyone here have any recommendations for attempting to install a 6" liner into a an 8 x 12 liner? I guess my other option would be to go with oval but I really don't want to do that. Method #1 according to the stove manual is to run a section of flexible or rigid pipe from the insert up into the first section of tile liner and terminate. Method 1 would be an easy install. From what I have read on this site that should be my last option for a number of reasons.

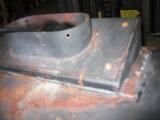
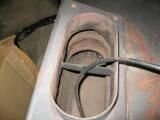
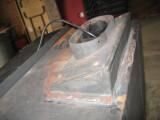
The stove has an aftermarket exhaust collar on it that is an odd size the inside diameter is 7.44". The manual states the flue collar will take an industry standard 8" oval pipe. It doesn't! I believe that the previous owner had the 8" swapped for a 7" for some reason. I bought a standard 8" oval to 6" round adapter & the 8" oval portion comes closer to fitting around the outside of the collar than the inside. Once again the manual does state that 6" pipe can be used as a chimney liner. To simplify this whole situation I was thinking of going to my local steel shop and having then make up another plate identical to the other one with one exception it would have a 6" round flue collar instead of the oval. My local steel guy said he could make that up no problem. So if I could swap the oval piece out for the round it would make the whole connection process a lot easier. What would be the down side of swapping that oval piece with a round?

Thanks for any help
 
Thanks for the help BrotherBart!! I wish I could figure out how to post pics on this site. I could show you what I'm dealing with. So far you are the only one I have found that knows anything about Sierra stoves!
 
What sort of problems are you having posting pictures? Have you read the instructions on the top sticky notes in the Pictures forum? If you need help, just give a shout. If all else fails you can attach them in a PM or email to me.
 
Please see the attached pictures. The insert actually has two separate pieces screwed to the top. What I was going to do was replace the top piece with a 6" round version. The top piece on the stove is a 7" oval that is bolted to another frame with a larger oval opening. What is the purpose of the oval attachments on top of this insert? Seems to really complicate things!

Thanks again for the wealth of knowledge on this site!
 

Attachments

  • METER 008.jpg
    METER 008.jpg
    3.6 KB · Views: 355
  • METER 007.jpg
    METER 007.jpg
    3.8 KB · Views: 347
  • METER 009.jpg
    METER 009.jpg
    3.7 KB · Views: 357
BeGreen thanks for the help with posting pictures. I went to the picture forum and found everything I needed! Now back to figuring out how this install is going to work.


Thanks again
 
The reason I am the only one that knows about those stoves is that I am the only one as antique as that stove is. What you have there is an old late '70s to early '80s stove. Under that add-on boot is that "industry standard" flue collar. When that stove was built liners and stuff like that just weren't available or in common usage. Inserts were either just slid into the fireplace and allowed to blast the exhaust through the damper frame into the smoke chamber or they were direct connected using oval pipe that would fit through the damper frame and extended up into the flue tiles a little ways. Nobody would dream back then of cutting the damper frame out of a fireplace. So the guy that had this boat anchor bought a direct connect kit from somewhere and it came with that adapter and the short piece of pipe that extended through the damper frame up into the flue.

If you insist on trying to install that dog take that adapter off the top and see if that oval piece you bought fits into the original flue collar on the stove. Then fill the holes in the top with stainless steel bolts. Personally I think you need to junk the whole thing and run down to some big box store and get a new stove that will heat better, be safer and not skunk up the neighborhood with smoke.

I hooked a liner to my old Sierra insert and the two times it was fired up after the installation it ran away out of control and went up over 1,200 degrees. It then went the hell out of my house after 21 years of loyal service. Those stoves and their controls were never designed to experience the kind of strong draft you get with a tall liner.

Lose that stove. Sell it for scrap, it weighs a lot because of the thick steel, and put the money into a decent stove.
 
BrotherBart thanks again for the help. The stove actually has a catylytic combuster sierra model # 4700TE with a manufacture date of 11/1997. Believe it or not the insert was bought new in 2001 and was only used a few times. The insert does have dual blowers and has the combuster. I figured that for free the stove might have some potential. But from your last post maybe I'm wasting my time.


Thanks again
 
The stove manual lists a minimum 36" sq. in. flue. 6" round is about 28 sq in. Seems like a lot of effort to install this beast only to find out it may not draft correctly.
 
BeGreen...yes the manual does state a chimney size of 36 sq inches minimum. My clay liner is a standard 8"x 12" which is 96 sq inches. If you read further the manual does state that method 2 allows for 6" stainless round or rigid. I appreciate any and all input this has been a real learning experience for me. Somedays I wonder if all of this is worth the hassle. When I finally get the insert in it might not even work properly! Once again thanks for the help.
 
Yes, you are correct, I should have kept reading. It looks like Bart has given you some good options with the 6" adapter boot. Looks like you are ready to install. Good luck!

PS: I agree that oval boots are a PITA. Some VC stoves have them too.
 
Status
Not open for further replies.