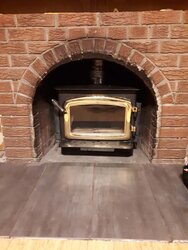
To keep it short the liner is attached to my insert. But to reach the connection i had to recesse my insert (regency i1100s) and this is not optimal because I cannot open my vents over about 1/4 open.......
My first solution was to remove bricks in front of the liner but I cannot remove these bricks in front of the liner because they are structural.
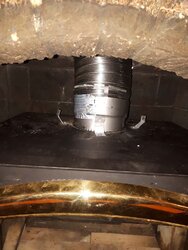
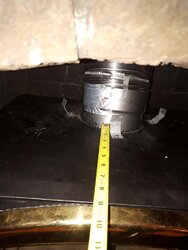
My second solution was to attach single walled elbows from the flue connection towards the back of the fireplace.....but I can't use elbows off the flue connector because I don't have enough room inside the masonry fireplace.
My third solution is to bring some parts and some measurements to a fabrication shop and fabricate an offset flue adapter. This is just very costly and out of my budget for the rest of the year.....
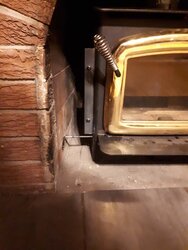
My last option is to bring in a masonry guy to work on the bottom left of my fireplace to allow my vent handle to slide 100% open....again it's a budget thing....
Now my questions for you all.
What do you think is a possible solution, you may have a different idea I didn't think of.
And for experience wood burners. Is it reasonable for me to think I can start a burn with the door partially open to allow for full airflow....i would just close the handle slightly so it would leave a small opening along the edge if the door. Less that 1/4". Then after 10 minutes of burning with a partially open door....i close the door and burn with my vents being almost completely closed. About 3/4 way closed.
My first solution was to remove bricks in front of the liner but I cannot remove these bricks in front of the liner because they are structural.
My second solution was to attach single walled elbows from the flue connection towards the back of the fireplace.....but I can't use elbows off the flue connector because I don't have enough room inside the masonry fireplace.
My third solution is to bring some parts and some measurements to a fabrication shop and fabricate an offset flue adapter. This is just very costly and out of my budget for the rest of the year.....
My last option is to bring in a masonry guy to work on the bottom left of my fireplace to allow my vent handle to slide 100% open....again it's a budget thing....
Now my questions for you all.
What do you think is a possible solution, you may have a different idea I didn't think of.
And for experience wood burners. Is it reasonable for me to think I can start a burn with the door partially open to allow for full airflow....i would just close the handle slightly so it would leave a small opening along the edge if the door. Less that 1/4". Then after 10 minutes of burning with a partially open door....i close the door and burn with my vents being almost completely closed. About 3/4 way closed.