
just got my 6” flexible liner delivered today and just about ready to get on the roof to start feeding it down the chimney. Any tips would be great to help me get through the installation process would be greatly appreciated.
Liner installation
- Thread starter Mercurydollar
- Start date
-
Active since 1995, Hearth.com is THE place on the internet for free information and advice about wood stoves, pellet stoves and other energy saving equipment.
We strive to provide opinions, articles, discussions and history related to Hearth Products and in a more general sense, energy issues.
We promote the EFFICIENT, RESPONSIBLE, CLEAN and SAFE use of all fuels, whether renewable or fossil.
You are using an out of date browser. It may not display this or other websites correctly.
You should upgrade or use an alternative browser.
You should upgrade or use an alternative browser.
I'm no expert here, but I just had a professional company install a liner in my chimney and I watched carefully to see what they did. First they swept the chimney, then they dropped a few "test bombs" down, to make sure the liner would fit. The "test bombs" were foot long pieces of liner, which I think were weighted. They had hooks on the top and bottom to which they attached ropes and had someone who was pulling up from the top of the chimney and down from the bottom of the chimney. This helped them to both see if the liner would fit and to knock off some of the mortar snots. In this process, they discovered a lot of mortars snots, and then had to get some long pipes with a chisel on the end to knock off more of the snots. The whole time during this process they had my fireplace opening covered with a heavy cloth tarp and an industrial vacuum running under the tarp the whole time to catch the debris. It was a good thing they did this as there was plenty of debris. My chimney opening was pretty tight and I had a 30 foot liner - your situation might not be as challenging, but these first steps were certainly necessary. You could make a test bomb using a paint can, or something like that. Note that at a couple points their test bombs got pretty stuck so it was a good thing that they had it secured very tightly to the heavy duty rope because it required a lot of push and pull to get it unstuck. Good luck, and above all be safe!
Need to know which direction it goes in or if it actually matters the direction of the way the corrugation is
Clean it properly make sure it is insulated. If it is directional make sure it is rightside up attach any fittings you need on the bottom then try feeding it in.just got my 6” flexible liner delivered today and just about ready to get on the roof to start feeding it down the chimney. Any tips would be great to help me get through the installation process would be greatly appreciated.
It does not have any arrows marking the direction in which way is which. Chimney was cleaned and inspected yesterday. Good and clean and structurally in great condition. My worrry is putting in upside down and creating more work for myself.Clean it properly make sure it is insulated. If it is directional make sure it is rightside up attach any fittings you need on the bottom then try feeding it in.
What type of liner is it?It does not have any arrows marking the direction in which way is which. Chimney was cleaned and inspected yesterday. Good and clean and structurally in great condition. My worrry is putting in upside down and creating more work for myself.
What type of liner is it?
Attachments

Is it corregated on the inside like the outside.
Attachments
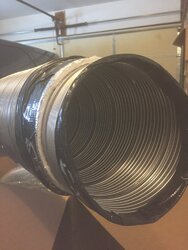
It is non directionalHope you can tell by that pic

Thanks. That’s a big weight off me. How can you tell?It is non directional
Because that is olympia forever flex liner inside which is nondirectional.Thanks. That’s a big weight off me. How can you tell?
black smoke signals
Feeling the Heat
Interesting thread! Does the smoke ccw or clockwise travel inside the liner effect the draft? Does water play a role here Just wondering.
Depends if you are in New England or Australia.Interesting thread! Does the smoke ccw or clockwise travel inside the liner effect the draft? Does water play a role here Just wondering.
")
Easy Livin’ 3000
Minister of Fire
When you need to cut it to length, use an angle grinder with a cut-off wheel. Cuts like a knife through warm butter. Forget the tin snips.
We put something in the appliance connector and duct taped it in. We attached a rope to the end, and one pulled from the bottom while the other fed from the top.
Your voice travels through the liner, so communication is easy.
Don't fall off the roof.
We put something in the appliance connector and duct taped it in. We attached a rope to the end, and one pulled from the bottom while the other fed from the top.
Your voice travels through the liner, so communication is easy.
Don't fall off the roof.
I put a liner in at the beginning of the month. Insulate it, use gloves, install an insulated block-off plate (link is here somewhere).
To attach a rope I cut a section of HVAC metal strap and secured it to both sides. Had a hole in the center that I ran the rope through. I had an offset at the bottom. We had to twist, pull, push, cuss... To get the liner in far enough to cut the end off and attach the appliance connector.
Careful ! Roof is dangerous and the metal is sharp.
Sent from my SAMSUNG-SM-G891A using Tapatalk
To attach a rope I cut a section of HVAC metal strap and secured it to both sides. Had a hole in the center that I ran the rope through. I had an offset at the bottom. We had to twist, pull, push, cuss... To get the liner in far enough to cut the end off and attach the appliance connector.
Careful
! Roof is dangerous and the metal is sharp. Sent from my SAMSUNG-SM-G891A using Tapatalk
Mark8
Member
Helpful Fire place links:
Inspect your fireplace chimney before installing insert:
https://www.hearth.com/talk/wiki/inspect-your-chimney-before-installing-insert/
Installing a chimney liner:
https://www.hearth.com/talk/wiki/do-you-need-a-chimney-liner/
Make a block off plate:
https://www.hearth.com/talk/wiki/make-a-damper-sealing-block-off-plate/
Masonary fireplace is not up to code:
https://www.hearth.com/talk/wiki/masonry-firepaces-not-up-to-code/
CSIA:
http://www.csia.org/chimney_liners....MIj470iYDZ2AIVjf5kCh2vcw69EAAYASAAEgL4t_D_BwE
Similar threads
- Replies
- 19
- Views
- 1K
- Replies
- 4
- Views
- 1K
- Replies
- 25
- Views
- 2K
- Replies
- 3
- Views
- 1K