Works like a charm. I highly recommend going the cheap cartridge heater route. Tempco replied to me stating:
The selected unit is not generally used in Pellet Stoves although it is the approx. size and wattage of a common design. We use different materials and terminations for them. That said your best bet for low volume wire & connector purchases is McMaster Carr.
I think this was a CYA situation. I installed it without the ring around it for now and have done this with replacement igniters in the past. I have not had a problem, but I am not guaranteeing the safety. (The heater only comes on for a few minutes when the pellets need to be lit). I am working on making a ring from a 3/8" bolt. I am rounding off the edges and filing it down with my angle grinder. It takes a while, because I have a battery operated angle grinder that eats the batteries in 5 minutes and then takes quite a while to recharge. (Ryobi should not have offerered this tool. I knew that it would eat batteries, but its convenient to take out to my lawn tractor for blade sharpening).
Here is information on all the parts that I used:
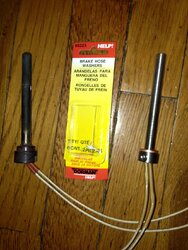
TEMPCO Cartridge Heater, 120V, 250 W, 61 W/Sq.-In
Grainger Item # 4NJF9 Mfr. Model # HDC00279
http://www.grainger.com/Grainger/TEMPCO-Cartridge-Heater-4NJF9
#18 High Temperature TGGT APPLIANCE WIRE Price per 10ft
http://www.ebay.com/itm/280669306371?ssPageName=STRK:MEWAX:IT&_trksid=p3984.m1438.l2649
SMALL CERAMIC WIRE NUTS HIGH TEMPERATURE PACK OF 10
http://www.ebay.com/itm/270736926787?ssPageName=STRK:MEWAX:IT&_trksid=p3984.m1438.l2649
IDEAL 12-Pack 22-18 AWG Disconnect Pairs
http://www.lowes.com/pd_136010-1270...L;=/pl__0__s?Ntt=ideal+disconnect&facetInfo;= (You can find them anywhere).
The ebay items probably won't be at those links for long. If the images don't show, they aren't. But, you will probably be able to find them by the item name that I listed.
Start by shutting the power off and unplugging the stove. I unscrewed the "panel" that hides the cartridge heater and took off the top and right panels of the stove. I removed the old cartridge heater, you can follow the wires to their disconnect terminals on the right side of the stove. They travel through a tube next to the fire box. (You may have to remove a rubber gasket to get the disconnect terminals through). It does not matter which wire reconnects to which, so don't worry about it. I placed the new cartridge heater where it goes. I then cut the leads so that they just reached the opening to the tube that is to the right of the firebox and leads towards the back of the stove. I cut the TGGT wire into two 18" lengths and stripped the ends. I ran the wire through the "tube". I connected the cartridge heater leads to the TGGT wire with the ceramic caps. I connected male disconnect terminals to the other sides of the TGGT wire. (I found that I actually had to cut one of the female disconnect terminals from the wires that lead to the control board and attach a new one, because the new male terminal didn't fit). You have to crimp the terminals in place with the crimping part of your wire cutter or crush it really well with some needle nose pliers. Now before I closed everything up, I made sure that the cartridge heater was lying where it was supposed to inside the stove and cleared all the parts (grate weldment) that I remove to clean the grate area so that the heater would not be damaged when I do this. After I closed up the stove, I checked the clearance again and everytime I clean the stove, I do this. Then I ran the stove. It lit right up and worked on several other tries.
I know I went into a lot of detail, but if you haven't done much electrical work, all the details may help you if you are unsure of yourself. Once you get into it, you will see how easy it is.
Here is the link to the St. Croix Service & Trouble Shooting Guide:
http://www.eventempinc.com/stcroix/downloads/dig1/Digital_Control_Board_Service_Manual-Pellet.pdf
Thats the manual you actually need that did not come with your St. Croix stove. It can't be posted enough.