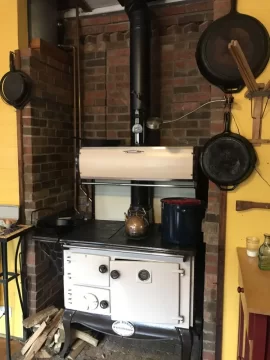
looking for advice to rebuild a waterford Wood stanley cookstove

  • Active since 1995, Hearth.com is THE place on the internet for free information and advice about wood stoves, pellet stoves and other energy saving equipment.

    We strive to provide opinions, articles, discussions and history related to Hearth Products and in a more general sense, energy issues.

    We promote the EFFICIENT, RESPONSIBLE, CLEAN and SAFE use of all fuels, whether renewable or fossil.

ray milosh

Member
Nov 30, 2012
20
I have heated and cooked with a 1993 Waterford Wood Stanley Cookstove for 16 years. It is time to disassemble it and remortar it, as it is getting harder to control the air to the firebox.

I haven't found any how-to's or any good blow up diagrams. Specifically, there are flat topped flush mounted quarter size circular caps on the corners of the top that must conceal bolt heads. I presume they are step one and I can't get them to come off...

Please let me know if you have any information.

thanks

Ray
 
Well, it's almost done.
17 hours so far.
remove doors, bottom grate, eyes, griddle, chimney, oven racks, etc.
I put old bed sheets on the floor, plywood over that, all to protect the hardwood floors from damage. I put plywood on the bottom of the stove and lifted it with a rolling floorjack and rolled it to the middle of the room. Remove side shelf and brackets. remove warming oven, backsplash and brackets. The bolts on the base of the brackets were stuck. I used a chisel, vice grips. impact, penetrating oil, an impact driver, a #3 phillips and patience to turn them out. Remove water jacket pipes. Remove rear insulated lower panel. Remove outer side covers, inner side covers and insulation. Remove water jacket, front upper and lower firebox shields and insulation. Remove side firebox shields. Turn out four corner spindles with penetrating oil and vice grips. the four caps on the corners of the stove top are threaded at the bottom and theoretically can be turned out, revealing a large cone shaped screw. I was not able to remove the caps, so I just turned out the spindles. Remove top of stove. Remove the exterior sheet metal cover and insulation from the back right. I didn't find it necessary to disassemble it any more than that.
Vacuum and wire brush off, chisel out loose mortar everywhere. Like Everywhere. I used a flashlight to look for air gaps. There were many of them. Especially between the left side and the top and the left side and the front side and along the interior plates of the oven.

Clean and paint things if you wish. I painted the warming oven sheet metal and the backsplash.

Mortar all interior spaces you can find but not the top, yet. Replace the top and check for fit. Figure out where to put mortar on the underside of the top. It took me a long time to figure it out. It's complicated. I used a tool to scribe the underside of the top while it was dry fit. I also carefully gasketed the bypass door, as its fit left many gaps. I removed and replaced the top several times so I could ensure that I could get it well seated. It hangs up in many places and requires practice to get it right.

I ran a bead of mortar on top of the stove and on the underside of the top and reassembled it and tightened the four corner bolts. After fitting the top, I ran mortar around the seam one more time, filling any gaps left over.
I used a total of 5 tubes of fireplace mortar. I used buff colored, as it is easier to see gaps.

I have a damper in the chimney. Historically, if it is fully closed the stove smokes. That's why I rebuilt it. It has always smoked from the reft rear of the griddle. I solved it by stuffing fiberglas insulation up from underneath.

On replacing the water jacket, I put fibergls insulation behind it and around the pipes to prevent it from leaking air.
 

Attachments

  • IMG_2311[1].JPG
    IMG_2311[1].JPG
    67.6 KB · Views: 384
  • IMG_2316[1].JPG
    IMG_2316[1].JPG
    73.4 KB · Views: 371
  • IMG_2325[1].JPG
    IMG_2325[1].JPG
    130.3 KB · Views: 397
  • IMG_2326[1].JPG
    IMG_2326[1].JPG
    136 KB · Views: 404
  • IMG_2331[1].JPG
    IMG_2331[1].JPG
    113.8 KB · Views: 386
What is being used for stove cement?
 
Is fiberglass safe for use in this application? Perhaps mineral or ceramic wool would be better.
 
I used imperial brand stove and fireplace mortar. If the fiberglass doesn’t last, I have rockwool. Would that be better?
Also, here’s a list of the tools and materials that I wound up using: adjustable wrenches, Number two and three Phillips, regular screwdriver, a standard (not metric) socket and wrench set, scrapers, dental picks, A rubber hammer, a 3 pound sledge, vice grips, an impact driver, chisels, Scissors and fiberglass insulation, fine and coarse steel wool, anti-seize, three eights inch stove Gasket and glue, Flat adhesive backed quarter inch wide stove gasket to seal the bypass damper door, high heat paint, stove mortar, easy off oven cleaner, paper towels and rags, stove black, large and small wire brushes and Penetrating oil.
I put the stove back in service two days ago. It is a whole different animal. Last night I filled the firebox and backed it down. Eight hours later, there were still coals in the stove, top was almost too hot to touch. it heats up way way faster than it ever has And I can load wood in the fire box without it smoking in the house even with the bypass damper closed.
Helpful hint: I use a stock pot to humidify the house. Hanging a towel in the pot Evaporates water about four times faster.

image.jpg