New (to me) Woodstock Soapstone Keystone

  • Active since 1995, Hearth.com is THE place on the internet for free information and advice about wood stoves, pellet stoves and other energy saving equipment.

    We strive to provide opinions, articles, discussions and history related to Hearth Products and in a more general sense, energy issues.

    We promote the EFFICIENT, RESPONSIBLE, CLEAN and SAFE use of all fuels, whether renewable or fossil.

mmcc

Member
Dec 12, 2016
67
Northeast Ohio
In another thread, it was mentioned that pictures of my recent acquisition may be appreciated.

So here it is.. a Woodstock Soapstone Keystone manufactured way back in February of 1995.

It seems to be in good shape. There's a bit of rust, some scratches in the stone, and a whole lot of black gunk inside. I thought the bypass wasn't closing properly, but it turns out the mechanism was a bit rusty and I wasn't pushing hard enough. Some WD40 and some elbow grease and all is well.

I'm going to pull the cat after I'm done with this post to see how it is looking.

A 7" to 6" adapter is on its way from the Woodstock folks, and I need to build an extension to my hearth. I think I'll be firing up before too long.

Now I just gotta figure out what to do with my old Jotul 602, but that's another post.
 

Attachments

  • stove1.JPG
    stove1.JPG
    132.6 KB · Views: 433
  • stove2.JPG
    stove2.JPG
    147.2 KB · Views: 468
And here's the catalytic combustor. The shipping bolts were in place, from which I'm inferring that the it is the original unit from 1995. 22 years young...

There's no crumbling, no breakage, and all the cells are clear. Should I just try using it, or since it is so old does it necessarily need to be replaced?
 

Attachments

  • cat.JPG
    cat.JPG
    143.4 KB · Views: 281
And here's the catalytic combustor. The shipping bolts were in place, from which I'm inferring that the it is the original unit from 1995. 22 years young...

There's no crumbling, no breakage, and all the cells are clear. Should I just try using it, or since it is so old does it necessarily need to be replaced?
I guess you could try the old cat just for the fun of it, but I wouldn't waste my time. After 22 years I'm sure there have been improvements made to the cats, and to realize the stoves potential I would go with a new one.
 
And here's the catalytic combustor. The shipping bolts were in place, from which I'm inferring that the it is the original unit from 1995. 22 years young...

There's no crumbling, no breakage, and all the cells are clear. Should I just try using it, or since it is so old does it necessarily need to be replaced?

Were they using stainless cats in 1995? I thought that was more recent technology.
 
Is that a tee hooked to a stainless liner in the fireplace? Will the stove fit on the brick hearth?
And here's the catalytic combustor. The shipping bolts were in place, from which I'm inferring that the it is the original unit from 1995. 22 years young...
There's no crumbling, no breakage, and all the cells are clear. Should I just try using it, or since it is so old does it necessarily need to be replaced?
Not that old. Has the stove also got the stainless combustor scoop with the screen? That's the first generation steel cat that they offered...diesel-foil. That one appears to be in good shape. They came out about 5 yrs. ago, so I guess the guy you bought the house from was only in there a few years, and the original owner was running the stove less than 5 yrs. ago? I had decent luck with it, but they will shrivel if you over-heat them, then you may need more wraps of interam gasket to seal them in the frame. Check to see that the cat isn't moving around in the frame. If it is, take the frame apart and replace the interam gasket. It is 1/16" thick, but expands with heat to about 1/8". You will have to eyeball it and see if you think it's going to seal with one thickness of interam gasket...otherwise you can put extra layer...maybe one and a half wraps or something. Use masking tape to hold the end of the gasket to the cat, then wrap, then tape the other end of the gasket to itself. The tape will burn away later. Here is some for $2.17 a foot: http://www.woodmanspartsplus.com/782441/products/Interam-Gasket-Material.html
The steel cat Woodstock sells now is DuraFoil, which has a more stable construction....may also be thicker foil, I don't know. You don't need the cast iron frame with the DuraFoil, but hang onto it in case you want to run a ceramic combustor at some point. You need the shipping bolts to secure the DuraFoil against the rope gasket around the opening. I bought a diesel-foil, but right now I'm running the original ceramic. I want to get a DuraFoil to have one in stock here, but they are out of stock on the website. Maybe you have to get on a back-order list to get one, I haven't called yet to find out.
This isn't a Woodstock, but you can see how this DuraFoil differs from your diesel, with the rows running straight across all the way:
upload_2017-1-24_12-14-35.png
 
Last edited by a moderator:
It does appear to be a steel cat in the pictures I do not know what it would have come with in 95. They are selling a steel replacement that no longer uses the cast frame around it here though it shows out of stock. (If you want one give them a call, sometimes they have a few set aside for emergency needs to make sure they can take care of customers.) I would say go ahead and try the one you have and see how it goes. Ordering a back up is never a bad idea on an older stove with an unknown history.

That is a beautiful stove! Enjoy! Can not wait to hear how it works out for you.

huauqui
 
It does appear to be a steel cat in the pictures I do not know what it would have come with in 95.
At the end of '10, mine shipped with a ceramic. Shortly after that, they started shipping with the diesel-foil cats.
 
Wow, Woody Stover, great info and fast. I was a bit slow I guess ;) but then that is nothing new.
 
Is that a tee hooked to a stainless liner in the fireplace? Will the stove fit on the brick hearth?
Not that old. Has the stove also got the stainless combustor scoop with the screen?

Good eyes! The tee is hooked to a stainless liner. I have a 7" to 6" reducer on the way so I can make the connection.

No, the stove will not fit on the brick hearth. The opening of the fireplace is jussssstttt a little too low to scoot it far enough back to sit on the hearth. I'm going to build an extension to the hearth (a 2x10 frame with plywood+backerboard+tile on the top, backer and tile on the sides, I'm thinking) so it can have somewhere to sit and meet the clearances.

The scoop is the old school cast iron one.

Thanks for the info on the cat. I think I'll give it a try and see how it works. Should I be installing the shipping bolts when I put it back in?
 
No, the stove will not fit on the brick hearth. The opening of the fireplace is jussssstttt a little too low to scoot it far enough back to sit on the hearth. I'm going to build an extension to the hearth (a 2x10 frame with plywood+backerboard+tile on the top, backer and tile on the sides, I'm thinking) so it can have somewhere to sit and meet the clearances.
I would cut the bottom inch or so off the legs so that it clears the opening.
 
  • Like
Reactions: weatherguy
I would cut the bottom inch or so off the legs so that it clears the opening.

Yeah.... I thought about that, but I need to put something fireproof in front of the hearth anyway to get the needed clearances, and I doubt my ability to make it look nice.

I also though about drilling some holes in the brick for the stove to sit in :)
 
Does Woodstock have a short leg kit for the keystone? In order to get the PH to fit I had to get the 4 inch leg kit instead of the 10 inch.
 
Try the old cat. If the bypass mechanism was rusted in place, the operator may not have been using it. We take for granted that everyone knows how to run a woodstove. Many people just think you put stuff in and burn it.
 
Try the old cat. If the bypass mechanism was rusted in place, the operator may not have been using it. We take for granted that everyone knows how to run a woodstove. Many people just think you put stuff in and burn it.

Great catch highbeam, I missed that in the earlier post.
 
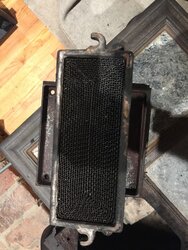
You can leave the shipping bolts in, but a little loose to act as guides or you can just leave them out. The weight of the cat frame is enough to seal against the gasket, and I don't think you want the bolts tight since the frame will expand and contract to some degree. Like I said though, save the bolts.
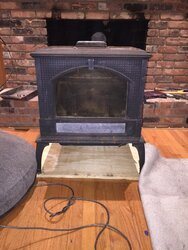
So, the stove will be sitting on the floor in front of the hearth? If so, the controls will be easy to get to, and you won't lose radiant heat into the fireplace. I see in the "installation" section of the manual that the want .59 R-value under the stove.
My stove sits on the hearth, with the back just an inch or two in front of the plane of the fireplace opening. I could use some insulation on the fireplace walls to keep from losing radiant heat to the outdoors through my external masonry chimney.
I have the cat probe installed....doesn't give a true cat temp since it is 8" long and the heat dissipates before it gets to the dial end, but it is still useful to monitor temps near the flue exit. In addition, I have a stove-top meter, just in front of the top-vent cover plate and stone, and then a magnetic surface meter lying on the stainless tee snout, almost to where it goes vertical. I find that the cat probe and the tee meter pretty much run in tandem, and I use those to tell me when to light off...not the stove-top temp as much. I will run the cat probe up to about 900-1000 and the tee snout meter will be at about 500-600. Then I adjust the air to level those temps off. After about 10 minutes of running at that level, I can close the bypass and get a reliable cat light-off, even though the stove-top meter may only be at 150-170, well below the 250 recommended in the manual. The cat probe face is hard to see unless I use a mirror so I have a bent paper clip marking 1000*, and I can see that and the needle looking down from the top (the meter face can turn in the hole, and the paper clip gives you a definitive reference mark.) You will have to experiment to see where you have to level the meters off to get reliable light-off, with your particular setup. Last pic here is from the Fireview, so the probe is on the other side of the flue exit than the Ks. The Fv sat even further back, flush with the fireplace opening, since it didn't have the 7-6" adapter.
001.JPG tee.JPG 002.JPG
I would cut the bottom inch or so off the legs so that it clears the opening.
Yeah.... I thought about that, but I need to put something fireproof in front of the hearth anyway to get the needed clearances,
I guess this stove was in a different house, or a different location in this house, if you had to move it?
Try the old cat. If the bypass mechanism was rusted in place, the operator may not have been using it. We take for granted that everyone knows how to run a woodstove. Many people just think you put stuff in and burn it.
Yeah, some people don't see the point of reading manuals. ;hm ;lol 
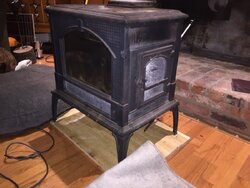
You have to wonder when you see a smoke stain like that above the load door. The Fireview (and I assume the Ks, since I ran both on my 16') will draft well on the 13.5' liner at my BIL's, so I'd say chances are good that they were opening the door with the bypass closed. :oops: But I guess there may have been some other draft issue...
I also wonder how the door got scratched like that?? BTW, check the ash pan door gasket...a leak there could over-fire the stove in a hurry.
 
Last edited:
Thanks for the great info.

So, the stove will be sitting on the floor in front of the hearth?

Not exactly. To keep it from being so far our in the room, I'm planning to build a platform in front of the hearth that is flush with the surface of the hearth. The front legs will sit on the platform, rear legs on the hearth. The surface of the platform will have (probably) be a slab of 2" thick sandstone. I have no idea how to calculate R values, so I'm not sure if I need cement board under that or not. I'll start another thread to see if I can figure that out.

I guess this stove was in a different house, or a different location in this house, if you had to move it?

Somebody else's house. Just bought it off of Craigslist.

I also wonder how the door got scratched like that??

I don't know. I'd guess someone trying to open the door latch with a poker, and frequently failing. Either that or they had a cat with strange scratching preferences.

BTW, check the ash pan door gasket...a leak there could over-fire the stove in a hurry.

I'll make sure to do that. Thanks!
 
I'm planning to build a platform in front of the hearth that is flush with the surface of the hearth. The front legs will sit on the platform, rear legs on the hearth.
I'm assuming you already checked that the tee snout/connector pipe will fit under the lintel? It's good to have a slight upward tilt to the pipe as well. My fireplace opening is 10 bricks high. Just eyeballing at the 9-brick level on mine, it looks very close as to weather your pipe would clear. Forgive me if I'm stating the obvious. ;)
 
I'm assuming you already checked that the tee snout/connector pipe will fit under the lintel? It's good to have a slight upward tilt to the pipe as well. My fireplace opening is 10 bricks high. Just eyeballing at the 9-brick level on mine, it looks very close as to weather your pipe would clear. Forgive me if I'm stating the obvious. ;)

It is going to be tight. The manual says that the lintel needs to be 26.5". My lintel is 26.5" on the nose.

How critical is the upward tilt? The idea of drilling some holes in the brick to lower the legs into is sounding better.
 
A 4 1/2" angle grinder with a cut-off wheel can cut the legs in just a few minutes. Far less destructive than dropping it into the hearth. Lay board on the floor next to the legs. Use a sharpie and mark all the legs at the height of the board. Tip the stove and cut with a cut-off wheel.
 
It is going to be tight. The manual says that the lintel needs to be 26.5". My lintel is 26.5" on the nose. How critical is the upward tilt?
In the above pic of the 7-6" adapter, that 7" portion sticks out an additional 1" past the flue collar. The flue centerline is 22.75, plus 3 is 25.75 needed for 6" pipe, without any slope. They may be including the slope with the 26.5 figure. I guess it depends how far out from the opening you want to put the stove. It looks like it's about 5.5" from the back of my top cast iron frame, back to where the 6" pipe starts.
These stoves draw pretty easy. Depending how tall your liner is from the top of the stove, you can probably get away without much tilt. The more, the better, though. I think the rule of thumb is 1/4" per foot.
 
The flue centerline is 22.75, plus 3 is 25.75 needed for 6" pipe, without any slope. They may be including the slope with the 26.5 figure.

In that case I think I'll be OK. I'm going to have to attach a 12" length of stove pipe to my tee and attach that to my reducer so I can set the stove completely outside the fireplace. I might not get the full 1/4" per foot, but I think I'll get something. Is it bad if the stovepipe touches the lintel?

It looks like you are supporting your tee with some concrete blocks (and a large industrial switch plate). Is that correct?