New User Needs a Lesson...or two

  • Active since 1995, Hearth.com is THE place on the internet for free information and advice about wood stoves, pellet stoves and other energy saving equipment.

    We strive to provide opinions, articles, discussions and history related to Hearth Products and in a more general sense, energy issues.

    We promote the EFFICIENT, RESPONSIBLE, CLEAN and SAFE use of all fuels, whether renewable or fossil.
Status
Not open for further replies.

Mushroom Man

Member
Sep 6, 2008
183
Eastern Ontario
The EKO 60 is live but even after reading everything on the site, I am stuck. When I filled the boiler with water I used a hose attached to a T with a ball valve in the primary loop. This was a temporary situation as I plan to install a plumbed-in water feed this weekend.
The pressure was about 25 when full. I was concerned about that high pressure since the pressure relief valve is set for 30. Not much room there for expansion.

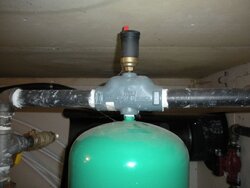
Thursday I learned about a Watts feed water pressure regulator and purchased one yesterday. I installed it last night on the same T as before (a more permanent install requires that I shut down and de-pressurize the system) . Following the instructions for the regulator, I turned the adjusting screw counter clockwise to reduce the pressure. Nothing, the pressure stayed the same.

Is it necessary to drain the entire system and re-add water through this valve. What is the secret to getting a bubble-free low pressure system. Ideally, I'd like to run with 10 lbs.

BTW, I filled the boiler with wood this morning and have just experienced a blow-off of the system pressure relief valve (30 PSI). Oh well, I at least I know it works, but it has created a small mess. Guess I was right to be concerned about the starting pressure.
I had set the controller for 70 and the LED reads 83 after the "blow-off". The circs are running and everything appears normal except for the large wet area. Is it normal for the temperature to exceed the controller setting? I read the user manual, but there is no answer there.
 
Most feed water valves have what is known as a "backflow preventer" built into them. This prevents your boiler water from bleeding
back into your(or the publics!) Drinking water. This is VERY important. To reduce pressure you will have to drain some water from a boiler drain
or some other location. To fill it to desired pressure start with the screw on the fill valve backed off(counter clockwise) and slowly turn clockwise
until you reach the desired pressure. The valve was preset but if you have changed it the safe thing to do is back it off and start over.

As far as the temp I think a bit of "overshoot" is normal although I am not familiar with the EKO controler.
 
Good Morning,

First, I am no expert. Just learned by doing.

I did not know there was masonery pressure storage tanks.
Water expands when heated. You need expansion tank(s). Most start off assuming 12PSI cold. The tank will absorb extra water and maintain close to 12 PSI system pressure. I use "Watts" brand. See sizing program from them.

http://www.watts.com/pro/divisions/watersafety_flowcontrol/support/support_ETsizing.asp


I did find that that oversize expansion good, undersize not so good (read bad). I think all makes are equal. I have 2- ETX-160's and 1-ETX 90 on 1400 US gallons of storage.

Chemicals: You need water treatment. With masonary storage I have no idea. Is it lined? IS it really designed for pressure? I did not know there was cement pressure water storage.

Air. If it is a closed system you must remove all the air. In line air seperators are the answer. I found highest point is best, but to my surprise they will work in lower spots. I did find that they work better on output side of pump, rather than input side. My system has 16 feet between boiler (it's high) and lowest (exchanger in basement). See air seperators below.

http://www.watts.com/pro/_products_sub.asp?catId=64&parCat=250

Again I have used different makes, all seem to work equaly well.

There are lots of people on this site with more knowledge than me, maybe they will chime an and add more info.

Good Luck

Air.
 
Robby:
The masonry storage tank is a 1500 gallon insulated cistern with an EPDM liner. It has been built and holding 1400 gallons for 14 months awaiting installation to the primary loop. I was in a big hurry last year and built the tank before installing the boiler awaiting a pro to install. The pro was a letdown and subsequent quotes were out of this world, so I set about learning and doing. Steep learning curve but that's the story of my life. The whole thing is a steep learning curve.

The tank is unpressurized. When plumbed, (soon now) it will employ a heat exchanger, Grundos pumps on either side of the HX and a 4-way danfoss motorized control valve to control flow.

My interest at present is learning to operate the boiler effectively, then I'll plumb in the storage.
 
Did you fill your EKO to 25psi cold? Or was that the full-temp pressure? At room temperature your system should be set at 12-14psi or so. It should be nowhere near 25 cold. I set my system at 12psi at 60 degrees (including storage). When all of my storage is up to 160-180 my pressure hovers at 25ish....
 
Mushroom Man said:
The pressure was about 25 when full. I was concerned about that high pressure since the pressure relief valve is set for 30. Not much room there for expansion.


What was the indicator that you used to tell whether it was full? At 25 psi it must have been full a while before you shut off the feed water. Did you have a valve open on the far end from the feed to purge some air? I have always found that the best way to flood a boiler is to:
1) have the correct components. Like a feed water valve and Backflow preventer.
2) Allow the boiler to fill and catch about a bucket full of water on the other end to help purge some air out of the system.
3) shut off output valve and keep a eye on the pressure gauge. If the feed water valve is set correctly you should see the
pressure climb to 12 to 14 pounds.
There will still be air in the system so I usually run the circulator for a while to purge a little more air out through the separator and purge valve. THEN------- Fire her up while keeping an eye on the pressure. You should keep your feed water ball valve on in the early stages to make up water that was being displaced by air that will be purging out.
 
Mushroom Man

OK what kind of mushrooms???

I forgot. If you plumb in automatic air vent, http://www.watts.com/pro/_products_sub.asp?catId=64&parCat=250
highest point, air will quickly not be a problem. Usually I use 1" copper to plumb around boiler. If you add a T with one pointing straight up, add 3 or 4 inches copper and solder auto vent to the top it will work very well. Way cheaper and very effective.

Once you have all air out, add appropriate chemicals, you should test (with kit) immediatly, after a couple of months, at six months and annually thereafter. From that point on, unless there is a leak it's good for years and years. I turn the automatic fill off. That way if there is even tiny leak it will show up in pressure drop after a while.

I flush system with straight water to remove as much welding flux, dirt, etc., then fill with soft water if available. I have never had a problem with plugging exchanger or water to air radiators. Plumbing wholesalers sell a portable softener, not very expensive.

I have never installed or had experience with open systems. Seems to me, if you use soft water, right chemicals and try to minimize evaporation it wil be just as good. In fact I am interested in how you make out. I also would be interested in your opinions on the boiler after some use.

I am driving up to Red Deer, AB. to see the Portage and Main gassifier in operation, at a FArm Show, in a couple of weeks. I guess that is the future.
 
Robby asked what kind of mushrooms. We grow 4 varietals of certified organic oyster mushrooms. They are cold right now but will be warm in a week or so.

Thanks for the answers everyone.

After the blow-off of the pressure relief valve the pressure is about where it should be, around 20 at temperature. There is too much air and I am struggling with getting it out.

I cannot attain gasification in my attempts so far and will try to modify the adjustments (primaries, secondaries and fans) tomorrow.

I am very impressed with the length of burns in this unit, but the entire process can only get better with gasification.

I feel like the hardest part of the installation is past. The barn loops are stapled up, so the plumbing connections and barn loop pumps remain. Then it's on to plumbing the storage tank. It is about half done in that the lines to the tank are in place.

Note: I hate pex the most. I also hate black iron pipe. If I could afford copper, I'd choose that for everything above ground. Leaks are easy to fix with copper and the finished product looks great.

There's an end to this project. Isn't there?
 
There is oxygen bubbles aplenty in the system. I have the Watts separator at the top of system but it doesn't appear to be working as billed. Is this the right kind of tool for removing oxygen from the system? Can anyone describe how it is supposed to be used. For example is there a tire valve stem in the top that you unscrew. I cannot look inside the top because it is too close to the ceiling. It was not intended to be so close to the ceiling but a ridiculous by-law has forced me to install the boiler so that the botton of the secondary chamber opening is 20 inches above the garage floor. My insurance carrier insisted that I conform to the by-law.

I wear stilts to load the boiler with wood :)
 

Attachments

  • WattsAirSeparator.jpg
    WattsAirSeparator.jpg
    50.6 KB · Views: 656
Did you open the red valve and let it bleed the air off??? My taco air seperater has to have the cap opened to work so I just leave it open and it bleeds air when it wants to.

Rob
 
Taxidermist:
I removed it briefly and expected to hear something. When I didn't hear air coming out, I put the cap back on. I am going to remove the cap now, leave it off and see what happens.
 
You may find that you will do better on the air removal to "pressure purge" the system, using your full pressure domestic supply. There are detailed directions in lots of other threads, but essentially it consists of putting house pressure at the inlet, and opening and closing the various system and drain valves in such a way as to push full pressure through each line until it runs free of obvious bubbles.

The circulators and air vents in the system are really only designed to deal with trace amounts of air, you need to get as much out as possible by pressure purging before startup...

Gooserider
 
I'll try the pressure purging idea.

The unit has burned now for 4 days without any signs of gasification. I re-read the Eko tuning sticky and reset the primary, secondary and fan shutters to factory specs according to the new manual. (12mm, 4 turns and 70%). I have the older controller (RK-2001E); therefore no fan speed adjustment.

The HX tubes were cleaned before firing. I have cleaned out the secondary chamber and left a bed of coals in the primary chamber before setting the fire with small dry splits. It is a mystery. Others seem to enjoy good gasification easily but it eludes me. I must be missing an important step.

Is there a foolproof methodology that I should follow to get rudimentary gasification or perhaps a troubleshooting methodology?
 
You don't have some sort of debris interfering with the complete closure of the by-pass damper, Do you?
 
It's hard to get to gasification starting with a cold boiler. Until you get the boiler temp up it tends to cool the fire down. I've found that with a cold start it doesn't get going good untill I'm atleast at 140* in the boiler. Also you need really good coals to make it work good. Some charcoal brickets work good for the first firing and after they get going put some really dry hardwood small spits on top. Don't fill the top up untill you get gasification. Once you get gasification it will heat up the refactory and after a few minutes you can fill it up. Just circulate the water in the boiler until you get up to 140 cause if you try and heat up the storage and all at the same time you won't ever get it hot enough to get the boiler hot.
leaddog
 
Curious!
After you get a good hot fire going with the bypass damper open (perhaps 300 degrees stack temp measured with magnetic thermometer) then close the lower door, start the combustion fan, and close the bypass damper what do you see if you open the lower door---say after 15 minutes? If you open the door and you get smoke pouring out, it not gassing. If you have some small amount of flame it's starting to gas but is not hot enough. If you have nothing in there, something's not functioning correctly.
 
In addition to the other comments, many of which were very good suggestions, I should add the biggest issue that we find with just about any modern stove, boiler, etc... Namely that you MUST have dry, well seasoned wood in order for things to work properly... Figure I should mention it since nobody else has.

Do you have a moisture meter?

What does it read if you resplit one of your peices of firewood and take a reading from the center? Ideally it should read around 15%. 20% is usually OK, over 25% and you will have problems getting gasification...

As a check to verify that it isn't a wood issue, get a load of really dry wood - try pallets, scrap lumber (not plywood or pressure treated) or some of those over priced, kiln dried bundles of wood they sell in the grocery stores - and burn it, with no water going outside the boiler and it's return unless you get the boiler temp up over 160*F or so... If you don't get gasification, there is likely something else wrong, either with the boiler itself, or your technique. If you do get gasification, then you need to take a closer look at your wood quality.

Gooserider
 
There was nothing wrong but me. I was trying to build a fire without the careful preparation of proper sized kindling and properly sized splits. Once I adapted to a boy scout method of building a fire, gasification worked like a charm using factory specs.

Thanks to all and especially Don L who paid me a visit and coached me saving me a season of trial and error.

Don't underestimate the importance of dry kindling, dry wood and small splits. Most of my splits will need to be split again to be efficient.

I'm looking for a splitter. My neighbor had lent me his but re-splitting is going to force a purchase.

I have a question now about the Infra-red hand-held thermometer that I bought. While it appears to work, it seems to understate the temperature compared to the temp gauge on the boiler. Should there be an allowance for taking the reading on black iron instead of the water itself. How much of a variance have you experienced if any?
 
Mushroom Man,
What is the difference between the IR thermometer and the boiler gauge? I have one of those too, and it's usually pretty close, but a few degrees low. One thing I had to do is put masking tape on the black iron pipe. These thermometers don't read well on shiny surfaces. Others have suggested using high temp flat black paint.
 
If you are talking about the temp showing on the controler it will read different than the water temp leaving as the probe is located above the fire box and the water leaving is coming off the fire tubes. Because the water doesn't mix fast you can get different readings. I have a pid reading the water temp at the 3-way valve and it will usually read 2 to 6* different.
leaddog
 
My temp gauge on the boiler is in Celcius not farenheit degrees. It is the older controller RK-2001 E so max temp setting is 80 degrees.
If my boiler reads 72 my first outlet from the boiler might read 67 on the IR thermometer. That is a big difference for 5 inches from the boiler. I think it should be identical or maybe a degree out. I am pointing at a non-shiny black surface.

The temperature reading on a shiny surface is out 30 degrees, so it is useless.

I'll try masking tape and see if there is a difference.

I tried magnetic tape material but the readings there are identical to the non-shiny black pipe. I was wondering if there is some kind of calibration needed. The boiler temp gauge is likely the truer of the two devices. It is handy to be able to walk around the system and take readings even if they are just relative readings but it would be better to have accurate measurements.
 
I didn't see leaddog's reply before I responded. His point is correct the firebox will be hotter than the water after heat exchange. I had not considered that.
 
Mushroom Man said:
Don't underestimate the importance of dry kindling, dry wood and small splits. Most of my splits will need to be split again to be efficient.

I'm looking for a splitter. My neighbor had lent me his but re-splitting is going to force a purchase.


Last year I bought one of those small electric splitters off ebay to do just what your talking about. I leave it in the wood shed and split my wetter wood down to toothpicks....pain but works. I'm happy with the splitter for what I'm asking it to do but don't expect it to do a good job for the first splitting of the larger ones.
 
I invested in a 22 ton tsc splitter. It has been a good unit so far and has split some very large knotted oak & hickory. Before that I was splitting 22 face cords with a maul but my shoulder was telling me to quit. I started with small splits of damp wood last year to help speed the dry time. It worked well but the small splits shortened the burn time. Well the splits and my inexperience with the EKO. I wasted a good deal of extra wood until I hit the right tune for the eko , Shortly after finding this site I will confess.

I have a better start this year on the wood with 7 full cords at 4-6 inch splits 24 inches long. I also have the fans at 50% , 10mm on Primary, 3 turns on secondary. I start with 1" kindling on bottom 2" above that and the big stuff on top let it burn up the vent until I see the temp hit 140. Start the fans, close it up and it gasses well, it's still 30-40 min away from working well. I don't start the pump til 160, that way the cold line water will mix back down to 140 and still keep the boiler hot enough ( Mix valve stays open). It's like a 3 stage start for me. 1 Boiler, 2 Lineset, 3 Tank load. By the time the tank load hits ( Set to start at 165-170 ) the eko has built up enough heat to sustain the load. If it is not hot enough the load will drive the eko to low and stop the tank circulator. It will fight it's way back. Wet wood makes this a vicious cycle. Dry wood and the eko will maintain 175-180 against a 100 Degree tank I am impressed. As the tank heats the eko will rise to 195 ( The max I have it set to ).

I would love to play with the tank flow rate based on the return temp to the boiler to smooth this out. That will be a computer controlled (Fun) project for me. It works well enough for now. I'm off to insulate my basement to hopefully cut a cord or two off my yearly demand.
 
Status
Not open for further replies.