oops! guess I can't do that...

  • Active since 1995, Hearth.com is THE place on the internet for free information and advice about wood stoves, pellet stoves and other energy saving equipment.

    We strive to provide opinions, articles, discussions and history related to Hearth Products and in a more general sense, energy issues.

    We promote the EFFICIENT, RESPONSIBLE, CLEAN and SAFE use of all fuels, whether renewable or fossil.
Status
Not open for further replies.

cac4

New Member
Jul 11, 2008
376
Essex County, MA
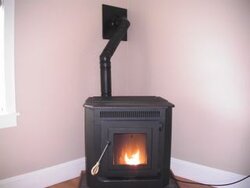
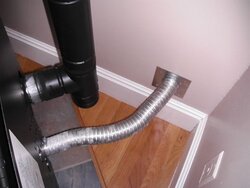
As I'm getting close to installing my stove, I started fussing around to determine the exact lengths of pipes that I'll need. Considering the required set-backs, and the thickness of my outside walls, it seems like its going to be difficult to get the setup I was planning. I just want to go straight out, through the wall, to a "T", then up a few feet for draft. The stove will be in a corner, so a 45 degree bend is going to be needed. So I got a 45-degree elbow to go w/ the rest of the piping, which came in the form of a kit from Lowe's. (came w/ 5 lengths of 1' pipe; elbow, thimble, appliance adapter, T, wall strap, for what I thought was a very good price).
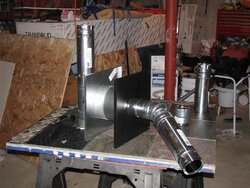
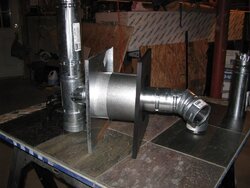
So, it looks like Its going to be tight, but I need to see exactly how long these pipes are, how they fit together, etc. So I dug out the piping, and started fitting things together. I connect a 1' pipe to the T, with the cleanout pointing straight down. slip that through the thimble sitting on a bench. get out the 45-degree, and try and put that on the other end where the stove will be...twist and: its not aligned right. It doesn't bend 90 degrees to the T; its pointing downward. So I take it back off, turn to the next available set of detentes in the pipe, twist, and...its pointing "up". (ugh).

I see in the parts listing for the stove that there is something called a "45 degree tailpipe weldment". I suspect this is what I'll need to make this configuration work. I bet its about a 500 dollar part, too. :roll:

But even with that, it looks like a 12" pipe will be too short, and a 18" pipe will be too long. There isn't alot of wiggle-room with the hearth pad I built.

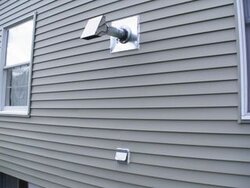
This wouldn't be a problem if I were just going "straight out". nothing has to twist-lock together on the other end of the pipe. I suppose "up, then out" would work, too, although I didn't have time to try it. Neither option is particularly attractive, the latter being difficult to access for cleaning, and the former being subject to smoke problems in the event of power failures...which are rare, where I live, but not unheard of.
 
It's hard to tell what configuration you need without pictures, but I had to use a little imagination to make it work and keep the end of the vent pipe 4 ft. from an opening window. Mine added up to 17 and seems to work just fine but I wouldn't go up more than that.

Pellet stoves have to push the exhaust air through the vent pipe with the stove's exhaust fan. With less restriction your pellet stove will breathe easier and burn more efficiently. First let's clarify the word restriction. Restrictions come from several different items.

45 degree elbows
90 degree elbows
Horizontal distance
Vertical distance
Elevation where you live.

A rule of thumb equation we are using has been adopted by most pellet manufactures. The equation is called the sum of Equivalent Vent Length (EVL). All of the above mentioned venting restrictions have been assigned EVL values as follows:

Each 45 degree elbow = 3 EVL
Each 90 degree elbow and Tees with cleanout = 5 EVL
Each foot of horizontal run = 1 EVL
Each foot of Vertical run = 0.5 EVL
Elevations above 3000 ft with an EVL of 7 must adapt to 4 inch vent pipe.

If your installation is below 3000ft, we would need to do some math. The rule of thumb equations is that if the sum of the EVL is 15 or greater, then the pellet vent pipe would be increased to 4 inch diameter pellet vent pipe.

Here is the link http://www.nevelsstoves.com/articles/Venting-your-pellet-stove.htm
 

Attachments

  • PIC_0013.JPG
    PIC_0013.JPG
    7 KB · Views: 2,143
  • PIC_0014.JPG
    PIC_0014.JPG
    15.5 KB · Views: 2,505
why did you have to off-set yours with a 45?

Ok, I know its hard to describe with words. maybe I'll snap a pic later tonight and post it.

In the article you referenced, the second diagram, with the stove in the corner, venting straight out is the first part of it. Except: instead of a straight-out pipe with a horizontal cap on it, picture a "T", so there can be a rising pipe. the old "candycane on the outside wall of the house" config.
You can see in that diagram that there would be a 45 degree elbow coming out of the back of the stove, then a straight piece of pipe to get outside. If you try to put a "T" outside, with the cleanout cap on the bottom, it won't be plumb. When its twist-locked on, it'll point 45 degrees off of verical, on one side or the other.
not intuitive...not expected.

As I posted before, if that "45 degree tail pipe weldment" is what it sounds like, it would eliminate the problem, by eliminating the 45 degree stove pipe elbow.

windows aren't a factor in my installation.

The manual for my stove doesn't mention "evl". It just says "15 feet of pipe".
 
cac4 said:
why did you have to off-set yours with a 45?

Ok, I know its hard to describe with words. maybe I'll snap a pic later tonight and post it.

In the article you referenced, the second diagram, with the stove in the corner, venting straight out is the first part of it. Except: instead of a straight-out pipe with a horizontal cap on it, picture a "T", so there can be a rising pipe. the old "candycane on the outside wall of the house" config.
You can see in that diagram that there would be a 45 degree elbow coming out of the back of the stove, then a straight piece of pipe to get outside. If you try to put a "T" outside, with the cleanout cap on the bottom, it won't be plumb. When its twist-locked on, it'll point 45 degrees off of verical, on one side or the other.
not intuitive...not expected.

As I posted before, if that "45 degree tail pipe weldment" is what it sounds like, it would eliminate the problem, by eliminating the 45 degree stove pipe elbow.

windows aren't a factor in my installation.

The manual for my stove doesn't mention "evl". It just says "15 feet of pipe".

I used the 45 so that the vent end outside would be 4 ft. away from the window, if I didn't use it it would have only been 3 feet. My owners manual says at least 4 feet away from window or door that opens.

It took some trial and error to get it to all come together right and straight. I have the stove adaptor, then the clean out T, then 2 12inch pipe, then 45 degree elbow, then one diagonal, then the 90 degree elbo, then 2 12 inch to the outside, then the cap. Hope this helps.

I think if you can keep it close to the 15 EVL it will work great.
 
ok, I get it.

the 45's work to offset a vertical pipe, as you did, because they rotate on the right end of the elbow; the other end is "fixed", so it can't be adjusted.

here's the pics:

I added a 12" piece in the second pic, to better illustrate.
 

Attachments

  • IMG_2096 (Large).jpg
    IMG_2096 (Large).jpg
    126.6 KB · Views: 1,096
  • IMG_2095 (Large).jpg
    IMG_2095 (Large).jpg
    104.6 KB · Views: 1,069
Love your hearth pad. Are you all set or do you need more help? Ask away if you do.
 
yeah. come over and help me lift it upstairs! :lol:

seriously...I guess the answer is that I need that angled tail pipe. or I need to go straight out, and forget about natural draft. Or, I need to go up, then out, instead of out, then up. decisions, decisions....
 
The perks of going up and then out is, your clean out T will be inside and easier to clean when it's cold outside. When the pipe is inside and warm the natural draft is better (if power goes out). I used an outside air kit (OAK) and my stove is running like a charm. See pics. Did the install ourselves. Scariest part was cutting holes in the side of the house.
 

Attachments

  • PIC_0017.JPG
    PIC_0017.JPG
    20.7 KB · Views: 1,793
I think I understand your problem.The angle of the 45 doesn't hit you exhaust square.
I have the exact setup you are trying to do and don't remember any big problem getting the angle right.

Doesn't that 45 swivel at the elbow joint? Something in that setup has to spin to give you the angle you need.
Don't quit, it'll work.
 
elbows rotate some.
 
cac4 said:
yeah. come over and help me lift it upstairs! :lol:

seriously...I guess the answer is that I need that angled tail pipe. or I need to go straight out, and forget about natural draft. Or, I need to go up, then out, instead of out, then up. decisions, decisions....


If the bridge werent out and it wasnt such a long commute now Id stop on the way by to the parents.
LOL
 
Maybe this is just a "feature" of the cheap duravent pipe. (not "pro"; just plain duravent). It only swivels on one end. the male end does not swivel.

I checked out the 90, and its the same way; swivels on the female end, fixed on the male.

as far as I can see, the only way for the 45 to sit at the right angle is for it to not be twisted into place. jamb it in there, and seal it up w/ silly-cone. if that's acceptable.

I was thinking that up, then out, with the corner installation would be difficult to reach for cleaning. looks like it would be hard to reach. I was hoping to just walk up to the t from outside, pop off the cap, and let the ash fall into the flower bed below. e-z to reach...no mess in the house.
 
I have cleaned the tee inside already, easy to get to (vent pipe is 4-5 inches from the wall) and I'm talking maybe a couple of teaspoons full of ash to vacuum up. Really easy.
 
Sometimes with the standard Pellet vent. you have to Split the difference on the TWIST LOCK to make the Fitting line up at the correct angle.
Meaning Not to twist all the way to lock. and be sure you put 3 screws in each joint.


NOW
the NEW duravent Pellet vent PRO. (not available at big box stores)
has new clean fittings. and the NEW Slip is much better and FITS through Wall thimbles. (unlike the Standard Duravent pellet slip)
I have install 2 pellet stove in a corner this week and the choice of 12" and 18 slip has made my job a lot easier to get things lined up to go through our around a eve.
 
The pellet vent PRO has 1" clearance
and the standard has 3"
 
cac4 said:
Maybe this is just a "feature" of the cheap duravent pipe. (not "pro"; just plain duravent). It only swivels on one end. the male end does not swivel.

I checked out the 90, and its the same way; swivels on the female end, fixed on the male.

as far as I can see, the only way for the 45 to sit at the right angle is for it to not be twisted into place. jamb it in there, and seal it up w/ silly-cone. if that's acceptable.

I was thinking that up, then out, with the corner installation would be difficult to reach for cleaning. looks like it would be hard to reach. I was hoping to just walk up to the t from outside, pop off the cap, and let the ash fall into the flower bed below. e-z to reach...no mess in the house.

i have a corner install ,and used excel pellet pipe,no twisting involved this pipe does not have leak issues like others.
 

Attachments

  • DSC00358.jpg
    DSC00358.jpg
    21.4 KB · Views: 1,033
how much for the excel? that looks like it would be about the same exact thing I'm doing, in terms of lenths of pipes and all....

If you don't have to twist the pipes all the way, then that solves the problem. I was thinking I'd not twist the T at all; its joint will be outside...mostly. twist the 45 all the way, as that would be inside the house...less chance of leakage. but it doesn't really look like the twist really seals the pipes any more; just locks them.

the paperwork that came w/ the pipe says 1" clearance in the US, 3" in Canada.

which seems to conflict with the other directions that say to put the vertical outside pipe so that it is held 3" off the wall...but maybe thats just because it came with a 3" wall strap. I see that they make a 1-3" adjustable strap...

Jester: your folks must be down there in Baja, eh?
I'm between 1 and 95, so the 1A bridge doesn't come into play...
 
cac4 said:
how much for the excel? that looks like it would be about the same exact thing I'm doing, in terms of lenths of pipes and all....

If you don't have to twist the pipes all the way, then that solves the problem. I was thinking I'd not twist the T at all; its joint will be outside...mostly. twist the 45 all the way, as that would be inside the house...less chance of leakage. but it doesn't really look like the twist really seals the pipes any more; just locks them.

the paperwork that came w/ the pipe says 1" clearance in the US, 3" in Canada.

which seems to conflict with the other directions that say to put the vertical outside pipe so that it is held 3" off the wall...but maybe thats just because it came with a 3" wall strap. I see that they make a 1-3" adjustable strap...

Jester: your folks must be down there in Baja, eh?
I'm between 1 and 95, so the 1A bridge doesn't come into play...
best go go by what the label on the pipe say.
I have both here
the new Pro vent has 1"
the older standard says 3" but I and a newer standard that has 1" on the label.

Also make sure it is L vent and not B vent.
 
cac4 said:
how much for the excel? that looks like it would be about the same exact thing I'm doing, in terms of lenths of pipes and all....

If you don't have to twist the pipes all the way, then that solves the problem. I was thinking I'd not twist the T at all; its joint will be outside...mostly. twist the 45 all the way, as that would be inside the house...less chance of leakage. but it doesn't really look like the twist really seals the pipes any more; just locks them.

the paperwork that came w/ the pipe says 1" clearance in the US, 3" in Canada.

which seems to conflict with the other directions that say to put the vertical outside pipe so that it is held 3" off the wall...but maybe thats just because it came with a 3" wall strap. I see that they make a 1-3" adjustable strap...

Jester: your folks must be down there in Baja, eh?
I'm between 1 and 95, so the 1A bridge doesn't come into play...
$360.00 for everything
 
Status
Not open for further replies.