Opened her up, now I've got questions

  • Active since 1995, Hearth.com is THE place on the internet for free information and advice about wood stoves, pellet stoves and other energy saving equipment.

    We strive to provide opinions, articles, discussions and history related to Hearth Products and in a more general sense, energy issues.

    We promote the EFFICIENT, RESPONSIBLE, CLEAN and SAFE use of all fuels, whether renewable or fossil.
Status
Not open for further replies.

stejus

Minister of Fire
Hearth Supporter
Jul 29, 2008
1,227
Central MA
I had liner cleaned in the spring so I figured I'd take a peek today to see if I could find anything before the burn season starts.

Do I need to be concerned?

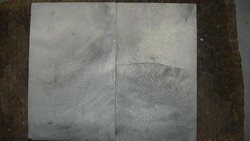
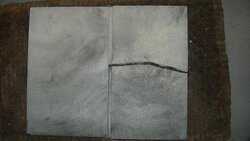
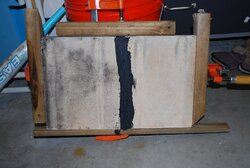
#1, #2, #3 - I have a cracked baffle. When it is installed on the secondary air tubes, it's visable but doesn't appear to let much heat through.

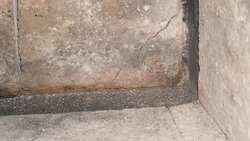
#4 - This crack is on a firebrick that is in the back lower corner.

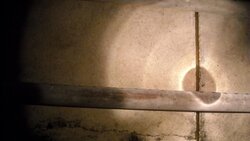
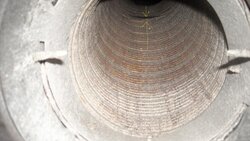
#5 - There is an indent in the stove liner. (it's a 316 Ti liner)

#5 - Stove liner appears to have a brownish/redish tint to it. Is this normal near the stove.

Any advise would be greatly appreciated as this is my second burn season coming up.

Thanks!
 

Attachments

  • #1 - crack in firebrick.JPG
    #1 - crack in firebrick.JPG
    26.3 KB · Views: 928
  • #2 - crack in firebrick.JPG
    #2 - crack in firebrick.JPG
    37.2 KB · Views: 936
  • #3 - crack in firebrick.JPG
    #3 - crack in firebrick.JPG
    37.1 KB · Views: 1,142
  • #4 - crack in firebrick lower left.JPG
    #4 - crack in firebrick lower left.JPG
    54.2 KB · Views: 928
  • #5 - bump in liner.JPG
    #5 - bump in liner.JPG
    43.4 KB · Views: 952
The baffle will probably be fine. The liner looks like it is kinked where it is up against the damper frame. Mine is the same way and I consider it a non-event. The residue in my liner is always reddish from top to bottom after a cleaning. The liner being reddish that close to the stove is just from the heat at start up. The elbow on top of my stove is completely golden colored now. The firebrick ain't a problem.

Looks like you are good to go from my humble point of view.
 
YOu might be able to connect the 2 broken pcs of baffle together furnace cement.
 
Hogwildz said:
YOu might be able to connect the 2 broken pcs of baffle together furnace cement.

Probably better just to straighten out some paper clips and insert half in one side and push them together. Furnace cement sticks to metal and fingers real well but would probably not work all that well with fiber board.
 
baffle should be replaced, or at least repaired. it's not the heat that is the issue, it's the smoke going thru it and up the flue without getting all the heat out of it, causing more heat loss and more creosoot.

the brick looks ok to me. industry standard allowable gap is a nickels width. If it's a standard 4.5 x 9 x 1.25, you can generally find them at a hearth shop for $3-4. buy a couple extra for next time.

i'd have to agree about the liner, but I'd also reach up there to make darn sure there is no gap or hole in it. if there is, most likely it was there when it was installed.
 
BrotherBart said:
Hogwildz said:
YOu might be able to connect the 2 broken pcs of baffle together furnace cement.

Probably better just to straighten out some paper clips and insert half in one side and push them together. Furnace cement sticks to metal and fingers real well but would probably not work all that well with fiber board.

I've never worked with stove cement. After I join the two pieces together, do I apply the cement to the inside (joined) edges or just goop it up on the outside surface. Something tells me to treat it like gluing two pieces together, but i want to be sure.
 
You might try a combo of what Hog and BB said: use the paperclip wire to hold the pieces together, but first run a bead of cement along the joint before you press the halves together. A tube of gasket cement is 5 bucks.
 
branchburner said:
You might try a combo of what Hog and BB said: use the paperclip wire to hold the pieces together, but first run a bead of cement along the joint before you press the halves together. A tube of gasket cement is 5 bucks.

Gasket cement won't take the heat. A door frame runs a lot cooler than a baffle at the top of the firebox.
 
Other than checking that dent out for structural integrity (i.e. no hole in it), I would have to say BURN BABY BURN.

Note: I am not a hearth pro, and that is just my opinion.
 
I thought my Rutland gasket cement tube and furnace cement tub were basically the same black sodium silicate goop rated to 2k F. Just thought I was paying more for the tube because, well, it's a tube...
 
branchburner said:
I thought my Rutland gasket cement tube and furnace cement tub were basically the same black sodium silicate goop rated to 2k F. Just thought I was paying more for the tube because, well, it's a tube...

Some are and some aren't these days. A lot of places are selling a clear glue for gasket cement. The Rutland is furnace cement and would do as well as anything.
 
poooooooooooooooooooooooooooooooook said:
it'll work& if u dont use it , it dries up with time & tube is useless

Are we still talking about adhesives?
 
BrotherBart said:
poooooooooooooooooooooooooooooooook said:
it'll work& if u dont use it , it dries up with time & tube is useless

Are we still talking about adhesives?

I know it's not right . . . but this one liner made my day . . . very funny.
 
I have smeared rutland black from the tub on the face of my ceramic baffle to fill dents and it did not spall of or anything. Works great smeared on the surface but I would also butter the inside of the crack before assembly.
 
Ok, I priced out a new baffle set and it's $75.00.

No way I'm paying for this after one year of use. I'm going with a DIY repair with straighted paper clips inserted on both sides and a bead of Rutland Black.

MY QUESTION - Should I pre-drill the holes a little larger than the paper clip size? This way I can stuff some Rutland Black into the hole where the paper clip will be inserted.
 
I'm not sure what your baffle material is, but if it's ceramic fiber board and the wire just pushes in, then just push it in. If it's a harder castable refractory material that needs drilling, I wouldn't bother drilling, I would just cement and clamp.
 
Update...

The small crack in the back corner is fixed. The Rutland Black bonded the two piece's together and held. I suspect it's due to the small surface area to repair.

The large baffle didn't go as well. I buttered the two piece's as well as the outside surface and then clamped. Let dry overnight and this morning, they didn't hold.

It really didn't absorb into the baffle. It just sat on top of the material and peeled off easily.

I think the firebrick in the back is more porous material and the Rutland Black absorbed into the material as well but the baffle didn't because it's smooth.

Any other ideas to get the refactory baffle piece's to stick together?
 
Did you try BB's paperclips?
 
branchburner said:
Did you try BB's paperclips?

No, I just buttered the two sides and clamped. I just tried to push a paper clip in and it went in.

I can push it in on one side, but how do I push in the other side? Should I just goo it up and push and hope the other clip goes in? I guess I could pre-drill... How many clips should I use?
 
I tried the paper clip approach and it seems to have worked better clamping from both sides.
It held together this time, but I really didn't try and separate either. The directions say to cure it slowly bringing the temp to 500 degrees.

Will curing this harden this bond like cement?

Is this Rutland Black ok with direct flame. It says it can withstand 2000 degrees, but what about direct flame?
 

Attachments

  • baffle with rutland black.JPG
    baffle with rutland black.JPG
    86.5 KB · Views: 577
The curing heat is to drive the moisture out of the furnace cement. You can put it in the oven or use a hair dryer to do the same thing. It dries like concrete but is brittle. Flames aren't gonna hurt the stuff.
 
BrotherBart said:
The curing heat is to drive the moisture out of the furnace cement. You can put it in the oven or use a hair dryer to do the same thing. It dries like concrete but is brittle. Flames aren't gonna hurt the stuff.

Thanks BB. I have it in the stove at this point. I may be burning tonight or in the morning because it's going down to the low 40's tonight. I've been looking for an excuse to fire it up so this my be it. Just a small hot fire should be enough to cure it slowly.
 
Put a little newspaper and small kindling in it now. Just light it and let it burn down to cure it some.
 
Success!

The paper clips and Rutland Black worked. Had a small hot fire on Sunday morning to cure the bond. Started off slowly with just kindling and then three small splits about an hour into it. Not sure i managed to get to 500 degrees, but it burnt for a good 4 hours before cooling. Last night I looked up and touched the bond (Rutland Black) material and it was hard as stone.

I'm sure this will not make the baffle brick a solid as it was before it cracked, but it sure filled the void so smoke and heat can't leak through now!

Burn baby burn! Oh well, it will not be for a while (at least this week) because there's no cold air in site for Southern New England. << Not a bad thing! ;-)
 
Status
Not open for further replies.