
New spectrum delivered today! A couple of questions for the group... One brick on the back sticks out farther than the other. On the parts diagram, there is no brick in this spot. Behind this brick is a vertical steel bar which is about flush with the other bricks. Is this brick in front of the bar needed? Without it, I could certainly fit in longer logs. Also, there is a wire thingy sticking out right above the brick - whats that for? Enclosed is a pic without the brick in place.
PE Spectrum question
- Thread starter n1st
- Start date
-
Active since 1995, Hearth.com is THE place on the internet for free information and advice about wood stoves, pellet stoves and other energy saving equipment.
We strive to provide opinions, articles, discussions and history related to Hearth Products and in a more general sense, energy issues.
We promote the EFFICIENT, RESPONSIBLE, CLEAN and SAFE use of all fuels, whether renewable or fossil. -
Super Cedar firestarters 30% discount Use code Hearth2024 Click here
You are using an out of date browser. It may not display this or other websites correctly.
You should upgrade or use an alternative browser.
You should upgrade or use an alternative browser.
- Status
- Not open for further replies.
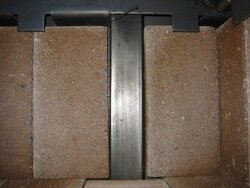
1. The "steel bar" is the secondary air manifold.
2. The brick is in the diagram in the manual. The open space in the brick diagram is the place for the aforementioned manifold.
3. The wire looks like the release pin for removing the baffle.
You need to remove that brick on the right and see what is behind it making it stick out. It should be flat against the back of the stove just like the two on the left. Have you tried just pushing it back?
And yes ya gotta have all of the firebricks in it when you burn it.
Thanks BB. The vertical bar cannot be pushed back and in fact the bottom brick (14d) is shorter than the others to make room for the air tube.
Yeesh this is confusing.
Here's my take on it... I think there should only be 3 vertical bricks along the back. I think I have an "extra" brick because I have ash cleanout. However, this theory means that the parts diagram would be worng and the 3 small bricks shown when there is no ash clean out would have been replaced by 1 large brick (my extra).
The baffle pin (part 17 on the PD), is not the wire thingy I'm refering to, I don't have a clue about that.
There are 3 bricks for the back wall. The "steel tube" delivers pre-heated air to the baffle for secondary combustion and is not covered by a brick.
The 1 extra brick is just that...an extra, they all come with a spare. An added touch from PE :lol:
The wire should not be there, it must be from shipping or something. See what it is connected to and get rid of it.
Enjoy the new stove, the spec's rock.
The 1 extra brick is just that...an extra, they all come with a spare. An added touch from PE :lol:
The wire should not be there, it must be from shipping or something. See what it is connected to and get rid of it.
Enjoy the new stove, the spec's rock.
Excellent, that means it can hold an 18" log (plus a little more) - and I have an extra brick.
The wire is welded to a weld spot on the back. It reminds me of a pig's tail - has a little knot on the end. ...hope it doesn't mean it's going to be an energy hog.
The dealer's hard to get ahold of - on the road a lot. Besides, you guys know everything!
Thanks.
The wire is welded to a weld spot on the back. It reminds me of a pig's tail - has a little knot on the end. ...hope it doesn't mean it's going to be an energy hog.
The dealer's hard to get ahold of - on the road a lot. Besides, you guys know everything!
Thanks.
Gunner knows his Sheet. I had a few extra bricks with mine. Where is your baffle pin? That wire surely cannot be it. It should be more like a "j" shaped 1/4" pin that has a hump in it. The bricks are not perfect. I have a couple that stick out a lil more than others. No biggie. You loading that puppy front to back?
Yea the pin's above and to the left of this wire. Yes loading from the front was the plan. Is there another way?? Dang, guess I should read the manual.
N/S is recommended, that's the way the stove was designed, and how God intended wood to be burnt in a stove as BB would say.
You can try E/W, but I bet you only do it once.
You can try E/W, but I bet you only do it once.
I mainly burn N-S. once in a while to get things going from a cold start I will burn criss cross to get temp up and a quicker bed of coals. Works for me anyways. For real burning its N-S for me. And no rolly polly splits.
Gunner has it right; three bricks span the backwall, leaving space for the rectangular air supply tube that runs up the backwall for the secondary burn chamber. Nothing covers the air tube, it must remain exposed to the fire to pre-heat the secondary combustion air.
Here's where the extra firebrick came from: your Spectrum has a standard ash dump in the floor, which means you use a cut brick to cover the floor behind the ash dump instead of a full brick. Not all PE stoves have the ash dump in the floor, so the standard brick set that ships with all models includes both the cut brick and the full brick. Save the extra full brick for a spare.
As to the wire, it shouldn't be there. PE's are full-bead welded around the inside seams by a wire-fed robot arm, and it sounds like your "wire" might be a bit of welding slag.
Gotcha. I thought we were talking about where to load from ie loading from the top like a washing machine. Thought I missed something fundamental. I was thinking about the smaller PE, but it was meant to load W/E and I didn't like the thought of a log rolling out so went with this one with a larger firebox and N/S configuration.
Thanks Tom - sounds like I need to dig out the wire clippers. You know, the way it's sticking out from the wall with the little tip on the end, almost looks like a sensor, I just cant find the digital temp display.
Thanks Tom - sounds like I need to dig out the wire clippers. You know, the way it's sticking out from the wall with the little tip on the end, almost looks like a sensor, I just cant find the digital temp display.
If you've done much welding you've likely stuck your rod to the weld. The wire looks like the mig welding wire that stuck to the puddle and then the machine moved on to the next weld or stove and the wire was either snipped off or broke off when the robot moved. A wirefeed welder man always has a pair of dykes close by to snip the wire. I have found pieces of wire like this on truck frames, tractor implements, and many other production welded pieces.
How about a pic of the install?
How about a pic of the install?
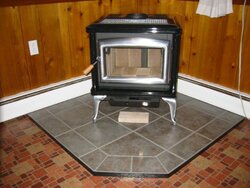
N1ST said:Ok, here's a pic zoomed out a bit...
Damn nice lookin stove. You are gonna enjoy that pup.
I like the contrasting colors. Roo's Summit with the black legs and door and my 30 brown with black legs and door. Gives'em a nice look.
Now hook that sucker up and give us FIRE!
N1ST said:New spectrum delivered today! A couple of questions for the group... One brick on the back sticks out farther than the other. On the parts diagram, there is no brick in this spot. Behind this brick is a vertical steel bar which is about flush with the other bricks. Is this brick in front of the bar needed? Without it, I could certainly fit in longer logs. Also, there is a wire thingy sticking out right above the brick - whats that for? Enclosed is a pic without the brick in place.
Absolutely agree with the other posters, that "wire thingy" looks like nothing more than an extra bit of MIG wire, especially if you said it ends in a weld puddle. Does it look a bit copper plated? (Most MIG wire has a copper flash coat on it's surface) I get a fair number of those, and they aren't a big deal. Just either wiggle it until it snaps off, or clip it off with a pair of nippers if it bothers you - ignore it if it doesn't ;-P Technically it should have been taken off during QA inspection, but it's a minor flaw that doesn't hurt anything.
However just to be paranoid, I'd suggest looking real close at all the welds in that general area to make sure they are complete, actually joining the parts they should be connecting, and so forth. I'm told that PE uses robots to weld their stoves, and in theory a robot should be making a "perfect" enough weld not to leave a "tail" like that. It is remotely possible that something caused the robot to go "off course" and make it's welds slightly out of position, leading to the tail... Not likely, but I figure it is probably easier to check now before you burn the stove and get everything all dirty...
Gooserider
- Status
- Not open for further replies.
Similar threads
- Replies
- 1
- Views
- 701
- Replies
- 1
- Views
- 968
- Replies
- 0
- Views
- 824
- Replies
- 1
- Views
- 2K
- Replies
- 11
- Views
- 2K