Removing damper from woodstove pipe

  • Active since 1995, Hearth.com is THE place on the internet for free information and advice about wood stoves, pellet stoves and other energy saving equipment.

    We strive to provide opinions, articles, discussions and history related to Hearth Products and in a more general sense, energy issues.

    We promote the EFFICIENT, RESPONSIBLE, CLEAN and SAFE use of all fuels, whether renewable or fossil.

Dabbler

New Member
Oct 15, 2023
36
Northeast
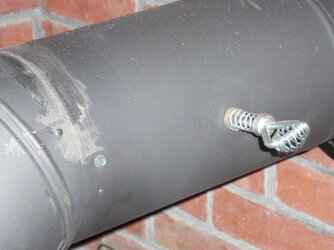
I would like to remove the damper from the flue pipe on my woodstove. A workman replaced the pipes and installed a damper over my strong objections. The instructions that came with the stove clearly said to not install a damper and cited federal regulations for this type of stove. I'm not satisfied with how the stove is burning (it was fine before). Two questions:

(1) The workman used furnace cement to seal each joint on the pipes. How do I remove this? I hope that removing the seal on both ends of the section with the damper will allow me to remove that section without disturbing the other sections too much.

(2) How should I plug the two spindle holes in the pipe ?

Consider me a rookie. Thanks for your help!

.
 
That is weird that anyone would put something in that was not requested. Hope it wasn't paid for. What stove is this for and is the stove pipe single-wall or double-wall?

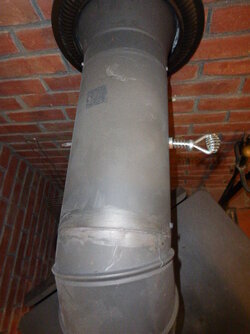
FWIW, stove pipe is not cemented together. Can you post a pictures of the whole install and the damper section itself? There may be other issues.
 
Here are some photos. This a Canadian stove made by CFM. I believe it's identical to the Englander 13: https://www.acmestoveco.com/product/englander-13-nc-pedestal/ Notice that there's a damper below the fire box, which was working fine. The pipe looked like a single wall when I saw it upon installation.


Woodstove.JPG
P1010633.JPG
 
Last edited:
I can see why and agree a damper is not needed. Normally one wants a 3ft. rise on the stove pipe before going horizontal. The horizontal run on the short vertical rise is already slowing down the flue gases considerably. A damper would not be used there unless the draft was exceptionally strong.

It also looks to me like the stove pipe was installed backward. The crimped end always points toward the stove.
 
What is the difference in how the stove burns now compared to before?
Before: No problems at all with air quality in house. Everything was working fine. After: House smelled like wood smoke, air quality deteriorated until I had to stop using the stove a couple of weeks later. It smelled like wood smoke, not burning cement. The cement smell went away after a few hours but the wood smoke smell persisted. The air quality in the house felt quite unhealthy.
 
Last edited:
I can see why and agree a damper is not needed. Normally one wants a 3ft. rise on the stove pipe before going horizontal. The horizontal run on the short vertical rise is already slowing down the flue gases considerably. A damper would not be used there unless the draft was exceptionally strong.

It also looks to me like the stove pipe was installed backward. The crimped end always points toward the stove.
Begreen, my intuitive thought (not based on knowledge or experience), was that even if the damper were horizontal, it might be making it harder for the smoke to rise. Do you think that could be true?

I can't tell if the crimped end is pointing toward the stove. Is there a way to tell this?

The draft has never been great on this stove, but over the years I learned to work with it and it was fine until the pipes were changed.
 
The crimped end is on the male end that inserts into the female end of the adjacent fitting.

The short vertical rise off the stove is not helping. A draft damper, even when open will restrict draft a bit. It needs to be removed.

It also looks like there is a 6" to 8" increaser at the chimney thimble. That also is not helping draft. What is the size of the liner in the chimney?
 
Thanks for the information so far. Can we proceed to removing the damper now as a first step? If that works, I'll be happy. See my two original questions.
 
Yes. it can be removed. I would just replace that section of pipe. Otherwise a short 1/4-20 x 1/2" bolt in each hole should help seal them. The other errors remain.

What is the ID of the chimney liner?
 
Instructions for removing that section, since it's cemented?
Tap it. The cement is not an adhesive. It will flake right off.
 
I suspect cement was used due to the backwards pipe installation. Pipe should be removed, and installed correctly with no damper. Backwards pipes leak.
 
I highly doubt that an open damper would have that great of an affect. It could, but it would be a rare instance. Combined with such short vertical rise…ah, maybe. Remove it and see if it makes a difference. If it does, then it does…that doesn’t mean the damper was the biggest cause for smoke and/or smells…that’s more the fault of little vertical rise and anything else wrong with the chimney, be it lack of height, bad design, liner too large and/or uninsulated, etc.

My biggest concern here is the negativity towards a pipe damper. If you ever get to use a stove on a well designed chimney you might discover how useful a pipe damper can be and how good of a safety device they really are when combined with some common sense and a little knowledge. As we often say about pipe dampers, “it’s better to have it and not need it than to need it and not have it”.

As such, a pipe damper will always be installed on any stove pipe I ever have. There are no rules saying I have to use it and there are no federal rules, NONE, against installing or using one. A manufacturer might recommend against it, but a recommendation is just that, not a federal regulation…not in the U.S.
 
  • Like
Reactions: Heat Maxx
I suspect cement was used due to the backwards pipe installation. Pipe should be removed, and installed correctly with no damper. Backwards pipes leak.
I think I agree with you. Do you think I can do this job on my own with no experience? Very hard to find anyone locally to do it, and it would cost about $400.
I highly doubt that an open damper would have that great of an affect. It could, but it would be a rare instance. Combined with such short vertical rise…ah, maybe. Remove it and see if it makes a difference. If it does, then it does…that doesn’t mean the damper was the biggest cause for smoke and/or smells…that’s more the fault of little vertical rise and anything else wrong with the chimney, be it lack of height, bad design, liner too large and/or uninsulated, etc.

My biggest concern here is the negativity towards a pipe damper. If you ever get to use a stove on a well designed chimney you might discover how useful a pipe damper can be and how good of a safety device they really are when combined with some common sense and a little knowledge. As we often say about pipe dampers, “it’s better to have it and not need it than to need it and not have it”.

As such, a pipe damper will always be installed on any stove pipe I ever have. There are no rules saying I have to use it and there are no federal rules, NONE, against installing or using one. A manufacturer might recommend against it, but a recommendation is just that, not a federal regulation…not in the U.S.
I just want to reiterate that the stove was working fine prior to replacing the pipe. Also note that this stove has an air controller at the bottom, which has always been enough to control the temperature.

However, in support of what you're saying, here is a thread about the same stove where the owner says he got good good results by installing a flue damper: https://www.hearth.com/talk/threads...or-the-first-time-on-my-englander-13nc.21781/

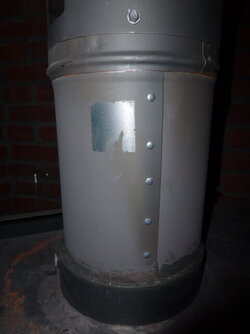
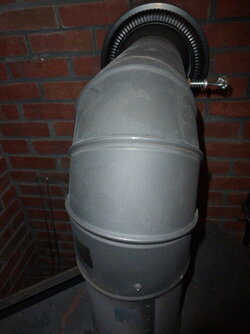
Here are some closer photos of the pipes. Can you tell whether the crimped edge is in the right direction?

P1010760.JPG P1010761.JPG P1010762.JPG
 
The installer used a hodgepodge of fittings to get the job done. By putting in an adapter on the stove end of the elbow, he was able to insert the female end of the elbow into the adapter, thus correcting the reversed direction. Correcting the piping would require buying a good crimper. Then it is a matter of removing the damper, plugging the holes it created, reversing the horizontal section and elbow direction. The adapter would then be unnecessary. I'd also turn the vertical pipe so that the seam faces backward, out of sight.
 
The installer used a hodgepodge of fittings to get the job done. By putting in an adapter on the stove end of the elbow, he was able to insert the female end of the elbow into the adapter, thus correcting the reversed direction. Correcting the piping would require buying a good crimper and reversing the horizontal section and elbow direction. The adapter would then be unnecessary.
Thank you. That's very helpful but discouraging.
(1) Could this account for the smoke problem?
(2) What is the best course now? Can I replace "some" of the pipes or would I need to replace "all" of them and start over?
 
What state are you located in? The northeast is still relatively warm. See if the stove works better when the temperature is below 45º outside. At 50-60º it probably will draft poorly.

Note that the thread posted about the Englander 13NC tells us nothing about the installation nor anything about the operator's familiarity with the stove and ability to run it properly.
 
I'm not using the stove currently. I don't want to build a fire in it until I know the pipe issue has been sorted out. Prior to the pipes being changed I had no trouble with the operation regardless of the outside temperature.
 
Thank you. That's very helpful but discouraging.
(1) Could this account for the smoke problem?
(2) What is the best course now? Can I replace "some" of the pipes or would I need to replace "all" of them and start over?
How is this discouraging? It's normally not a complicated procedure but if one lacks the tools and mechanical skills then that's understandable. No new pipe would be needed.
I'm not using the stove currently. I don't want to build a fire in it until I know the pipe issue has been sorted out. Prior to the pipes being changed I had no trouble with the operation regardless of the outside temperature.
It's hard to imagine this setup drafting well at 55-60º outside. The current stovepipe does not look dangerous.

Why was the work done in the first place? Was the old stove pipe in bad shape?

Was the chimney cleaned prior to the installation of the new stove pipe?
 
Honestly with that short of a rise i would consider swapping out to 2 45's instead of the 90. Might get a little more draft.
 
Honestly with that short of a rise i would consider swapping out to 2 45's instead of the 90. Might get a little more draft.
Every little bit helps in that scenario. Three to six feet of additional chimney height could also help.
 
Every little bit helps in that scenario. Three to six feet of additional chimney height could also help.
Very true! 1 extra section might be the difference between running the stove fine at 50F and having to wait till its 40F.

Edit: Preheating your flue will help as well if your problems are more during startup. Just shoot a blow torch or other hot flame up the flew inside the stove a couple minutes before you light the wood to get the draft started.
 
Honestly with that short of a rise i would consider swapping out to 2 45's instead of the 90. Might get a little more draft.
You beat me to this suggestion.
 
  • Like
Reactions: ctreitzell