Removing damper from woodstove pipe
- Thread starter Dabbler
- Start date
-
Active since 1995, Hearth.com is THE place on the internet for free information and advice about wood stoves, pellet stoves and other energy saving equipment.
We strive to provide opinions, articles, discussions and history related to Hearth Products and in a more general sense, energy issues.
We promote the EFFICIENT, RESPONSIBLE, CLEAN and SAFE use of all fuels, whether renewable or fossil.
You are using an out of date browser. It may not display this or other websites correctly.
You should upgrade or use an alternative browser.
You should upgrade or use an alternative browser.
How is this discouraging? It's normally not a complicated procedure but if one lacks the tools and mechanical skills then that's understandable. No new pipe would be needed.
It's hard to imagine this setup drafting well at 55-60º outside. The current stovepipe does not look dangerous.
Why was the work done in the first place? Was the old stove pipe in bad shape?
Was the chimney cleaned prior to the installation of the new stove pipe?
I like that idea, thanks. It's becoming apparent that I'm going to need to hire someone to do this properly.Honestly with that short of a rise i would consider swapping out to 2 45's instead of the 90. Might get a little more draft.
I like that idea, thanks. It's becoming apparent that I'm going to need to hire someone to do thiNo n
I wouodnt pay anyone to do this. but if you are not handy at all might be the right route.I like that idea, thanks. It's becoming apparent that I'm going to need to hire someone to do this properly.
I wouldn't say I'm not handy at all. I can measure, use a drill, etc. It turns out that I'm not able to find anyone local to do this for a reasonable price on a reasonable timeline, so I'd like to give this a try myself. How should I go about it? What safety issues should I be aware of?I wouodnt pay anyone to do this. but if you are not handy at all might be the right route.
This is not difficult to remove and replace connector pipe correctly.I wouldn't say I'm not handy at all. I can measure, use a drill, etc. It turns out that I'm not able to find anyone local to do this for a reasonable price on a reasonable timeline, so I'd like to give this a try myself. How should I go about it? What safety issues should I be aware of?
The open damper provides little to no resistance, and should not have an adverse affect when open. We don’t know if the damper plate is installed correctly on the rod you turn showing the handle position is coordinated with actual damper position. It could be partially closed and you don’t know it.
Tap the joints to break the seal created by cement. That is not necessary and should not be used.
The male, or crimped end faces down into the larger pipe below it so any condensing fluids from combustion stay inside and drip back down into stove.
Pipe joints are finished with 3 self tapping screws at each joint.
The only special tool other than tin snips to cut metal would be a hand pipe crimping tool that makes the wavy crimps on the male end you cut off. Do not cut the female end since that will be visible when put together.
Once pipes are removed, make sure the pipe inserted into chimney is not too far in. It can be slid in so far that it blocks the cross sectional diameter of flue causing the smoking issues.
The next thing when pipe is removed is to check the diameter of the chimney flue liner. This is critical to create the correct draft needed as well as fire safety possibly requiring an insulated stainless steel liner the same size as stove outlet. That is the most important part of the job.
Use a mirror to look up chimney flue assuring there are no obstructions. A certified sweep would at this point possibly recommended camera inspection if issues are found. They would also check exterior of chimney for clearance to combustible material.
It may have worked with the existing chimney, but over TIME may not be safe, and in the event of a chimney fire, the existing chimney without insulated liner cannot protect the dwelling from the intense creosote fueled chimney fire.
Exterior chimneys require 1 inch clearance to combustibles and interior chimneys require 2 inches. When these clearances are not met, an insulated liner is required.
As you can see, the black connector pipe is the simplest part of the venting system.
Thank you very much for these instructions. I guess I need to give this some thought. Seems a bit complicated. I don't have tin snips or a crimping tool.This is not difficult to remove and replace connector pipe correctly.
The open damper provides little to no resistance, and should not have an adverse affect when open. We don’t know if the damper plate is installed correctly on the rod you turn showing the handle position is coordinated with actual damper position. It could be partially closed and you don’t know it.
Tap the joints to break the seal created by cement. That is not necessary and should not be used.
The male, or crimped end faces down into the larger pipe below it so any condensing fluids from combustion stay inside and drip back down into stove.
Pipe joints are finished with 3 self tapping screws at each joint.
The only special tool other than tin snips to cut metal would be a hand pipe crimping tool that makes the wavy crimps on the male end you cut off. Do not cut the female end since that will be visible when put together.
Once pipes are removed, make sure the pipe inserted into chimney is not too far in. It can be slid in so far that it blocks the cross sectional diameter of flue causing the smoking issues.
The next thing when pipe is removed is to check the diameter of the chimney flue liner. This is critical to create the correct draft needed as well as fire safety possibly requiring an insulated stainless steel liner the same size as stove outlet. That is the most important part of the job.
Use a mirror to look up chimney flue assuring there are no obstructions. A certified sweep would at this point possibly recommended camera inspection if issues are found. They would also check exterior of chimney for clearance to combustible material.
It may have worked with the existing chimney, but over TIME may not be safe, and in the event of a chimney fire, the existing chimney without insulated liner cannot protect the dwelling from the intense creosote fueled chimney fire.
Exterior chimneys require 1 inch clearance to combustibles and interior chimneys require 2 inches. When these clearances are not met, an insulated liner is required.
As you can see, the black connector pipe is the simplest part of the venting system.
I'm having the pipes replaced tomorrow. Quick question about the direction of the male end: Is this also important on the horizontal section, or only on the vertical and angled sections? Could a reversed pipe in the horizontal section influence the flow of smoke and gasses? (I'm wondering theoretically. I plan to replace all the pipes that are in the wrong direction.)
Every section of pipe is supposed to have the male end down as far as I know. Were you able to find an increaser with a male end? That seems like it would solve your backwards pipe problems. Maybe crimp the existing increaser down.
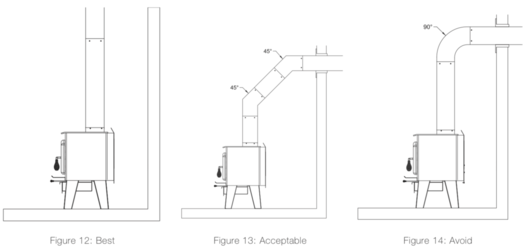
If it were me I would use (2) 45s and a new section of stove pipe, with a damper. I know you don’t like dampers but I don’t think they affect draft when open.
Single wall is easy enough to work with, definitely use the tin snips for cutting, I’ve also used a pneumatic cutoff wheel.
3 screws per joint, no big deal.
Not really, but the point is not the flow of gases. the crimp is toward the stove so that any condensed tars drip back into the stove and not down the sides of the pipe. There will be no horizontal section with a 45º offset instead.Could a reversed pipe in the horizontal section influence the flow of smoke and gasses?
They do have a small effect, even when open. Given the short rise to the thimble, I would leave it out.I know you don’t like dampers but I don’t think they affect draft when open.
Last edited:
Do you mean ONE 45-degree elbow, or TWO?There will be no horizontal section with a 45º offset instead.
kcmclellan
Member
Nothing wrong with getting a pro to do the job. I wouldn't hesitate to hire someone who will do the job properly and correctly first time out!I like that idea, thanks. It's becoming apparent that I'm going to need to hire someone to do this properly.
all night moe
Minister of Fire
You have one 90 degree now. Two 45s equal 90.Do you mean ONE 45-degree elbow, or TWO?
I think my woodstove saga is over. I had the pipes replaced, without a damper, and there is no more smoke smell in the house.
When I took the old pipes apart I discovered that they either had no crimping on either end, the crimped end was pointing in the wrong direction, or instead of crimping the worker cut a slit in the end of the pipe and squeezed the edges of the cut together to make the pipe smaller. I still don't know what caused the smoke in the house, but it's gone.
I did encounter one problem---the increaser (6" to 8" at the chimney) was only available as female. To get around that we had to crimp both ends of the horizontal pipe.
I wish I had tried two 45-degree elbows as suggested, but I suspected there wasn't room for two because the vertical pipe is only 8.5" tall. The draft is still not great during the first hour, but the small Englander is infamous for this. Once the first load of wood is burning strong, subsequent loads do OK and I can close the air vent at least halfway. However, according to many reviews and my experience, this will never be a stove you can pack tight with large logs and close the vent for a long burn.
In any case, the air quality in the house is much better than before.
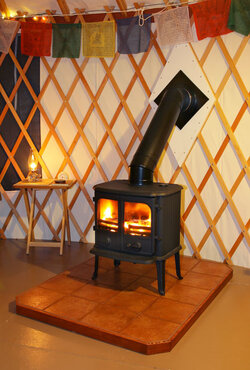
I'm glad there is progress. 50% of the problem was poor workmanship. It looks like a the 45s could work with the first 45 right off of the flue collar. It might need a short section off the top 45 to connect to the thimble. That was the solution for this yurt installation with a short chimney, though we had the luxury of establishing the thimble height.

AFAIK, there is no relation between the CFM stoves and Englanders. The 13NC was purely Englander. The CFM stoves are much more closely related to the Century line of SBI stoves. Most of them were pretty easy on their draft requirements. SBI just aquired Englander about a year ago.

AFAIK, there is no relation between the CFM stoves and Englanders. The 13NC was purely Englander. The CFM stoves are much more closely related to the Century line of SBI stoves. Most of them were pretty easy on their draft requirements. SBI just aquired Englander about a year ago.
Oh shoot, I didn't notice you said this. I should have read your instructions better. Also didn't notice the part about not cutting the female end. Well, live and learn. My stove is functional but not beautiful, what with silver screws and the cut female pipe. I did get the seams facing back and down, though.There will be no horizontal section with a 45º offset instead.
My CFM appears identical to the Englander 13.AFAIK, there is no relation between the CFM stoves and Englanders. The 13NC was purely Englander.
Does it look like the main cause of my draft problem is that the hole into the chimney is too low? Someone mentioned above that the minimum height to the vertical pipe is 3 feet.
Visually yes though the door is different, but not sure internally? Maybe they contracted with Englander? What model CFM is this?My CFM appears identical to the Englander 13.
Yes, more rise off the stove would have helped. The 45s instead of 90s would compensate. The diagram I posted earlier is from SBI manuals.Does it look like the main cause of my draft problem is that the hole into the chimney is too low? Someone mentioned above that the minimum height to the vertical pipe is 3 feet.
Model #: 13 NC CLP. This manual came with the stove: https://www.manualslib.com/manual/186207/Cfm-Air-Tight-Wood-Stove.html#manualVisually yes though the door is different, but not sure internally? Maybe they contracted with Englander? What model CFM is this?
Yes, more rise off the stove would have helped. The 45s instead of 90s would compensate. The diagram I posted earlier is from SBI manuals.
Thanks. You taught me a couple of important things . . . for the next house. The reason I didn't get two 45s was because I didn't have time to consider a different setup before the installer came. I had to supply the pipes, so I just went with the setup that was there 30 years ago when I bought the house. I'm only now realizing the ways that that setup wasn't optimal.
That manual is for a different stove entirely. It's for the CFM (Century) FW27009. This is the manual for the stove:
Last edited:
Similar threads
- Replies
- 21
- Views
- 2K
- Replies
- 14
- Views
- 1K
- Replies
- 4
- Views
- 522
- Replies
- 6
- Views
- 496


