Roof is leaking rainwater down my stove pipe and pooling around my stove!

  • Active since 1995, Hearth.com is THE place on the internet for free information and advice about wood stoves, pellet stoves and other energy saving equipment.

    We strive to provide opinions, articles, discussions and history related to Hearth Products and in a more general sense, energy issues.

    We promote the EFFICIENT, RESPONSIBLE, CLEAN and SAFE use of all fuels, whether renewable or fossil.
Status
Not open for further replies.

kolbyTheDog

New Member
Nov 19, 2007
41
Central Illinois
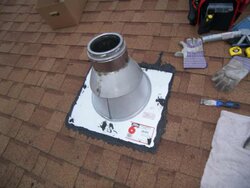
I installed my freestanding Regency R6 wood stove myself in December 2007 and it worked great all winter. This is my first wood stove and first time cutting a hole in a roof. Throughout last winter and this summer, when it rained pretty hard I would get a puddle of water on the top of my stove - rainwater would drip down the outside of my stove pipe in the house and fall onto the stove top. Sometimes I would get enough water that it would even puddle on the floor. I figured this was because I did a poor job tarring the flashing into the shingles since I originally only used a single tube of asphalt goo. Earlier this summer I got up into the attic and put a plastic storage box next to the insulation shield and was able to catch the dripping rainwater and had no more puddles.

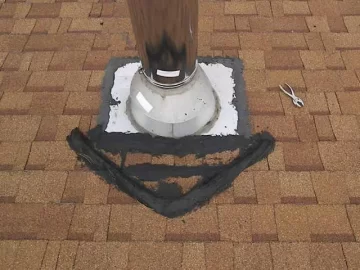
Last week I went to the hardware store and bought a gallon of asphalt goo and went up on the roof and made a V shaped dam as I saw in a book how building a dam could channel the rainwater away from the roof penetration of a chimney. I also went up to the attic and removed the plastic storage box / drip catcher. Yesterday it rained pretty hard and I had a huge puddle on the floor all around my woodstove! ARGH! I went up into the attic and pulled the pink fiberglass insulation back and found the insulation in the rafter area next to the SS chimney was soaked. I put the plastic storage box / drip catcher back and also propped up the insulation so it will dry out.

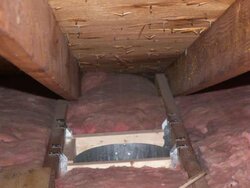
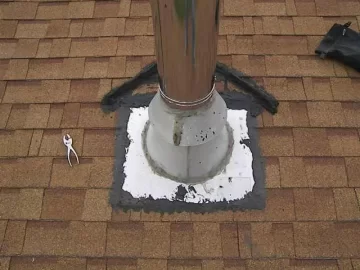
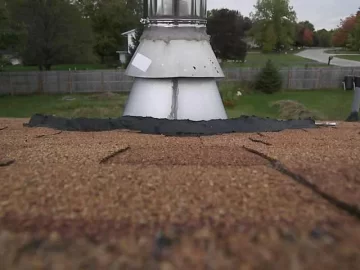
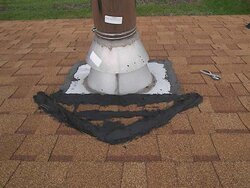
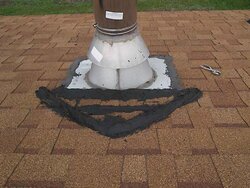
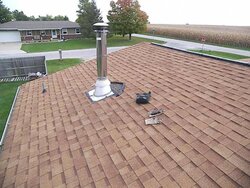
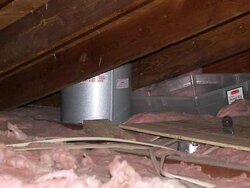
It seems water is coming in between the roof plywood / decking and the SS chimney flashing as I can see a drip mark on one of the rafters right under the edge of the hole I cut in the roof. Any ideas on what I can do to stop this? Should I add more goo around the flashing? If so, where specifically? I attached some pics of my install. The leak is happening on the side where the silver pliers are laying on the roof.
 

Attachments

  • 100_4611_640x480.JPG
    100_4611_640x480.JPG
    35.5 KB · Views: 7,019
  • 100_4612_640x480.JPG
    100_4612_640x480.JPG
    37.7 KB · Views: 4,508
  • 100_4613_640x480.JPG
    100_4613_640x480.JPG
    25.4 KB · Views: 4,053
  • 100_4614_640x480.JPG
    100_4614_640x480.JPG
    36.4 KB · Views: 3,885
  • 100_4615_640x480.JPG
    100_4615_640x480.JPG
    36.7 KB · Views: 3,915
  • 100_4616_640x480.JPG
    100_4616_640x480.JPG
    42.9 KB · Views: 4,360
  • 100_4621_640x480.JPG
    100_4621_640x480.JPG
    22.1 KB · Views: 3,782
Can't quite tell exactly how you installed that, but the flashing should be underneath the shingles and sealed to the roofing paper, then the shingles replaced atop the flashing. It should all be put together so that water runs off, not under the shingles. Looks to me like you've got the flashing sitting on top of the shingles, so water can get between the two and find its way to the hole in the roof. Ideally, there should be nothing but shingled roof beneath the perimeter of the storm collar. I'm not a pro, just speculatin' here. Rick
 
Yes, I installed this in mid December so it was very cold out. I could barely pry the shingles up without breaking them and I didn't have any new ones on hand or the knowledge of how to replace them. I tucked the top part of the flashing under the line of shingles up towards the top but the sides of the flashing are laying on top of parts of the shingles on the sides (I think).

I attached to this post two pics from when I did the install. I forgot to take a pic of the hole in the roof without the flashing over it...
 

Attachments

  • 100_3242_640x480.JPG
    100_3242_640x480.JPG
    24.3 KB · Views: 2,542
  • 100_3177_640x480.JPG
    100_3177_640x480.JPG
    20.4 KB · Views: 2,381
I'd get a square of shingles and get at it (or get a roofer to do it). It looks like your roof is fairly new so you should get a decent color match.

In a way it is good that you had a noticeable leak. You can fix it now and not have any future problems. If it was a minor (undetected) leak you'd probably have ended up with a serious rot problem.
 
Hay dude they didn't have the 5gallon can of tar at the hardware store ? . step one in the fix is to leave the beer on the ground . step 2 would be to go to HD and get some shingles and a flat bar used to remove shingles. ( Leave the tar at the store) step 3 remove the roofing around the pipe flange and try to clean flange or replace it with a new one . 4 replace shingle below the pipe 5 nail pipe flange to roof with 4 nails( Don'T go crazy with the nails) 6 re place shingles on top of pipe . Most pipe flashing don't need any tar but if you have to get sticky you could put a bead of tar on top of the flashing and under the shingle. If its cold you could slap the roofing with the flat bar to break the seal between the layers . good luck
 
I know you hate to hear this but I agree with Rick and EngineRep. It looks like the storm collar is sealed well so that only leaves the flashing.

I also have tried to seal a strip of flashing on top of the shingles and it did not work no matter how much goo I applied to it.

I do have an idea that my keep you from having to lift the cone flashing. Get another strip of flashing and install it under some shingles a row or two up-roof from the stove pipe flashing. Position the new flashing under the shingles close enough that it can over lap the stove pipe flashing.
 
One of the potential issues with this install, is that if you try to seal the bottom edge of the flashing, it can trap water that gets in at a higher spot. If the water then backs up, it will find the first path out, which may be via the opening in the sheathing down into the ceiling support / radiation shield. When applying sealant to flashing, put an upside down "U" shaped bead on the flashing with the open end facing down. What you are trying to do is prevent water coming in the top and sides. If any does, you want it to be able to run out the bottom.

My 2 previous chimney installs also have the flashing slipped up underneath the upper layer of shingles (the supervent flashing has about a 6" overhang on all edges) and sitting on top of the shingles everywhere else. I have never had a drop come in the house yet, even when the remnants of IKE came through here with torrential rain for hours.

Make sure the storm collar is properly sealed all around its circumference and on the overlap of the cone. Put a bead of silicone up the seam on the side of the pipe above the storm collar. Put a bead of silicone around the joint of the rain cap to class A pipe (not inside the joint, if you ever want to get it apart again...).

And get rid of the dam you created above the flashing. That dam will make water pool and back up, creating more problems than ever.
 
Kolby what fossil said...

...after you re-shingle if you have to use some GE silicone caulk it dries clear and you wont see it from the ground. 2 hour job max...on a warm day. Good luck on the fix.
 
Status
Not open for further replies.