
steel studs for hearth
- Thread starter greythorn3
- Start date
-
Active since 1995, Hearth.com is THE place on the internet for free information and advice about wood stoves, pellet stoves and other energy saving equipment.
We strive to provide opinions, articles, discussions and history related to Hearth Products and in a more general sense, energy issues.
We promote the EFFICIENT, RESPONSIBLE, CLEAN and SAFE use of all fuels, whether renewable or fossil.
You are using an out of date browser. It may not display this or other websites correctly.
You should upgrade or use an alternative browser.
You should upgrade or use an alternative browser.
- Status
- Not open for further replies.
") ya its galvanized
ya its galvanized
got the first layer of cement board on the steel! gotta go to lowes and get some anti acid mesh and the motar and 3 more sheets of the cement board, and look at some tile to give me something to ponder for what color or texture i want it in the end.
ok got my 2nd layer of cement board cut, now im getitng ready to motar/thinset it down, now do you use screws to screw the 2nd layer of cement board to the first? or do you just motar it like the tile???
greythorn3 said:ok got my 2nd layer of cement board cut, now im getitng ready to motar/thinset it down, now do you use screws to screw the 2nd layer of cement board to the first? or do you just motar it like the tile???
Good question so far your hearth looks good and I am a few steps behind you on the hearth thing.. Did you dry lay your tile and then build the hearth box to accomodate the tile or did you just build the size box you wanted/needed and will deal with the tile cuts? Man I feel pretty dumb on this as I've never done tile before.. More questions than answers..
Ray
Screw the top layer to the steel with screws long enough to penetrate both layers of cement board. You do not screw the top layer to just the layer underneath. They sell special screws for this purpose usually right where the cement board is sold. In a pinch, drywall screws will work.
ok i will use the special screws i got to screw them to the studs thru the 2 layers.they are the rock-on screws, it might take a miricle for me no to screw into other screws since i really put allot in one the first layer tho! every 4 inches or so.
raybonz said:greythorn3 said:ok got my 2nd layer of cement board cut, now im getitng ready to motar/thinset it down, now do you use screws to screw the 2nd layer of cement board to the first? or do you just motar it like the tile???
Good question so far your hearth looks good and I am a few steps behind you on the hearth thing.. Did you dry lay your tile and then build the hearth box to accomodate the tile or did you just build the size box you wanted/needed and will deal with the tile cuts? Man I feel pretty dumb on this as I've never done tile before.. More questions than answers..
Ray
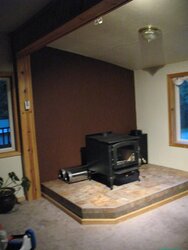
Well i started with the stove purchase, then i went off the R value plus the size of the hearth required, and found the location i wanted to place it, well the place i wanted to put it was good so i just oversized it to go to a beam in the room so i would have plenty of space to feel comfortable with its location.
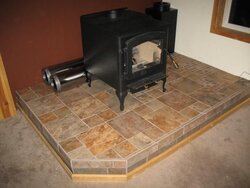
I have a tile saw and will cut the tile i need to but the general dimensions of the hearth are 5' x 7' 10" i used 5' because thats what length the sheets of durock come in, and its a little over the length required for the hearth by the stove manufacture
Highbeam said:Wow, from a BK to a non-cat englander.
haha! no the blaze kings still in use, its in my city house, this is my country house so i use the 2 englanders, anyhow thats the plan, to keep that nasty fuel oil guy away.
ok im starting tileing, how do you guys tile the side of the hearth? is there a trick to make the tiles stay in the motar on the side without falling off or moving down while they dry??
also my stove came in finally to HD and gonna get it this weekend
also my stove came in finally to HD and gonna get it this weekend
This is the same as tiling a backsplash. I start on the bottom and rest the bottom tile right on the subfloor. Then stack the tiles vertically using spacers. I only used a single tile on my hearth sides so it was much easier. Can't slide down. Use a thicker thinset mix mainly to keep the tile sucked to the wall.
I was worried too... but they just stuck there fine. Used the little spacers a well as I could.. our wall tile is custom hand formed and has lots of imperfections/texture.. in the craftsman style. Even and straight was relative with them. We went "up" 14 tiles, not a one tried to fall off the wall.
thanks guys guess i will give it a go.
was trying to get some spacers another memeber here in alaska has that was giving them away for free, but even after lending him my chainsaw he still ignores my pm to get them free spacers, and said he is going to throw them out. stuckup kids now-a-days.
so gonna wing it with cardboard spacers or wood ones.
I'd get a bag of spacers from the hardware or big box store if you have one nearby. Their design is like little crosses and tees so that they maintain spacing in multiple directions at once. Hard to make them. They are inexpensive, consistent in size and won't soak up moisture.
ya i was just trying to avoid driving the 100 mile round trip to get them since hes in palmer alaska too.
greythorn3 said:ya i was just trying to avoid driving the 100 mile round trip to get them since hes in palmer alaska too.
wait 'till Saturday, take her with ya.. do the Noisy Goose for lunch.. make a day of it.. lol
The joy of living rural is everything is a drive.. the pain of living rural is everything is a drive.
Luckily, most days I don't need anything... but sometimes I just go for a drive anyways..
well got the hearth done, its really solid. still waiting to grout it tho. i dont have any fears teh stove will fall thru it at all. solid as a rock. will get some pics up tonight, dont got the chimney in yet but its mostly sitting on the hearth waiting.```
well got the hearth done, its really solid. still waiting to grout it tho. i dont have any fears teh stove will fall thru it at all. solid as a rock. will get some pics up tonight, dont got the chimney in yet but its mostly sitting on the hearth waiting.```
greythorn3 said:well got the hearth done, its really solid. still waiting to grout it tho. i dont have any fears teh stove will fall thru it at all. solid as a rock. will get some pics up tonight, dont got the chimney in yet but its mostly sitting on the hearth waiting.```
Look forward to the pics! I have made good progress here as well with pics of course!
Good Luck!
Ray
greythorn3 said:oops i mean i am just waiting to SEAL the grout. ya!!
I mixed my grout with Grout Once that Best Tile recommended instead of water so you never have to seal again.. It came out good and the grout color looked fine..
Ray
well to late for that the grouts already done. anyhow heres some pictures. waiting to do some roof hole pokin soon, gotta wait tell it looks like its not gonna start raining tho
once thats done, then i gotta seal the grout, and slaughter a pig and i will be ready for the first fire in this new stove.
and then onto the basement install of the wood buring furnace.
once thats done, then i gotta seal the grout, and slaughter a pig and i will be ready for the first fire in this new stove.
and then onto the basement install of the wood buring furnace.
Attachments
- Status
- Not open for further replies.
Similar threads
- Replies
- 1
- Views
- 588
- Replies
- 21
- Views
- 1K
- Replies
- 1
- Views
- 862
- Replies
- 10
- Views
- 481