
steel studs for hearth
- Thread starter greythorn3
- Start date
-
Active since 1995, Hearth.com is THE place on the internet for free information and advice about wood stoves, pellet stoves and other energy saving equipment.
We strive to provide opinions, articles, discussions and history related to Hearth Products and in a more general sense, energy issues.
We promote the EFFICIENT, RESPONSIBLE, CLEAN and SAFE use of all fuels, whether renewable or fossil.
You are using an out of date browser. It may not display this or other websites correctly.
You should upgrade or use an alternative browser.
You should upgrade or use an alternative browser.
- Status
- Not open for further replies.
turbocruiser
Feeling the Heat
Wow that looks terrific! Everything coordinates really well with everything else. You have a safe, strong awesome looking setup. Out of curiosity, do you know what is waiting for you in the attic area above? Again that looks terrific you should be pretty proud.
 Nice job there. Wanna do mine ?????
 ya its pretty much a hot roof, with rolled roofing, so not much space between the actual ceiling and roof itself,just enough tfor 2x6 rafters and some batt insulatiom, the rafters are 24" on center too, pretty straight forward it seems. 4 12 pitch
ha i would help you do yours but you are a ways away, it was easy and some worries, but now that its done, man that things solid! i dont even think i would have needed the sheetmetal between the steel rafters and durock but i do like to worrie and that causes me to throw more into projects then is probably needed. hope it lasts for many years anyhow
thanks guys. cant wait tell i get the chimney done and start my first burning in this one.. been 60f out tho so it will be hot, but i can open windows and let that new stove stink out. before winter.
i sealed with the spray grout sealer and man was it easy! hope it holds up. it really didnt stink that bad but i had 4 windows open on 3 walls around the stove.
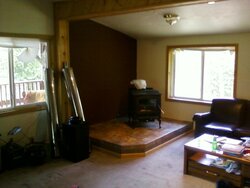
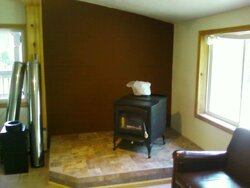
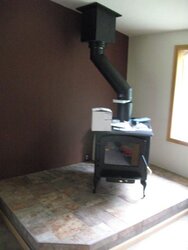
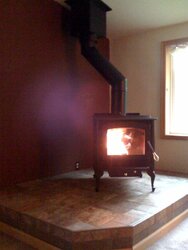
alright ive been trying the corner install also, what do you guys think looks better on this setup? the corner or parallel with the wall, the wife doesnt seem to care either way now.
Skip
Skip
Attachments

turbocruiser
Feeling the Heat
I really like the look of the corner install where it is bisecting the corner there. Just my 2 cents. Either way though it is going to look terrific!
Definitely the corner install. Has a better "feel" to it, matches better with the corner of yer hearth, and just opens up the room. I'd say if it was in the middle of a wall or long room then parallel, but like you have it pic #3 looks best.
The corner install will focus radiant(and blower) heat into the room and not toward the couch, which if it is leather may dry it out prematurely.
Corner install . . . both for the looks and for the reason BeGreen mentioned -- it will radiate the heat out into the room a bit better.
haha! ok guys its the corner install forsure then! thank you guys. the couch is pleather. it may have just melt.
well went to the stove dealer again to get some DVL black pipe, OUCH that hurt! 1 18" section, 2 45's a adjustable 6"piece and the stove and chimney adapters along with the roof brace. and another flashing for the 2nd chimney another 437$ gone.
Corner for sure, and here's why... think about how you will load this stove. You are going to come in with an arm load of wood and set it down on the open hearth area to the left. Then open the door with your left hand and feed the stove with your right hand. The corner install gives you more lay down area for wood and positions the door opening to better accept the wood.
Plus, you want to be able to see the fire as much as possible. The stove is like a TV and you face the screen towards the living space.
Plus, you want to be able to see the fire as much as possible. The stove is like a TV and you face the screen towards the living space.
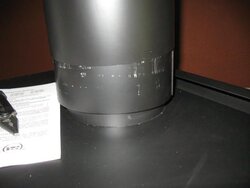
alright well i am about 2 inches to short for the pipe! gotta exchange the 6inch slip to a larger piece
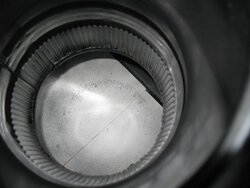
anyways ran into another issue. it doesnt seem the stove pipe adapter goes into the stove all the way, is it ok to alter the crimped end to get it to go further into the stove? or on the englander is it supposed to go like this? it seems like they didnt make the hole big enough for the crimped end of the pipe to go all the way into the stove, it will just go to the welded plate as it is. this leaves space between the outer double wall and the stove top.
anyone one else with a englander run into this?
Attachments
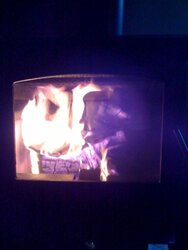
greythorn3 said:first fire in the new stove
Looks great congrats!! Hopefully soon I will be able to do the same and bake off the new paint! The fumes can be obnoxious and this is a good time of year to bake it on with all the windows open... How bad is the paint smell?
Ray
raybonz said:greythorn3 said:first fire in the new stove
Looks great congrats!! Hopefully soon I will be able to do the same and bake off the new paint! The fumes can be obnoxious and this is a good time of year to bake it on with all the windows open... How bad is the paint smell?
Ray
it wasent to bad to me, but im used to working on stinky greezy cars, but my wife wasent thrilled with the smell, we had all the windows open after it started stinking.
")
BlankBlankBlank
Minister of Fire
greythorn3, first off, your hearth and stove installation looks great. Very professional. Question is this: did you use screws or pop rivets to assemble the steel studs?
WoodNStuff said:greythorn3, first off, your hearth and stove installation looks great. Very professional. Question is this: did you use screws or pop rivets to assemble the steel studs?
used pop rivets, then screwed the concrete board to them.
bsj425
Burning Hunk
Hey what did you use to attach your trim to your tile? I am trimming mine up today and need some advice. Just general construction adhesive or something special to get the wood to bond to the tile?
- Status
- Not open for further replies.
Similar threads
- Replies
- 1
- Views
- 588
- Replies
- 21
- Views
- 1K
- Replies
- 1
- Views
- 862
- Replies
- 10
- Views
- 469