How Do I Restore An Old Papa Bear Door

  • Active since 1995, Hearth.com is THE place on the internet for free information and advice about wood stoves, pellet stoves and other energy saving equipment.

    We strive to provide opinions, articles, discussions and history related to Hearth Products and in a more general sense, energy issues.

    We promote the EFFICIENT, RESPONSIBLE, CLEAN and SAFE use of all fuels, whether renewable or fossil.

Todd67

Minister of Fire
Jun 25, 2012
940
Northern NY
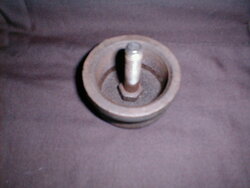
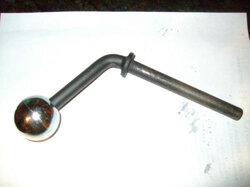
The door is the original cast iron door without the trees. I searched and read countless threads on the forum. From my research I have learned that the chrome ball handle was 1 3/4" diameter. The pipe cap dampers were 2" diameter, with a 1/2" bolt plug-welded to the cap. How big was the hole that was drilled in the center of the pipe caps prior to welding the bolt in place? How long were the bolts? Is there a source that sells the 1.75" chrome balls for the handles? I quoted this older post from coaly as a reference. I'm asking questions now, in case I find an old stove to restore to original specs and appearance.

The first post of this thread shows the early doors and draft caps.

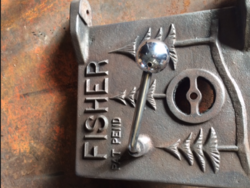
The first stoves had steel plate doors, then a cast iron door was suggested by Bob's father Baxter. A few cracked between the air intake holes and the trees were added to make the door thicker. This is an early three piece top before the tops were bent from one piece. The draft caps were pipe caps with a half inch bolt "plug" welded in the center. The draft caps with fins were invented by Bob's father, Baxter as well.
For a time line on the stoves development you can read The Fisher Stove Story here; Click on attachments tab for PDF of the scanned book
https://www.hearth.com/talk/wiki/bob-fisher/

Original draft caps;
View attachment 137836 View attachment 137837 The pipe cap was drilled in the center and welded through the hole to the top of bolt head.

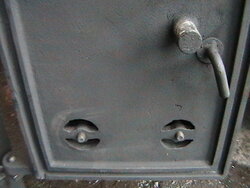
First style cast door; (and also the door style pictured on the Fisher Stove Story cover)
Notice bent handle and solid chrome ball as well.

View attachment 137838 Notice top plate detail welded with 3 pieces.
 
For the draft caps I'd use 1/2 bolts that have some unthreaded area. Cut the head off and drill your hole in the cap to fit the unthreaded part of the bolt snugly. Don't push the bolt all the way through but leave about 1/8" and weld flush. The trick would be to get the bolt set square so that the draft knob tightens to the door evenly. I would screw the bolt and draft cap tight to the door, then weld it up.
 
  • Like
Reactions: Todd67
Drill 1/4" or larger hole to plug weld the bolt head to cap. 3/8 is fine, the larger the hole, the more welding rod or wire is needed.
The bolt was 2 inch X 13 and fully threaded. When closed, the bolt protrudes through the door by 9/16 inch.

Original Fisher Draft Cap.JPG Original with bolt welded to cap.

The main issue is centering and holding the bolt exactly straight and parallel to the pipe cap threads. Metalworking is a hobby of mine that I've used over the years repairing and making parts for steam engines. It is a big part of stove repair. So I have a lathe, milling machine, and drill press to make what is needed. I'm sure there was a jig used which could be made easily with a 2 inch pipe plug that would screw into the cap. Center drill through the pipe plug and tap for 1/2 X 13 tpi bolt. Center drill drill is best done with a lathe using the tail stock. Screw bolt into plug from the inside of fitting. Allow bolt head to protrude far enough when plug is inserted into cap, that the bolt head comes into contact with cap. When screwing plug into cap, only a few turns by hand are required. This holds the bolt tight, straight and centered for welding.


No source I know of for chrome plated steel ball without threads and drilled for set screw. Again you are into making your own or finding an original.
 
Thanks for the answers guys! I wanted to ask this question in case others had similar questions. Thanks for the video link coaly!
 
Did the original pipe cap draft caps unscew all the way out of the door, or did they have some sort of "stop" mechanism to keep them from being unscrewed off the door?

@coaly , can you post a good picture of the inside of one of your doors with the pipe cap dampers?
 
Last edited:
Interesting difference. The finned caps thread is in the cap itself. If those threads wear out just replace the cap.
The old style pipe caps must be threaded in the door. No easy way I see to repair worn threads in the cast door.
Wonder if wearing of the door threads on the older stoves caused owners to go with the newer finned caps?

A double nut inside the door would stop the pipe caps unscrewing completely. Or spot weld the inner nut.
 
  • Like
Reactions: Todd67
My pipe caps were replaced with the 5 fin caps at some point. I haven't cleaned up the inside of my door yet, so I don't know if the nuts are welded to the inside of the door (I'm guessing they are). I need to try to remove the draft caps and bolts so I can replace them with the propper pipe caps.

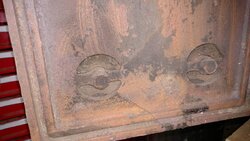
Here is the inside pic my my door
IMG_20190108_174600256.jpg
 
I'd be real careful about taking those nuts off since the door is already cracked. You might be better off drilling them out instead of trying to loosen the nuts.
 
  • Like
Reactions: Todd67
Interesting difference. The finned caps thread is in the cap itself. If those threads wear out just replace the cap.
The old style pipe caps must be threaded in the door. No easy way I see to repair worn threads in the cast door.
Wonder if wearing of the door threads on the older stoves caused owners to go with the newer finned caps?

A double nut inside the door would stop the pipe caps unscrewing completely. Or spot weld the inner nut.

That's a good question, if the pipe caps had to be replaced with newer caps when the threads on the door wore out.

It's been stupid cold here since last Thursday, so I haven't messed with the stove at all. I'm talking -5 to -10 at night, and a high of 5 or 10 during the day.
 
I'd be real careful about taking those nuts off since the door is already cracked. You might be better off drilling them out instead of trying to loosen the nuts.

I agree. I wasn't planning on removing the nuts. Coaly said Fisher used a 2" long bolt, so I was planning to use a 2.5" bolt to make up for the nut.
 
Of course, instead of tapping the web in the door for the cap bolt they could have welded a nut inside. I know welding cast is tricky.
I'd be interested in knowing how they did it.
 
  • Like
Reactions: Todd67
Of course, instead of tapping the web in the door for the cap bolt they could have welded a nut inside. I know welding cast is tricky.
I'd be interested in knowing how they did it.

I'm curious about that too. I'm thinking they did a simple mig tack weld on two sides of the nut. I'll probably clean up the inside of the door today so I have a better idea of what I have to look forward to.
 
I haven't heard from coaly since I posted pics of my Papa Bear. I hope he's ok, and not mad at me:(;)
 
Last edited:
Well, I tried to turn the draft cap bolts with a 3/4" wrench and they won't budge. I cleaned the threads and nuts with a small wire brush and sprayed a heavy dose of WD-40 on them. I didn't apply too much force to the bolts with the wrench, for the sake of not cracking the door any more than it already is. I might try to apply heat to the nuts and threads this summer. If that doesn't work, I might be forced to leave those 5 fin draft caps on the stove:mad:
 
Last edited:
Papa 4.jpg This is about as far as you would need to open the pipe caps. If you were afraid you could open them too far, a cotter pin inside would prevent turning farther than necessary.

WD is not a very good penetrant. Keeping it soaked with PB Blaster is much better, or Liquid Wrench........ Personally, Kroil has proved itself to be the best for rusted or corroded parts for me. The most expensive too. Keep in mind it takes TIME to rust and get stuck, and TIME to soak in to loosen it as well.

Here's a tip; After soaking with penetrating fluid of choice, heat a socket on a short extension in boiling water. Hold the bolt from turning, and put the hot socket on the inside nut. Keep constant pressure while the nut heats. It doesn't take much heat to expand the nut evenly all around enough to break the bond, and it will come right off. It doesn't heat the inner shaft like a torch. This works with lug nuts or any other nut that is stuck to a male thread. On tractors or vehicles outside, I use a camp stove to boil water next to where I'm working. On steam engines, I use steam to heat the socket, put it on the nut, and the steady pressure transmits the heat after a few seconds and really stubborn fittings come loose.
 
  • Like
Reactions: Todd67
Thanks for the pic and the tips coaly! It's been below zero here for the past 4 nights, with highs around 5 or 10. Today got up to 17, but it's still to cold to attempt to break the bolts loose. I still can't tell if the nuts are welded to the inside of the door. I'll try the socket idea this summer. There are 2 or 3 cracks coming from that right side draft cap hole, so my main concern is not making those cracks worse. I've got a good 4-5 months to let's those bolts and nuts soak. I might have Kroil in the house, and I have plenty of PB.

Have you ever tried any of the rust cutter products?
 
According to the picture Coaly posted (which I assume is of the same style door as yours Todd), it appears as though the nuts inside the door are part of the new draft caps.

Can you bring the door inside to work on it? I'd lay it face down, flat and dribble a few drops of PB Blaster on it few times a day for about a week before wrenching it. Takes patience!

Must have been fun drilling and tapping that cast iron back in the day.
 
  • Like
Reactions: Todd67
Don, I'll try to remove the door tomorrow (Tuesday) after work. The pins came up about 1/8" and wouldn't come up any farther. I've been spraying WD on the pins every couple of days so they should come out fairly easy.

It's a good idea to bring the door inside. I have all the patience in the world with this Papa Bear. It's not going anywhere anyway, so time is on my side.

Drilling and tapping these doors back then doesn't sound like much fun. When Bob hired Ron, Ron found all kinds of broken bits that the two previous workers kept breaking.
 
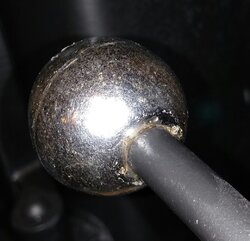
On these early stoves, was the chrome ball handle threaded on or welded on? Pages 19 & 20 of the book says that Carol handed Bob three chrome balls. Bob welded two on the back corners of the stove and the other one onto the handle.

On my Papa Bear it looks like the ball was cut off. There is no evidence of the handle being threaded at any time, or welded, for that matter. It's a rough cut, not clean at all.

On my early Baby Bear, I tried with all my hand strength to untwist the chrome ball handle, and it won't budge. There is no set screw on the Baby Bear chrome ball, and it looks threaded, not welded.
 
Last edited:
Nope, nothing like that. Just a solid ball.

I just worked on getting the door off my Papa Bear, and the bottom pin is still stuck. The top pin comes out, but I am not able to tap the bottom pin out with a hammer and punch.
 
Spray it up and let it soak. It will break loose by rotating with vise grips or pliers. Then soak and rotate until it works the penetrant in before tapping out.
Don't worry about leaving jaw marks in the rivet head, I have plenty. If the rivet sticks out the bottom, you can grip it at both ends and rotate as you work the penetrant in. I buff the pin with a wire wheel if salvagable and clean the hole with fine sandpaper or emery cloth wrapped around a dowel like a chop stick.
Mine all have set screws on the ball feet and handles.
 
  • Like
Reactions: Todd67
I reread your post #14. You won't be able to turn the bolts without removing the inside nut first. They normally have threads in the door, and a lock nut both inside and outside locking the bolt in place. If the bolt is long enough, you can open the cap fully and get under it with an open end wrench to loosen the outside nut first. Then everything should start turning.
 
  • Like
Reactions: Todd67
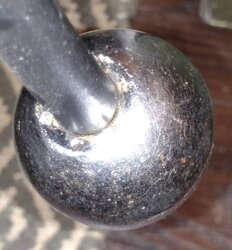
Just for comparison, this is the Baby Bear chrome ball. There is no (weld) bead around the base of it where it connects to the door handle. That makes me think it is threaded on.

IMG_20190115_213804.jpg
IMG_20190115_213906.jpg

A closer look at the end of the door handle on my Papa Bear looks like the chrome ball might have been broken off. The end of the door handle doesn't look like it was cut off... it's very jagged, whereas a hacksaw cut would be straight and clean. I don't have a good picture of it to show what I'm talking about.
 
Last edited:
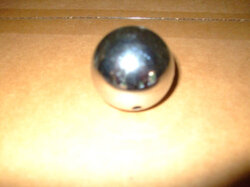
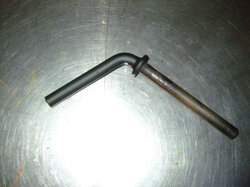
New old stock;

Early Knob $16 pair ebay Steve.jpg Early Style Handle $10 ea ebay Steve.jpg

Early Handle and Knob.jpg
 
  • Like
Reactions: Todd67