Insert and Chimney Liner Install

  • Active since 1995, Hearth.com is THE place on the internet for free information and advice about wood stoves, pellet stoves and other energy saving equipment.

    We strive to provide opinions, articles, discussions and history related to Hearth Products and in a more general sense, energy issues.

    We promote the EFFICIENT, RESPONSIBLE, CLEAN and SAFE use of all fuels, whether renewable or fossil.

profdlp

Member
Sep 23, 2017
42
Westlake, Ohio
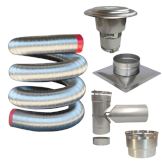
I have a Rockford Chimney Liner Kit sitting in my garage. I've also done a lot of research - much of it here, for which I thank you all! :)

The fireplace insert and chimney have been cleaned thoroughly, which was long overdue. (The insert came with the house, so this was a learning experience, to say the least.) ;)

I also have some (non-foil-faced) insulation I got from Rockford with the idea of packing it around the bottom of the chimney liner (above the top of the stove) in order to add an odor barrier (of sorts).

What last-minute tips would you have? What do you wish someone had told you the first time you did something like this which wasn't covered in the standard how-to videos?

One thing I see is that my insert has leveling bolts on the rear of the unit. I'm assuming that is just to accommodate slight variances in the brick, etc.

Any other ideas to help me do this 100% on the first try? Planning to do this Saturday and I can't wait!
 
Just stuffing kaowool insulation around the liner will not be much of an odor block. A proper block-off plate sealing the damper area will be more effective. If there is extra insulation, it's better to put it behind the insert rather than on top.
 
  • Like
Reactions: profdlp
Just did it Sunday. I did the wrap insulation. I had one slight offset to get through. Maybe 10” horizontal over about 4 feet vertical. The wire mesh hung up on mortar that was left between joints. It took two people up too and one pulling below to get it through.

I should have removed as much of the excess mortar as I could reach. Glad I had put the rope in the end as I didn’t think I would need it. Having removed the entire damper assembly gave great access and helped a lot. Glad I had extra help.

Evan
 
  • Like
Reactions: profdlp
appliance adapter to go from the liner to the insert, block off plate material and pay attention to the liner since some of them are directional.
 
Just stuffing kaowool insulation around the liner will not be much of an odor block. A proper block-off plate sealing the damper area will be more effective. If there is extra insulation, it's better to put it behind the insert rather than on top.
My chimney is actually in the middle of the house. Would that principle still apply? I can understand if the chimney had one side on the exterior of the home.

(And if it does apply I will certainly take your advice.)
 
Just did it Sunday. I did the wrap insulation. I had one slight offset to get through. Maybe 10” horizontal over about 4 feet vertical. The wire mesh hung up on mortar that was left between joints. It took two people up too and one pulling below to get it through.

I should have removed as much of the excess mortar as I could reach. Glad I had put the rope in the end as I didn’t think I would need it. Having removed the entire damper assembly gave great access and helped a lot. Glad I had extra help.

Evan
I have a slight jog about halfway down. (Total length of the chimney is about 15') I actually rigged up a Rube Goldberg device and pulled a 6" coupler through to see how big a problem that would be; it made it through easily, but that area looks to be the wild card as to whether this will be quick and easy or a pain in the neck.
 
My chimney is actually in the middle of the house. Would that principle still apply? I can understand if the chimney had one side on the exterior of the home.

(And if it does apply I will certainly take your advice.)
In that case there isn't a need for added insulation around the insert. What make/model insert is this for?
 
I do not believe the liner is directional. Would that be marked?

Not sure what you mean by "block off plate material".
What type of liner is it? Some are directional some are not.
 
It is a Kingsman Cabin Insert. Not even Kingsman seems to know anything about it. (They do not have an Archive or Legacy section that I can find. Found this on the Internet - mine is in much better shape.

Kingsman-SomeoneElse's.jpg
 
block off plate material
Usually a piece of sheet metal that the liner passes through (above the insert) and seals the chimney from the firebox/house.
 
What type of liner is it? Some are directional some are not.

I have the 6" kit in a 20' length with the insulation and a square top cap. The appliance adapter is a great fit and I have the fireproof cement to apply.
 

I have the 6" kit in a 20' length with the insulation and a square top cap. The appliance adapter is a great fit and I have the fireproof cement to apply.
No need for cement.

That doesn't tell me which type of liner it is. Is it just standard light wall corregated inside and out?
 
No need for cement.

That doesn't tell me which type of liner it is. Is it just standard light wall corregated inside and out?
Does this help?

316Ti Stainless Steel Chimney Liners - Air and water tight, with 7 ply seams and 10 corrugations per seam for the very best flexibility and strength on today's market. Rated number one in the industry for strength and flexibility. UL Listed and made of the highest quality, hand picked, prime stainless steel made in the United States.
As for the cement, wouldn't the lack of that give you a potential leak right at the bottom of the liner?
 
I am probably going to have to add that on later. Doubt I have time to fab one up.

But sounds like a good idea.
I ran without one for two years. I think they are really worth it probably essential if you really want to heat with it. I added one after on my upstairs stove. Much harder get a good fit and seal after you drop the liner. That said I didn’t have time Sunday either so….. I’ll figure out how to make one without pulling the liner again.
 
  • Like
Reactions: profdlp
As for the cement, wouldn't the lack of that give you a potential leak right at the bottom of the liner?
Nope not as long as it fits properly. And the furnace cement will crumble and disappear in the first season.


Does this help?
By that I am assuming it is just regular light wall which is not directional.
 
  • Like
Reactions: profdlp
I ran without one for two years. I think they are really worth it probably essential if you really want to heat with it. I added one after on my upstairs stove. Much harder get a good fit and seal after you drop the liner. That said I didn’t have time Sunday either so….. I’ll figure out how to make one without pulling the liner again.
I figure I can pull the insert, maybe at some point when I want to inspect everything anyway and give it a thorough cleaning, then add the plate. I think this sounds like a very good idea.
 
I figure I can pull the insert, maybe at some point when I want to inspect everything anyway and give it a thorough cleaning, then add the plate. I think this sounds like a very good idea.
It is much harder to do it after your initial install
 
Update:

Got the liner through a week ago. It was an extremely tight fit but it made it, insulation and all. I would not want to have to do that again. The little offset in the chimney halfway down was almost my undoing.

Got the chimney cap and rain hat on over the weekend. Also got a metal plate in there at the bottom with some 2000* insulation on top of it. The chimney is basically sealed at each end with an insulated liner running through it. I think I was losing more air out of there than I thought. My wife and I both noticed that road noise is diminished with the cap, plate, etc., in place. I'm pretty sure my house is going to be warmer this winter even without a fire actually burning in the insert due to just having that sealed up now.

Had to order an angled stove adapter. Before the new liner arrived I had illusions that "flexible" meant I would be able to bend it around enough to come straight down into the stove. Live and learn. The new one has a 30-degree offset and lines up perfectly.

I also took the door off to give the glass a really good cleaning. I was having trouble getting in the corners so I ended up taking the brass frame off and removing the glass altogether. It is perfect now. The gasket material was pretty much shot so after a quick trip to the store I replaced it entirely. Having gone that far I decided to try and polish up the brass. Amazing how much a little Brasso and some elbow grease could do. It really looks like a completely different (and much newer!) stove now.
 
Last edited:
  • Like
Reactions: EbS-P
My last hurdle is to seal around the spot where the liner adapter fits into the stove. It is down in there good but I do have a small gap all the way around. Before I put the sealing stuff in there I would like to pack it with a little something as a backer for the sealing compound.

I have two ideas:

1) Use some of the leftover steel mesh that went around the insulation on the liner and braid it into a rope I could press down in there.

2) Use some leftover gasket material.

Any opinions?
 
Last edited:
My last hurdle is to seal around the spot where the liner adapter fits into the stove. It is down in the good but I do have a small gap all the way around. Before I put the sealing stuff in there I would like to pack it with a little something as a backer for the sealing compound.

I have two ideas:

1) Use some of the leftover steel mesh that went around the insulation on the liner and braid it into a rope I could press down in there.

2) Use some leftover gasket material.

Any opinions?
Wrap it in glass gasket. No need for anything else. You also may be able to trim the elbow down a bit to get it to seat better. There isn't any sealant that will hold up there.