Wood Stove Wall Installation - Questions

  • Active since 1995, Hearth.com is THE place on the internet for free information and advice about wood stoves, pellet stoves and other energy saving equipment.

    We strive to provide opinions, articles, discussions and history related to Hearth Products and in a more general sense, energy issues.

    We promote the EFFICIENT, RESPONSIBLE, CLEAN and SAFE use of all fuels, whether renewable or fossil.
Status
Not open for further replies.

Wood Stove Man

New Member
Hearth Supporter
Oct 28, 2010
15
TX
Hello experts,

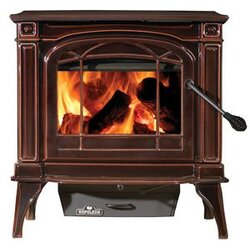
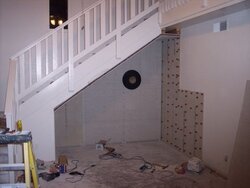
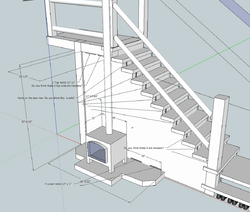
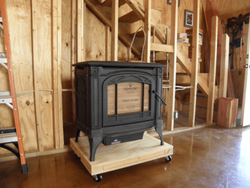
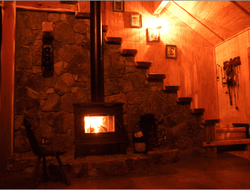
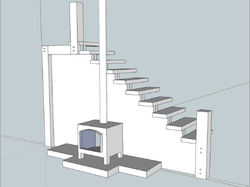
I am going to build a veneer stone wall 8' high x 12' wide with a 1 inch space behind and place a wood stove in front. As you can see in the drawing bellow. The wall is in front of a staircase.
Here are my questions:

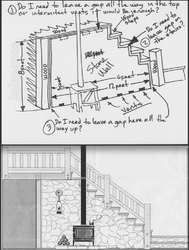
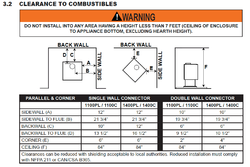
1. Do I need to leave a 1 inch gap on the sides of the wall or can I place it contacting two wood columns on the sides? see image.

2. The ventilation gap in the top has to be completely separated from the top of the stairs or it only needs some spaces for the air to scape.

3. How do I attached the wall to the back? 1" ceramic spacers work for a wall this big? if so, how far apart do I need to place the spacers from each other, and how far from the stove area?

Thank you so much for your help with this.

P.
 

Attachments

  • Screen shot 2010-10-28 at 11.05.14 AM.png
    Screen shot 2010-10-28 at 11.05.14 AM.png
    216.1 KB · Views: 1,608
  • Screen shot 2010-10-28 at 4.03.00 PM.png
    Screen shot 2010-10-28 at 4.03.00 PM.png
    20.2 KB · Views: 1,564
Is there a specific reason for the spaced wall? What stove are you using, and what clearances to combustibles does it call for?

You wouldn't need shielding on the entire wall if you did want to reduce the clearances, but again, the ability to reduce clearances is stove dependent.

I would be more concerned that someone would grasp the smoke pipe while using the stairs.
 
Hello Brent

The wood stove is a Napoleon 1100 Cast Iron. I am going to use double wall pipe. The manual says: 10" to the back wall with a single wall connector, and 6" to the wall with a double wall connector.
I think 6" is too close for a wood stove, so I want to be extra careful.

PS. Where it says double wall connector in the manual it refers to the wall or the stove pipe?
 

Attachments

  • Screen shot 2010-10-28 at 4.46.17 PM.png
    Screen shot 2010-10-28 at 4.46.17 PM.png
    25.8 KB · Views: 1,338
Double wall refers to the connector aka the stove pipe. You say 6" is too close for a stove, but I can assure you that many new units don't radiate any heat rearward due to insulation in the firebox by firebrick as well as built in shielding on the rear of the stove. If you are concerned, I'd recommend moving the stove away from the combustible wall over building the large faux wall used as a heat shield. Seems like a lot of work. In order to qualify as a heat shield it would need to be entirely built of non-combustible material.
 
CleanBurnin said:
Double wall refers to the connector aka the stove pipe. You say 6" is too close for a stove, but I can assure you that many new units don't radiate any heat rearward due to insulation in the firebox by firebrick as well as built in shielding on the rear of the stove. If you are concerned, I'd recommend moving the stove away from the combustible wall over building the large faux wall used as a heat shield. Seems like a lot of work. In order to qualify as a heat shield it would need to be entirely built of non-combustible material.

Thank you for the explanation. This is my first wood stove, I am excited about it but I don't want to do mistakes
Moving the stove toward the front is not an option because the setup of my ceiling.
You really thing that if I place the Woodstove 6" from the combustible wall I will be fine?

Here are some photos of the demolition process for the woodstove location.

I appreciate any comments or suggestion for my project.
 

Attachments

  • Screen shot 2010-10-29 at 11.07.27 AM.png
    Screen shot 2010-10-29 at 11.07.27 AM.png
    199.3 KB · Views: 971
Extra protection never hurts. To answer the initial question: for spacers, the 1/2" cement backer board can be cut into 3" x 60" strips. Double up these strips to create the 1" spacers. Attach these strips vertically to the wall, then attach the cement board to these strips. The gap, top and bottom does not need to be continuous, it can have solid sections as long as the air space still has good venting.

Even if you didn't do the air space, the combination of the cement board and stones would already be increasing the protection above what is called for. It definitely doesn't hurt to overkill the setup a bit. I would also increase hearth depth a little in case you find that you want to install a larger stove later on.
 
I used copper pipe cut in 1 inch increments, spaced 6 inches apart, centered on the studs. Then I used long 3 inch screws and went through the copper pipe opening. The hardy-board was very stout even though it was spaced off the wall by one inch.
 
BeGreen said:
Extra protection never hurts. To answer the initial question: for spacers, the 1/2" cement backer board can be cut into 3" x 60" strips. Double up these strips to create the 1" spacers. Attach these strips vertically to the wall, then attach the cement board to these strips. The gap, top and bottom does not need to be continuous, it can have solid sections as long as the air space still has good venting.

Even if you didn't do the air space, the combination of the cement board and stones would already be increasing the protection above what is called for. It definitely doesn't hurt to overkill the setup a bit. I would also increase hearth depth a little in case you find that you want to install a larger stove later on.

"I would also increase hearth depth a little in case you find that you want to install a larger stove later on"... Good point, I did not consider that. :)

This is the hottie I am installing.
 

Attachments

  • 1100C.jpg
    1100C.jpg
    17 KB · Views: 992
Wood Stove Man said:
Did you left any gap on the on the sides of your wall?

My situation is a little unique because I chose to keep the stove under the stairs (where the previous owner had it). I plan to come up with some sort of molding to cover the 1 inch air gap and still allow for good air flow. In your situation and as a wood worker, I'd have no problem putting the columns on the sides to cover the air gap as long as you had airflow from bottom to top and met any other clearance issues.
 

Attachments

  • Hearth Project 001.jpg
    Hearth Project 001.jpg
    32.4 KB · Views: 1,031
  • Hearth Project Part 2 001.jpg
    Hearth Project Part 2 001.jpg
    38.7 KB · Views: 1,016
Wood Stove Man said:
Did you left any gap on the on the sides of your wall?

Not required, just bottom (air in) and top (air out) are needed.
 
spendaviscpa said:
Wood Stove Man said:
Did you left any gap on the on the sides of your wall?

My situation is a little unique because I chose to keep the stove under the stairs (where the previous owner had it). I plan to come up with some sort of molding to cover the 1 inch air gap and still allow for good air flow. In your situation and as a wood worker, I'd have no problem putting the columns on the sides to cover the air gap as long as you had airflow from bottom to top and met any other clearance issues.


I love photos. That really help. Thank you!
 
BeGreen said:
Wood Stove Man said:
Did you left any gap on the on the sides of your wall?

Not required, just bottom (air in) and top (air out) are needed.

BeGreen, thank you for the advice. What kind of 3 inch screws should I use? Do I only need to place the around the panels or also in the middle of the panels?
 
Keep us posted on your progress. It looks like you have a great spot for a stove with a wonderful atmosphere. I hope to have my project finished this weekend. The installers will be out next Friday to put the stove in.

Good luck!
 
I used 3 inch deck screws with a square drive head. I've never had good luck with screws made for/by hardy-board. I love square drive screws. I did use screws in the middle of the panels (between the studs), since I was sandwiching hardy-board on each side of the air gap. I only used 2 inch screws there...
 
spendaviscpa said:
Keep us posted on your progress. It looks like you have a great spot for a stove with a wonderful atmosphere. I hope to have my project finished this weekend. The installers will be out next Friday to put the stove in.

Good luck!

I sure will. I like this place and all your advice.
 
Wood Stove Man said:
CleanBurnin said:
Double wall refers to the connector aka the stove pipe. You say 6" is too close for a stove, but I can assure you that many new units don't radiate any heat rearward due to insulation in the firebox by firebrick as well as built in shielding on the rear of the stove. If you are concerned, I'd recommend moving the stove away from the combustible wall over building the large faux wall used as a heat shield. Seems like a lot of work. In order to qualify as a heat shield it would need to be entirely built of non-combustible material.

Thank you for the explanation. This is my first wood stove, I am excited about it but I don't want to do mistakes
Moving the stove toward the front is not an option because the setup of my ceiling.
You really think that if I place the Woodstove 6" from the combustible wall I will be fine?

...snip

Yep. And Underwriters Laboratories or Warnock Hersey labs thinks so too. That is what the clearance to combustibles is listed as, so that distance will be fine. More distance is better, but the listed distance is all you need. That is why they listed it at that distance.
 
My woodstove just arrived. I am so happy, I wanted to have one since I was a child. Everything arrived in good condition. I will be posting photos soon. (After I recover from my back pain from the downloading.)
 
The letter of the law for wall protection is nonflammable for the shield assembly and it has to be a noncombustable surface. The air gap needs to be 1" from whatever you're shielding and you need "50% of 1 inch" open around the gap, which I took to mean you can enclose the sides but not the top and bottom for mine.

I built mine using steel studs and cement board.

So long as there's 1" of space between those treads and the wall shield, you'll be fine. Also so long as the treads are nonflammable and sufficient distance from the stove and pipe you'll be OK. The double wall stovepipe kit will have a number, but for simpson duravent double wall pipe I know it's six inches. Given the wall clearances for the stove itself I would be hard pressed to get the pipe six inches from a flammable surface.
 
I made this sketch so you can see what I am trying to achieve:
And here are the questions:

1. Do I need the 2 top vents?
2. Do I need the vents on the lower right?
3. Do you think it is safe to install the vents between the step raisers as the image shows?
4. Any other ideas?

One last thing any suggestions on the platform for the stove? Size, high...

Thanks again and have a nice weekend
 

Attachments

  • Screen shot 2010-11-05 at 3.33.22 PM.png
    Screen shot 2010-11-05 at 3.33.22 PM.png
    91 KB · Views: 885
As promised, here are some photos of the process.
The first one is the wood for the stairs (Aromatic E. Red Cedar
 

Attachments

  • Screen shot 2010-11-05 at 3.51.24 PM.png
    Screen shot 2010-11-05 at 3.51.24 PM.png
    268.2 KB · Views: 835
Wood Stove Man said:
I made this sketch so you can see what I am trying to achieve:
And here are the questions:

1. Do I need the 2 top vents?
2. Do I need the vents on the lower right?
3. Do you think it is safe to install the vents between the step raisers as the image shows?
4. Any other ideas?

One last thing any suggestions on the platform for the stove? Size, high...

Thanks again and have a nice weekend
By any chance, anybody say my pretty diagram and my many questions? :)
 
I'm not sure what to tell you on the vents. As I understand the code, the vent (both bottom and top) should be uninterrupted behind the stove. That is, I believe a proper shield has to have an uninterruped 4' or so section behind the stove at the bottom and top.

As for the platform, I'd just work to whatever R value you need.
 
As I promised here is my stove working for the first time. Thank you all for your advice.
 

Attachments

  • Screen shot 2010-12-07 at 1.33.37 PM.png
    Screen shot 2010-12-07 at 1.33.37 PM.png
    45.1 KB · Views: 880
Status
Not open for further replies.