My installation project

  • Active since 1995, Hearth.com is THE place on the internet for free information and advice about wood stoves, pellet stoves and other energy saving equipment.

    We strive to provide opinions, articles, discussions and history related to Hearth Products and in a more general sense, energy issues.

    We promote the EFFICIENT, RESPONSIBLE, CLEAN and SAFE use of all fuels, whether renewable or fossil.
Status
Not open for further replies.

gmule

Feeling the Heat
Feb 9, 2011
451
Conifer Colorado
After lurking and reading for several months it is finally time to post up my project.
First I want to say thanks to all of you for posting the links to building codes and keeping everything organized so that I could make this happen.

After my dad passed away last year my mom decided that she wanted something a little easier for her to take care of so she replaced my dad's woodstock fire view with a pellet stove and asked me if I wanted to drive 800 miles round trip to come and get the Woodstock. I jumped at the chance to get that stove to put it in my home.

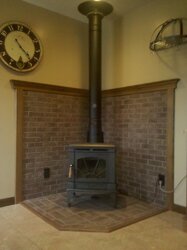
After moving it around to several locations in the living room my wife and I decided that this would be the new home for the stove.

ry=400.jpg


Once we figured out where the stove was going it was time to build a hearth.

ry=400.jpg


I am almost finished with the wall and hope to grout it this weekend so I can set the stove and install the chimey.

ry=400.jpg


I am real close to having this project completed and can't wait to use this stove since winter will be here before you know it.
 
Great looking stove and hearth, I'm sure you will love it. Looks like the stove may need a little touch up paint?
 
That's coming along really nicely. Thanks for the update.
 
Beautiful set up!
One question though....is the tile on top of the plywood ok for the floor protection? (I wasn't sure if you would need some sort of cement board between the tile and plywood)
Excellent work though....wish mine looked as nice as yours.
 
Nice work. I usually grow weary easily on install pictures but that one looks real nice! Disclaimer: I am OCD to a fault :)
 
Beautiful set up!
One question though….is the tile on top of the plywood ok for the floor protection? (I wasn’t sure if you would need some sort of cement board between the tile and plywood)
Excellent work though….wish mine looked as nice as yours.

I was going to say the same thing. Tile on plywood is not sufficient protection for a fireview. Looks great, though!
 
gmule, that is fantastic that you were able to get that stove. You have a winner. Be sure to check all the gaskets and the cat. If you need, Woodstock has a kit that is really great for the Fireview and it does include all the gaskets, etc.

I agree and hope you put cement board under the tile but methinks you put that on just so you'd know how it was going to look when finished.
 
gmule said:
After lurking and reading for several months it is finally time to post up my project.
First I want to say thanks to all of you for posting the links to building codes and keeping everything organized so that I could make this happen.

After my dad passed away last year my mom decided that she wanted something a little easier for her to take care of so she replaced my dad's woodstock fire view with a pellet stove and asked me if I wanted to drive 800 miles round trip to come and get the Woodstock. I jumped at the chance to get that stove to put it in my home.

I am real close to having this project completed and can't wait to use this stove since winter will be here before you know it.

I'm sorry for the loss of your Dad. What a great quality gift to remember him by. Enjoy the stove!

Good luck,
Bill
 
Thanks for all the kind words. You guys are correct that there is 1/2" cement board on the bottom of the hearth. The Wood stock company is great I did order a gasket set and new cat to make sure that everything on this stove is up to par.
 
I believe the tile on plywood is adequate for heat protection although I wouldn't suggest it in the construction sense. Eventually the mortar seperates itself from the wood surface and in time the tile will become loose. A 1/4" tile backer would have been the answer....Best of luck, I love the look and the great pattern choices...
 
Here is the completed project with the stove set. Now to assemble the chimney sytstem.
I will be using a Simpson Duravent class A system to vent it straight up.

ry=400
 
That looks fabulous. Great job. Sorry to hear about your dad- I lost my father just this past March. He came out the summer before and helped me build my woodshed. It's great to have something solid like this to remember them by.

~Rose
 
Sorry to hear about your Dad.. Your hearth looks great, nice job!

Ray
 
Yes, that is looking really good.
 
gmule said:
Thanks for all the kind words. You guys are correct that there is 1/2" cement board on the bottom of the hearth. The Wood stock company is great I did order a gasket set and new cat to make sure that everything on this stove is up to par.

My apologies, I must have missed your post before my original made it on.
 
You hearth is spectacular. Such a fitting pedestal for that stove !

Can i ask, why did you decide to tile the back wall ? I'm am going thru a very similar install and have the ability to achieve the clearance requirements and was not planning on tiling the back wall. Again, my compliments on your handiwork.
 
main-er said:
You hearth is spectacular. Such a fitting pedestal for that stove !

Can i ask, why did you decide to tile the back wall ? I'm am going thru a very similar install and have the ability to achieve the clearance requirements and was not planning on tiling the back wall. Again, my compliments on your handiwork.
. It would act as a pretty good heat sink. Not only will the Soapstone give off heat for hrs, so will that Hearth and the wall.. IMO.

Other than that, it looks great too.
 
main-er said:
You hearth is spectacular. Such a fitting pedestal for that stove !

Can i ask, why did you decide to tile the back wall ? I'm am going thru a very similar install and have the ability to achieve the clearance requirements and was not planning on tiling the back wall. Again, my compliments on your handiwork.

I wanted something interesting behind the stove that would enhance the beauty of the stove.
 
DexterDay said:
main-er said:
You hearth is spectacular. Such a fitting pedestal for that stove !

Can i ask, why did you decide to tile the back wall ? I'm am going thru a very similar install and have the ability to achieve the clearance requirements and was not planning on tiling the back wall. Again, my compliments on your handiwork.
. It would act as a pretty good heat sink. Not only will the Soapstone give off heat for hrs, so will that Hearth and the wall.. IMO.

Other than that, it looks great too.

Is this a good thing?
 
gmule said:
main-er said:
You hearth is spectacular. Such a fitting pedestal for that stove !

Can i ask, why did you decide to tile the back wall ? I'm am going thru a very similar install and have the ability to achieve the clearance requirements and was not planning on tiling the back wall. Again, my compliments on your handiwork.

I wanted something interesting behind the stove that would enhance the beauty of the stove.

You chose well gmule. And if this weather keeps up it won't be long before you have some heat from that stove.
 
Having additional thermal mass behind the stove enhances the length of time that you get heat after the stove burns down. It is like having a bigger block of hot soapstone. I think this is a good thing. I heat up a couple of tons of sandstone behind and around my stove, and it works well.
 
Oh, Okay that is a good thing
 
Status
Not open for further replies.