Installed the new Alderlea T5 yesterday and it looks really nice. Too bad it isn't burning so well. At first I thought it was poor draft due air leaks in the connector pipe since smoke was coming out of the joints. I sealed them up with furnace cement and no more smoke from the pipe. I can't seem to get a good draft unless the door is open but then smoke pours out through that. Even with the air control all the way to the left (open), it doesn't seem to be getting enough air into the firebox.
The air control works to close off the air even more so I guess that's working okay. What else can I check on the stove to make sure that the stove isn't the problem.
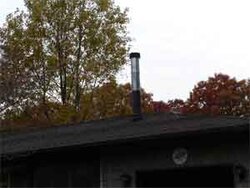
The chimney set up is 4 1/2' of 6" connector pipe to a 6-8" increaser at the ceiling support and about 7' of 8" thru the attic class A Amerivent chimney.
This might be too short or maybe the increase in diameter is slowing down the draft. The old smoke dragon with 8" pipe all through did alright with it. To add a 4' length of 8" galvanized Amerivent chimney to the existing setup is about $300.
For not much more I can probably replace the whole chimney with SS 6" class A.
Any suggestions?
The air control works to close off the air even more so I guess that's working okay. What else can I check on the stove to make sure that the stove isn't the problem.
The chimney set up is 4 1/2' of 6" connector pipe to a 6-8" increaser at the ceiling support and about 7' of 8" thru the attic class A Amerivent chimney.
This might be too short or maybe the increase in diameter is slowing down the draft. The old smoke dragon with 8" pipe all through did alright with it. To add a 4' length of 8" galvanized Amerivent chimney to the existing setup is about $300.
For not much more I can probably replace the whole chimney with SS 6" class A.
Any suggestions?
")