Buried Piping in 6" Sewer (SDR 35) pipe question

  • Active since 1995, Hearth.com is THE place on the internet for free information and advice about wood stoves, pellet stoves and other energy saving equipment.

    We strive to provide opinions, articles, discussions and history related to Hearth Products and in a more general sense, energy issues.

    We promote the EFFICIENT, RESPONSIBLE, CLEAN and SAFE use of all fuels, whether renewable or fossil.
Status
Not open for further replies.

byrddogwi

New Member
Feb 26, 2008
26
SE MN
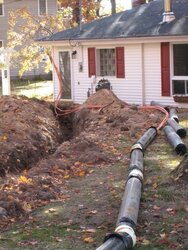
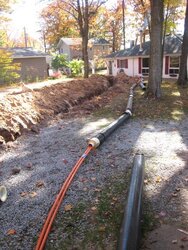
I plan on putting in 6" SDR 35 pipe and putting the supply, return and boiler feed in it and foaming the 6" pipe with closed cell foam. It will be buried 4-5' deep and about 150' long.

My question is, if I just put my 1" supply, return and boiler feed line in the pipe, will the return and boiler feed suck heat from the supply? Should I put the supply in rubatex (~R2-3) inside of the the 6 inch pipe or should I just leave it without any extra insulation? I would like to keep it without in case I need to pull new line through in the future. I am also burying 1 1/2" ENT in case I need to run any signal wires between the shed and the house. I already have 2 sets of 12/2 UF wire going out to the shed. One for power and one for contact closure of the over temp Aquastat.

I need to change out my lines since I was losing so much heat last year underground. I hope I can make it through this winter with 7-8 full cords cut up for this season. I have about a 48K BTU heat loss from -30 to 70 degrees F parameters. Last year we had a lot of problems with the Seton. I also am working on re-insulating the Seton, it sure had a bunch of insulation missing from it. Must have been a Monday build.
 
I would be putting 2-3 inches of closed cell foam around the outside of the 6" pipe the whole 150' length making it a 6" diameter conduit for my pex tubing.
 
I though a lot about using spray foam to do this. I did run sewer pipe (6") and will have 4 - 1 inch lines in it (2 out, 2 in). I plan to wrap the lines with bubble foil insulation. I have a 125' roll x 2' wide from ebay, and plan to first wrap it around the hotter lines first, then finish the wrap around the entire asembly - probably 4-6 times (until I run out). I wont know if I have any loss until the unit is up and running, but it's the best I can do for now without getting into a huge expense.
 
Although I can't cite the thread, I recently read on this forum about a guy who was re-doing his underground piping becasue of heat loss. Scrimping on underground insulation is not a smart thing to do. You don't want to see 15 or 20 degree F. temperature drops between the boiler and your basement heat exchanger! I also have a vague memory of another guy who calculated that he was heating his backyard trench to the tune of 30,000+ BTU per hour. We all work too hard for the wood to heat your backyard.

I would bury two six inch sewer pipes (one supply, one return) with lots of bubble wrap or foam. And remember, if water gets into the sewer pipe, it will suck the heat out of your pex faster than a lawyer can pick your pocket.
 
I think that you have to insulate the lines, but I wouldn't worry about the boiler feed. Since there will be no flow the water will just heat up to the ambient temp in the casing.
The only way that you are going to get the tubing in or out of the casing is all 3 together, so it wont matter if they are all insulated. Use plenty of lube, the water based kind they use for pulling wire.
 
With that pipe and length pull you should pull all the stuff thru at the same time with lots of lube and do not plan on being able to pull more thru later unless you pull a spare empty tube for signal wire. You can tap into the cold water for a fill in the basement and maybe won't need the boiler feed line. I have seen where they use some solid foam insulation to make a "form" to contain the spray in stuff and protect it some. If possible I would put the heat supply in an additional insulated sleeve like you are thinking of to keep it as warm as possible.
 
First thing and of utmost importance is no ground water. Second thing I would do is insulate the pipes with at least 1 1/2" thick fiberglass insulation. I would put this in sch. 80 pvc 20 feet at a time, U pick the diameter,bigger with in reason the better. After casing is installed completely i would air test to 20 lbs make sure there is no leaks, on the casing,and maintain while backfilling. Be very thoughtful on the back fill and the floor of the trench. Base being crushed stone and compacted. Cover your duct piping a few inches with sand or fine crushed rock before back filling the rest of the trench. NO CLAY. This will help keep ground water away from your casing. Don't ever drive anything heavy over your casing.I would stay away from the bubble wrap. Remember it's always cheaper to do it right the first time,and by doing it right this system can out last you.
 
I was very close to doing the same thing that you're getting ready to set out for. I switched directions and went with the pre-insulated Thermopex. After a lot of calculating (cost of spray foam trench vs. pre-fab) and a few hours pouring over posts here (on The Hearth), I've concluded that there are some things you simply cannot skimp on. I used Thermopex. There are a couple of others out there too that are also good. Thermopex is now running at $12/ft for the one inch dual pipe. It has a rugged outer shell with closed cell insulation on the inside separating the supply and return lines. You also don't need to go as deep (24" max). You also can rest assured that you won't be revisiting this issue again. I know that Fred Seton and others at Bethlehem Steel may say that the foam board over pipe in a trench is a good option. I'm not buying it.
 
JMann said:
I was very close to doing the same thing that you're getting ready to set out for. I switched directions and went with the pre-insulated Thermopex. After a lot of calculating (cost of spray foam trench vs. pre-fab) and a few hours pouring over posts here (on The Hearth), I've concluded that there are some things you simply cannot skimp on. I used Thermopex. There are a couple of others out there too that are also good. Thermopex is now running at $12/ft for the one inch dual pipe. It has a rugged outer shell with closed cell insulation on the inside separating the supply and return lines. You also don't need to go as deep (24" max). You also can rest assured that you won't be revisiting this issue again. I know that Fred Seton and others at Bethlehem Steel may say that the foam board over pipe in a trench is a good option. I'm not buying it.

This pre-insulated pex is a great idea, unless you need to move more than 80K BTU through the pipe (80k max through 1" - maybe a little more with a stronger circulator). I have 140k to move, so Im using 4 - 1" lines (2 out, 2 in). No one makes this set up in a pre fab - as far as I know. And even worse, is it is almost impossible, forget about unaffordable to get 1 1/4" or 1 1/2" pex. Someone needs to make and sell this stuff so that us in the wood boiler world can afford it. I found a manufacturer in NJ www.jmeagle.com that makes up to 1 1/2" sizes, but their "distributors" have no idea who JM Eagle is - and multiple calls to their corporate offices yielded no return calls.
 
I am leaning more towards using Thermopex ($9/ft for 1" pex) just because it is getting colder and has been raining a lot so it will be hard to schedule a spray foam contractor to come in, they won't spray when it is wet. Plus they want me to have the pex on 2" polystyrene board to spray the foam to which is also another expense. And I can't easily figure out how to attach the 1" to the foamboard. The clips available here only fit up to 5/8" pex tubing.

If anyone else has attached pex to 2" foamboard for the closed cell foam to spray on, how did you do it? How did you keep the 1" pex pipe separated? It seems that they could just lift if up and spray underneath the pex on top of the ground but two contractors I have spoken with want the 2" polystyrene under it.

I could possibly use zip ties but they will probably pull through the board. I have seen screw clips that screw into the board but again they are for 1/2" pex. Plus I need to keep the 2 lines separated. I could use some wire mesh but if I keep adding more to the things I need for them to foam I will be close to the cost of the thermopex.

Thanks for any more suggestions.
 
Byrddog said:
I am leaning more towards using Thermopex ($9/ft for 1" pex) just because it is getting colder and has been raining a lot so it will be hard to schedule a spray foam contractor to come in, they won't spray when it is wet. Plus they want me to have the pex on 2" polystyrene board to spray the foam to which is also another expense. And I can't easily figure out how to attach the 1" to the foamboard. The clips available here only fit up to 5/8" pex tubing.

If anyone else has attached pex to 2" foamboard for the closed cell foam to spray on, how did you do it? How did you keep the 1" pex pipe separated? It seems that they could just lift if up and spray underneath the pex on top of the ground but two contractors I have spoken with want the 2" polystyrene under it.

I could possibly use zip ties but they will probably pull through the board. I have seen screw clips that screw into the board but again they are for 1/2" pex. Plus I need to keep the 2 lines separated. I could use some wire mesh but if I keep adding more to the things I need for them to foam I will be close to the cost of the thermopex.

Thanks for any more suggestions.

Hi Byrddog,
I have not attached pex to foam board but the solution I used worked for me so this is an alternative suggestion. I used 4" corrugated sewer pipe and 1" pex. I bought 4' sleeves of flexible closed cell foam used for insulating hot and cold water pipes in the home at Menards. The sleeves were for 1 1/4" pipes (jsut right for 1" pex) and were 1/2" thick and I put the sleeves on each pipe so there was a 1" foam barrier between the two pipes that virtually prevents thermal leaching. I have two identical gauges, one at the boiler supply line going out of my garage and one on the supply line coming in to the house. The temperature readings are so close you have to imagine a difference greater than 1*f. I only have a fifty foot run and the outside of my 4" pipe is not insulated. There was a noticeable warm spot where my trench was but that was before I packed the open areas of my 4" with some loose fiberglass insulation. Now you can't tell I have a pipe in the ground except where it comes out by my garage where the boiler is.
In the dead of winter if I take my gloves off I can feel the heat on the flexible foam insulation on my boiler pipes but it's not much and there is none to feel on the 4" corrugated. I have a third temp gauge (different make) at the top of my boiler where the water comes out and it is two degrees warmer than where my supply line goes out to the house but my expansion tank is barely insulated and my pumps are completely exposed. I duct taped the ends of the foam/pex and seams and taped each 4' joint together then taped the two pieces of foam/pex together. Then pushed my foam pex in to the 4" corrugated even though it was a tight fit. All it cost me was $3.18 per linear foot total.
Would I do it different? I would use 6" corrugated instead of the 4" because I bought some flexible insulation I could not use because the tolerances were too close with out it and I had already bought the 4". Also because I could run extra lines for electricity etc. Otherwise NO.
You don't have to do it my way. That's not my point here. I just explained it so you would understand the following concept. If you want to do the foam board thing why not use the flexible foam as the pex line separator and for the boost up off the foam board? It's been cheap, adds insulation and would give you a great surface to tape your lines in place since they would then be separated. Or you could go the 6" corrugated, with out insulating the exterior, as in your earlier plan, and use the bubble wrap to wrap your already flexible-foamed/pex lines. My pipe is barely 2' deep and I see no heat trail where it's at. My temp gauges tell me the rest of the story. I don't want you to do less than needed but I also know you don't need mega over-kill to get the job done. You might save $5 a foot at today's prices too. Have jun with your project. I did with mine and I'm happy too...Cave2k...(Dustin)
 
Because of the recent unavailability of thermopex in this area I decided to go with Insul-Seal pipe instead. I got mine from Dave at Cozy Heat, the closest supplier to me. This is a 4 inch PVC pipe with foam insulation and a plastic sleeve on the outside, and it comes in ten foot sections. I installed two runs 120' each of 1 inch pex-al-pex inside the pipe.
I found it difficult to unroll the pex straight enough to slide the insulated sections over the pex, and the 45* elbows used to make turns required the pex to be rolled up again to slide on. After install, I pressure tested the pex with no leaks. How would I pressure test the PVC pipe to ensure my joints are glued and sealed properly?
My trench is as previously described - four feet deep, crushed gravel on the bottom, sand around the Insul-Seal and on top, backfilled with sand and small rocks. No clay on site, drainage is always good, and I won't be driving over any of the sections. I'm hoping that this is adequate for my system.
 
Would anyone hazard a guess as to what R factor one might need to use for underground PEX going 210 feet to a barn.
 
How would I pressure test the PVC pipe to ensure my joints are glued and sealed properly?

Reduce the one end to say 1" in your case a 4" x 1" reducer. Get a glued by screwed adapter and reduce to a assembly to give a means to let in compressed air and a gage to read how much air you are letting in. The other end of the casing you would cap that end by gluing a 4" cap. If you need more info let me know. Joe.
 
I think it would be nearly impossible to pull the pex though the PVC once it is glued. I had to do some fancy work just to get it in the ground with the pex inside. See pics:
 

Attachments

  • IMG_3164.JPG
    IMG_3164.JPG
    83.3 KB · Views: 447
  • IMG_3162.JPG
    IMG_3162.JPG
    101 KB · Views: 492
The pics above show the pipe before the joints were glued, caulked, and sealed, then taped.

After install, Pex pressure tested fine. Since it sticks out of the PVC on both ends, I don't see how I could pressure test the PVC now.
 
Medman said:
Because of the recent unavailability of thermopex in this area I decided to go with Insul-Seal pipe instead. I got mine from Dave at Cozy Heat, the closest supplier to me. This is a 4 inch PVC pipe with foam insulation and a plastic sleeve on the outside, and it comes in ten foot sections. I installed two runs 120' each of 1 inch pex-al-pex inside the pipe.
I found it difficult to unroll the pex straight enough to slide the insulated sections over the pex, and the 45* elbows used to make turns required the pex to be rolled up again to slide on. After install, I pressure tested the pex with no leaks. How would I pressure test the PVC pipe to ensure my joints are glued and sealed properly?
My trench is as previously described - four feet deep, crushed gravel on the bottom, sand around the Insul-Seal and on top, backfilled with sand and small rocks. No clay on site, drainage is always good, and I won't be driving over any of the sections. I'm hoping that this is adequate for my system.


How did you pressure test your pex? I have 1 1/4 inch pex I would like to test before I pour concrete. Can you find the stuff you need for testing at Home Depot?
 
Status
Not open for further replies.