
I just got back from Duluth MN where I picked up 4 radiators for $65 each. They are in really nice shape. This is the cheapest I have seen used ones. Most of the prices have been $100-$125 and up. I plan on replacing some of my baseboard. I also have a radiant slab that is hard to heat. It was poured over 6" of sand over the radiant pipes. This is how it was being done 15 yrs ago. I can pump a lot of heat into the sand and I don't seem to get much out. I am thinking of abandoning it for a C.I. radiator or two. They sure are heavy.
Cast Iron Radiators
- Thread starter djblech
- Start date
-
Active since 1995, Hearth.com is THE place on the internet for free information and advice about wood stoves, pellet stoves and other energy saving equipment.
We strive to provide opinions, articles, discussions and history related to Hearth Products and in a more general sense, energy issues.
We promote the EFFICIENT, RESPONSIBLE, CLEAN and SAFE use of all fuels, whether renewable or fossil.
You are using an out of date browser. It may not display this or other websites correctly.
You should upgrade or use an alternative browser.
You should upgrade or use an alternative browser.
- Status
- Not open for further replies.
Gooserider
Mod Emeritus
Sounds like a good idea... If you haven't already done so, it might be worth doing a search on them, I know Eric has made some really good posts in the past about rebuilding and reconditioning cast iron rads.
Gooserider
Gooserider
Eric Johnson
Mod Emeritus
I love CI rads. Post some pics or tell us more about what you've got. They really are functional works of art, in my opinion.
tom in maine
Minister of Fire
I redid our previous home over about 15 years ago. It had about 17 radiators with an old steam system.
The basement was a lot warmer than the upstairs, since there were 3 and 4" steam pipes throughout the basement.
We moved in in January and it was -10F. Once we got the steam boiler controls working properly (that first night it hung at about 52F--the kids flew out of the house to go to school that morning!), the upstairs overheated and the first floor was cold.
I installed thermostatic control valves on every radiator and was able to regulate the heat very nicely.
After a couple years, we had insulated most of the house (4250 sq. ft. built in 1855) to R-40 and removed the old steam behemoth with the 10" flue pipe and installed a tiny direct vented oil system WITH an outdoor reset control.
There was no thermostat in the house, constant circulation and the radiator valves would protect the rooms from overheating. One radiator was always on, in the biggest room so the circulator was not deadheading.
It never overheated since the outdoor reset took care of that.
I would not hesitate to to use either old CI radiators or new radiant panels with passive control thermostats.
BTW, I would consider using the sand radiant as a heat sink for a (big)solar system, if that ever becomes a thought. Should work better than a tank, if it is well insulated.
Dune
Minister of Fire
Tom in Maine said:I redid our previous home over about 15 years ago. It had about 17 radiators with an old steam system.
The basement was a lot warmer than the upstairs, since there were 3 and 4" steam pipes throughout the basement.
We moved in in January and it was -10F. Once we got the steam boiler controls working properly (that first night it hung at about 52F--the kids flew out of the house to go to school that morning!), the upstairs overheated and the first floor was cold.
I installed thermostatic control valves on every radiator and was able to regulate the heat very nicely.
After a couple years, we had insulated most of the house (4250 sq. ft. built in 1855) to R-40 and removed the old steam behemoth with the 10" flue pipe and installed a tiny direct vented oil system WITH an outdoor reset control.
There was no thermostat in the house, constant circulation and the radiator valves would protect the rooms from overheating. One radiator was always on, in the biggest room so the circulator was not deadheading.
It never overheated since the outdoor reset took care of that.
I would not hesitate to to use either old CI radiators or new radiant panels with passive control thermostats.
BTW, I would consider using the sand radiant as a heat sink for a (big)solar system, if that ever becomes a thought. Should work better than a tank, if it is well insulated.
Back in the day, we used to talk about using stone for storage, How does sand work? I imagine you would need to run a grid of pipes through it, much more pipes than for a water tank I would think.
Dune
Minister of Fire
djblech said:I just got back from Duluth MN where I picked up 4 radiators for $65 each. They are in really nice shape. This is the cheapest I have seen used ones. Most of the prices have been $100-$125 and up. I plan on replacing some of my baseboard. I also have a radiant slab that is hard to heat. It was poured over 6" of sand over the radiant pipes. This is how it was being done 15 yrs ago. I can pump a lot of heat into the sand and I don't seem to get much out. I am thinking of abandoning it for a C.I. radiator or two. They sure are heavy.
Before you pipe the C.I. rads, be sure to pressure test them. They often leak after having been bounced around. Been there done that.
tom in maine
Minister of Fire
I think it was about 25 years ago, we did a really big radiant floor for a very large welding shop.
They worked on things like ferry boats and they knew that the slabs would crack. They also wanted to have the floors be warm since the gigantic
doors would be opened to get the big things in and all the warm air would just flow out of the building.
Since the welders were usually lying on the floor, the radiant floor was a great fit.
In that installation, we installed tubing in a layer of sand that was a foot deep. The sand protected the tubing and added thermal mass.
The biggest issue was keeping the tubing lying flat. We were using polybutylene, which was easier to work with than PEX. I think there is PEX hardware that would help assist installing this way.
The system worked with an outdoor reset and we ran an oil system to heat the floor. It took days to get up to temperature, but it worked well.
Sand is a poor conductor of heat, but if the floor system is well insulated, the system does work well.
We did another one, as a residence. It was gas fired. When the heating system went down, it was a week before the residents knew about it.
Insulation is the key, both for the slab and the house. This concept has legs for a wood system, but the details are important.
This type of system responds very slowly, so it is prudent to have tubing in the slab also (if it is a residence) or have some radiant panels for quick response.
Tom
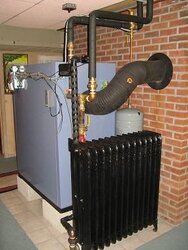
3 of the radiators are large, 38 " tall. 1 is 25" wide and 2 are 22.5"wide. The last one is smaller, 11" wide x 8" deep x 32" tall. This one will probably go in my mudroom (8x12). The largest one will go in my family room where the slab that sucks heat is. I have a VC Dutchwest woodstove in this room that I like, I just don't want to have to start a fire to watch TV. I have 5 zones in the house now, 2 radiant slabs (marginal), basement, main floor, and upstairs (bedrooms). These last 3 have baseboard that I would like to replace with C.I. rads.
What was the temp control that was used with these? I thought I read that it was plumbed in line, if so does it stop flow? I think I saw one schematic where the rads where piggybacked on a main line so as to not disrupt flow. Does this make any sense?
What was the temp control that was used with these? I thought I read that it was plumbed in line, if so does it stop flow? I think I saw one schematic where the rads where piggybacked on a main line so as to not disrupt flow. Does this make any sense?
Gooserider
Mod Emeritus
Essentially you can plumb C.I. rads just like you do any other heater - go back through the various threads with plumbing diagrams, and you can put your rads in in place of whatever other emitters might have been used... You can plumb them in series, in which case they will essentially be controlled by the zone control for that zone, and all in that series string will come on and off at the same time - however note that each one will get slightly cooler water, and thus put out less heat than the one that came before it... This is because all the water in the series passes through all the rads, and the water passing through the first rad will be cooled by the amount of heat it puts out. That cooler water will go into the second rad, and get cooled some more, and so on. Depending on the system layout this can cause issues of the first rads putting out to much heat, and the later ones not putting out enough. It is sometimes possible to work around this by using smaller size rads in the first rads, and larger ones further down the line...
If you do some sort of parallel return, or other parallel configuration, then each rad can have it's own thermostatic radiator valve, which would control the flow to that one unit, in effect making each rad its own "mini-zone"
If I was designing the setup, I'd probably look at doing some sort of parallel configuration just because I think it gives better control and flexibility. My initial inclination would be to do a "home run" type setup with small PEX lines from a radiant style manifold in the boiler room to each rad, w/ a Thermostatic Radiator Valve on each one. This would give a lot of flexibility, and the smaller lines will probably be easier to run through the existing structure..
Gooserider
tom in maine
Minister of Fire
To plumb radiators with thermostatic control valves, you need to install them in parallel or with monoflow tees.
This is pretty simple with PEX and I would suggest shutoffs in the basement for each radiator, in order to isolate them in case you need to move one or service it.
The radiator should have an air vent (aka coin vent) so it can be purged of all air.
If they are in series, if you shut off one radiator, it will shutoff the entire loop.
Without the thermostatic valves, it will put you into the situation where the system can overshoot temperature wise, given all the mass the cast iron represents.
RobC
Minister of Fire
I got a couple off Craigslist. First I cleaned out the old fittings, flushed tanks and did a pressure checked. I used a Schrader valve on the top 1/4" NPT fitting to be replaced by a coin vent at the install. I cleaned them up by wire brushing and pressure washing. Paying a little extra time to any ornamental areas where multiple old layers of paint had hidden the detailing. ( Sand blaster would have been nice ). I used a couple of coats of HI TEMP semi gloss black spray paint to finish. On a side note. One of the first times I did a air pressure check on a large item, I didn't allow for the expansion of the HOT compressed air in the filling for a pressure drop, COOLING, over the first couple of hours. For example, you fill to 45 PSI come back in a couple of hours and its at 38 ( not necessarily a leak) you need to come back in 5 or 6 hours and hopefully it will still be 38. Any comments on install pictures welcome.
Attachments
Eric Johnson
Mod Emeritus
Nice.
I use regular rustoleum and it holds up well, even with pretty high temps. I do the Schrader valve thing for pressure testing as well. You can easily make one out of an old bicycle tube air valve and some standard fittings.
The thing to be careful about when buying cast iron radiators for hot water systems is that they have tubes (i.e., water flowing across the radiator) on both the top and bottom. Older steam radiators don't have a top tube, making them pretty difficult to bleed all the air out. It can be done, but it's not easy or convenient.
in hot water
New Member
Tom in Maine said:I think it was about 25 years ago, we did a really big radiant floor for a very large welding shop.
They worked on things like ferry boats and they knew that the slabs would crack. They also wanted to have the floors be warm since the gigantic
doors would be opened to get the big things in and all the warm air would just flow out of the building.
Since the welders were usually lying on the floor, the radiant floor was a great fit.
In that installation, we installed tubing in a layer of sand that was a foot deep. The sand protected the tubing and added thermal mass.
The biggest issue was keeping the tubing lying flat. We were using polybutylene, which was easier to work with than PEX. I think there is PEX hardware that would help assist installing this way.
The system worked with an outdoor reset and we ran an oil system to heat the floor. It took days to get up to temperature, but it worked well.
Sand is a poor conductor of heat, but if the floor system is well insulated, the system does work well.
We did another one, as a residence. It was gas fired. When the heating system went down, it was a week before the residents knew about it.
Insulation is the key, both for the slab and the house. This concept has legs for a wood system, but the details are important.
This type of system responds very slowly, so it is prudent to have tubing in the slab also (if it is a residence) or have some radiant panels for quick response.
Tom
I'm not sure sand is a good choice under a concrete slab, especially a structural, heavily loaded one. I've worked on a lot of heavy equipment shops and have never seen sand used for base. Dry sand doesn't compact and has poor consolidation. Google around for info on sand under concrete, and have a structural engineer sign off on any slabs you install over sand.
A slab is only as good as the base below it. This is why compaction tests are required on all commercial slabs, radiant or not in many areas.
www.concretees.com/people/bruce/pubs/C99C023.pdf
As for high mass 12" thick sand bed radiant installs... keep in mind that flywheel works both ways. When the weather warms, or the building heatload drops that large mass will still radiate energy. Bob Ramlow is proponent of large sand bed radiant, generally solar powered all summer. He instructs homeowners to open windows to control over heating. doesn't sound like a practical or user friendly way to regulate comfort in your home or shop??
hr
Highbeam
Minister of Fire
Sand has great compressive strength IF it is confined. Well, most things do I suppose. It is frequently used in my area under slabs and in utility trenches for both bedding and for backfill.
Gooserider
Mod Emeritus
RobC said:I got a couple off Craigslist. First I cleaned out the old fittings, flushed tanks and did a pressure checked. I used a Schrader valve on the top 1/4" NPT fitting to be replaced by a coin vent at the install. I cleaned them up by wire brushing and pressure washing. Paying a little extra time to any ornamental areas where multiple old layers of paint had hidden the detailing. ( Sand blaster would have been nice ). I used a couple of coats of HI TEMP semi gloss black spray paint to finish. On a side note. One of the first times I did a air pressure check on a large item, I didn't allow for the expansion of the HOT compressed air in the filling for a pressure drop, COOLING, over the first couple of hours. For example, you fill to 45 PSI come back in a couple of hours and its at 38 ( not necessarily a leak) you need to come back in 5 or 6 hours and hopefully it will still be 38. Any comments on install pictures welcome.
As a bit of an aside and / or safety note, it is FAR safer to fill any device being pressure tested w/ water and then pressurize the water, the higher the test pressure the more benefit from doing so. Air is compressible, and if you have a catastrophic failure of the device under test (DUT) it will instantly expand back to it's non-compressed volume, with potentially explosive damage, shrapnel, etc. Essentially a bomb! If you have the DUT full of essentially non-compressible water and the same failure occurs, then the water blows out and makes a mess, but the expanding air volume is limited to what's in the pressure hose, normally not very much of a problem...
Yes, filling w/ water and draining is messy, and if you have a leak it can be a bit harder to locate, but IMHO the safety benefits are worth it if you will be testing at close to design strength, or if the DUT has the potential for a shattering material failure, or a high internal volume.
Gooserider
Eric Johnson
Mod Emeritus
I agree with that. In my case, I use the air filler to test radiators "in the field" to determine whether they are worth hauling home. You don't need very much pressure to know whether a rad is water-tight. 5 or 10 psi with a bicycle pump is sufficient.
Minor leaks can be repaired with an automobile radiator repair kit, or, if you don't mind violating one of the basic tenets of plumbing/heating etiquette, use a bottle of Boiler Stop Leak in the system and the leak should disappear.
Minor leaks can be repaired with an automobile radiator repair kit, or, if you don't mind violating one of the basic tenets of plumbing/heating etiquette, use a bottle of Boiler Stop Leak in the system and the leak should disappear.
Gooserider
Mod Emeritus
Eric Johnson said:I agree with that. In my case, I use the air filler to test radiators "in the field" to determine whether they are worth hauling home. You don't need very much pressure to know whether a rad is water-tight. 5 or 10 psi with a bicycle pump is sufficient.
Minor leaks can be repaired with an automobile radiator repair kit, or, if you don't mind violating one of the basic tenets of plumbing/heating etiquette, use a bottle of Boiler Stop Leak in the system and the leak should disappear.
True, low pressure testing like you describe it doesn't really matter that much. The DUT is rated for much higher pressures, so an explosive failure is unlikely, and even if it did happen the pressures involved are low enough to minimize the damage potential... I'd start looking at using water pressure (hydrostatic) testing more if I was getting over 30-40 psi or so. I will also say that my gut tendency is that somewhere along the way, I would want to bring everything I build up to it's maximum rated pressure, or whatever I can get out of my compressor, whichever is less... I figure that sort of stress test verifies that all is as well as it can be, and that there aren't any marginal spots that might break down later once things are in service...
Gooserider
Eric Johnson
Mod Emeritus
If I have access to city water, I just fill it up from the bottom and bleed the air out the top. You're getting maybe 110 psi for a rad that will never see more than 30. Leave it for a couple of hours and see if you get any leaks.
pybyr
Minister of Fire
Gooserider said:Eric Johnson said:I agree with that. In my case, I use the air filler to test radiators "in the field" to determine whether they are worth hauling home. You don't need very much pressure to know whether a rad is water-tight. 5 or 10 psi with a bicycle pump is sufficient.
Minor leaks can be repaired with an automobile radiator repair kit, or, if you don't mind violating one of the basic tenets of plumbing/heating etiquette, use a bottle of Boiler Stop Leak in the system and the leak should disappear.
True, low pressure testing like you describe it doesn't really matter that much. The DUT is rated for much higher pressures, so an explosive failure is unlikely, and even if it did happen the pressures involved are low enough to minimize the damage potential... I'd start looking at using water pressure (hydrostatic) testing more if I was getting over 30-40 psi or so. I will also say that my gut tendency is that somewhere along the way, I would want to bring everything I build up to it's maximum rated pressure, or whatever I can get out of my compressor, whichever is less... I figure that sort of stress test verifies that all is as well as it can be, and that there aren't any marginal spots that might break down later once things are in service...
Gooserider
...except stay well clear if trying such a test at any significant psi level -- sudden failures of vessels containing compressed air or any gas are nothing you'd want to be near
Gooserider
Mod Emeritus
pybyr said:Gooserider said:Eric Johnson said:I agree with that. In my case, I use the air filler to test radiators "in the field" to determine whether they are worth hauling home. You don't need very much pressure to know whether a rad is water-tight. 5 or 10 psi with a bicycle pump is sufficient.
Minor leaks can be repaired with an automobile radiator repair kit, or, if you don't mind violating one of the basic tenets of plumbing/heating etiquette, use a bottle of Boiler Stop Leak in the system and the leak should disappear.
True, low pressure testing like you describe it doesn't really matter that much. The DUT is rated for much higher pressures, so an explosive failure is unlikely, and even if it did happen the pressures involved are low enough to minimize the damage potential... I'd start looking at using water pressure (hydrostatic) testing more if I was getting over 30-40 psi or so. I will also say that my gut tendency is that somewhere along the way, I would want to bring everything I build up to it's maximum rated pressure, or whatever I can get out of my compressor, whichever is less... I figure that sort of stress test verifies that all is as well as it can be, and that there aren't any marginal spots that might break down later once things are in service...
Gooserider
...except stay well clear if trying such a test at any significant psi level -- sudden failures of vessels containing compressed air or any gas are nothing you'd want to be near
Just what I was saying - do a hydrostatic test, where the DUT is filled with water, and you just use a small volume of airspace to apply pressure.
Gooserider
Singed Eyebrows
Minister of Fire
If you have leaks, boiler sealer works wonders,as mentioned. You can tie a rag to a boiler leg or section that is leaking & it will wick treated water into a container. With large radiators you can run some real low temps. I can heat with 110 degree water. Good luck, Randy
Eric Johnson
Mod Emeritus
There are so many good things about cast iron radiators. I think it's like having a little wood stove in every room. Nice place to warm your hands, butt, whatever.
WRVERMONT
New Member
I love them. It feels so good using something that was made a long time ago but remains perfectly "state of the art." I'm busy getting a number of them ready for nieghbors system.
pybyr
Minister of Fire
I dread to think of what new-manufactured cast iron radiators would cost ! It's fortunate that old units come available at somewhat reasonable prices.
heaterman
Minister of Fire
Gooserider said:RobC said:I got a couple off Craigslist. First I cleaned out the old fittings, flushed tanks and did a pressure checked. I used a Schrader valve on the top 1/4" NPT fitting to be replaced by a coin vent at the install. I cleaned them up by wire brushing and pressure washing. Paying a little extra time to any ornamental areas where multiple old layers of paint had hidden the detailing. ( Sand blaster would have been nice ). I used a couple of coats of HI TEMP semi gloss black spray paint to finish. On a side note. One of the first times I did a air pressure check on a large item, I didn't allow for the expansion of the HOT compressed air in the filling for a pressure drop, COOLING, over the first couple of hours. For example, you fill to 45 PSI come back in a couple of hours and its at 38 ( not necessarily a leak) you need to come back in 5 or 6 hours and hopefully it will still be 38. Any comments on install pictures welcome.
As a bit of an aside and / or safety note, it is FAR safer to fill any device being pressure tested w/ water and then pressurize the water, the higher the test pressure the more benefit from doing so. Air is compressible, and if you have a catastrophic failure of the device under test (DUT) it will instantly expand back to it's non-compressed volume, with potentially explosive damage, shrapnel, etc. Essentially a bomb! If you have the DUT full of essentially non-compressible water and the same failure occurs, then the water blows out and makes a mess, but the expanding air volume is limited to what's in the pressure hose, normally not very much of a problem...
Yes, filling w/ water and draining is messy, and if you have a leak it can be a bit harder to locate, but IMHO the safety benefits are worth it if you will be testing at close to design strength, or if the DUT has the potential for a shattering material failure, or a high internal volume.
Gooserider
Ditto on the hydrostatic vs compressed air testing. Fill with water, test to relief valve pressure at a minimum, ASME specs are 1.5 times relief pressure IIRC. If you do the same with air only you do indeed have a bomb on your hands. I know a guy who nearly lost his leg when a tire came off a rim at only 30PSI. He still walks with a limp 15 years later.
- Status
- Not open for further replies.
Similar threads
- Replies
- 3
- Views
- 364
- Replies
- 22
- Views
- 4K
- Replies
- 10
- Views
- 2K
- Replies
- 25
- Views
- 2K