
Thanks man last question is does the caulking have to be any silicone type based or is there a special one I need?
Cathedral Ceiling Support Box
- Thread starter 04HemiRam2500
- Start date
-
Active since 1995, Hearth.com is THE place on the internet for free information and advice about wood stoves, pellet stoves and other energy saving equipment.
We strive to provide opinions, articles, discussions and history related to Hearth Products and in a more general sense, energy issues.
We promote the EFFICIENT, RESPONSIBLE, CLEAN and SAFE use of all fuels, whether renewable or fossil.
You are using an out of date browser. It may not display this or other websites correctly.
You should upgrade or use an alternative browser.
You should upgrade or use an alternative browser.
- Status
- Not open for further replies.
I have right now dow corning 100% silicone rubber black and it is high temp will this work and If so, I just apply it to the top of the collar where it meets the chimney pipe?
BIGDADDY
Feeling the Heat
- May 17, 2012
- 416
I don't think the upper flange should be cut off.You don't fold over 4 flaps and nail to the roof. Cut the upper edge flush with the opening. View attachment 115806
The the flanges should be nailed at the outer edge all around. Then shingle over top avoid nailing through the metal any lower then your original nailing.
I believe if the upper flange is cut a leak may occur. If he has a leak in a year or two he will be up there caulking frequently to stop the leak.
He did a neat job cutting an placing the shingles but if that metal flange was cut off its gonna be a problem. Probably after the caulk dries and cracks.
This was part of my concern, but my flashing has air holes on the sides of it. So, If rain comes sideways, it would just fall in the box anyway like it would do now. This makes me wonder why I have air slots in my flashing isn't this a big non no or does the storm collar protect this 100% ?
Again, Instead of bring the square box through the roof I left it in the room and just cut a circle hole>
Again, Instead of bring the square box through the roof I left it in the room and just cut a circle hole>
The Box has nothing to do with keeping water out. The flashing is what makes it weather tight.I don't think the upper flange should be cut off.
The the flanges should be nailed at the outer edge all around. Then shingle over top avoid nailing through the metal any lower then your original nailing.
I believe if the upper flange is cut a leak may occur. If he has a leak in a year or two he will be up there caulking frequently to stop the leak.
He did a neat job cutting an placing the shingles but if that metal flange was cut off its gonna be a problem. Probably after the caulk dries and cracks.
The slots are for ventilation, the storm collar should keep the rain out. It's rare to have an issue from the ventilated flashing.
BIGDADDY
Feeling the Heat
- May 17, 2012
- 416
Sorry my bad. I thought he was saying to cut the flange on the flashing.The Box has nothing to do with keeping water out. The flashing is what makes it weather tight.
The slots are for ventilation, the storm collar should keep the rain out. It's rare to have an issue from the ventilated flashing.
cableman
Minister of Fire
How bout some pics! Glad ya got it in. I came up with a way im installing support and pipe after flashings already been installed! I didnt have to rush that day getting it all locked in. Did you end up cutting the box to the pitch of the roof or it wouldnt reach up that high anyway? Mines 2x6 so it had to be cut and made sense for me to cut it with the pitch.
I assume you aren't using Super-Vent then? Because it will not fit through the flashing with the pipe support clamp on it. Unless you can get into the attic to put it on, it won't work this way.I came up with a way im installing support and pipe after flashings already been installed!
Will post pics as soon as possible and box did reach the roof supervent setup.
My question is though thinking about installations without a support box isn't it a bad idea to have the flashing with air slots because of heat loss and I am shocked the air slots do not cause water leakage? Think about it if it is an attic space you will have bugs and other stuff come into the attic? I guess that storm collar does the trick.
Also, webby3650 I wanted to make sure you understand what I meant in one of my posts. The round part of the flashing there is a vertical bead that holds it shape and goes uop toward the storm collar. I placed roof tar on this as well. I think that I need to use the silicone caulking no?
Last edited:
Okay guys got it in today man that was an all day event. Here a a few questions. First off is it okay that I am at exactly two inch clearance? Please tell me the codes are not written more then 2 inch because there was a stud in the way. I did not bring the box up through instead since my cathedral ceiling is double studded I boxed it in on the top and bottom there are like 20 2 and 1/2 inch screws hold that sucker on. My first question is that I applied roof tar to the bottom and top of the storm collar. However, I noticed that from the inside you can move the chimney up and then down? Is this okay or did I miss something please please tell me know. Also, when I put the flashing in I noticed that there were three layers of shingles I got under all three but when I cut them, they were about 1/2 inch from being flush to the round part of the flashing. So, I just roof tared the gap. Lastly, I did what I though I would do, I did not leave room for the removal of the flue pipe. However, I can move the chimney u so is it okay to remove it like this or do I need to buy a telescoping piece of single wall pipe. However, the fit is designed to fit a 2 foot section perfectly? So maybe if I get two one foot sections there will be enough slack or no. My thinking is if it is okay to move the chimney pipe up I do not have to worry about the flue telescoping part? Also, when I went to lock the pipe adapter by turning it I ended up turning the whole chimney again will this mess up that tar around the storm collar I think yes?
My main concern is if I should lift the chimney to put the two foot section of stove pipe in or no just buy a telescoping part ist there one that size thoughThanks
Sorry for rambling but am new at this!!
Roofing tar is not for the storm collar, silicone is. This will get warm and the tar will melt. Scrape it off and clean with turpentine or mineral spirits while it is fresh.
The 2" clearance is fine. Yes you can move the chimney up and down in a Selkirk install. That is how you make the room penetration of the pipe as per the previously mentioned install chart for clearances.
A short section of telescoping pipe will make your final connection go much easier.
alforit
Feeling the Heat
Okay guys got it in today man that was an all day event. Here a a few questions. First off is it okay that I am at exactly two inch clearance? Please tell me the codes are not written more then 2 inch because there was a stud in the way. I did not bring the box up through instead since my cathedral ceiling is double studded I boxed it in on the top and bottom there are like 20 2 and 1/2 inch screws hold that sucker on. My first question is that I applied roof tar to the bottom and top of the storm collar. However, I noticed that from the inside you can move the chimney up and then down? Is this okay or did I miss something please please tell me know. Also, when I put the flashing in I noticed that there were three layers of shingles I got under all three but when I cut them, they were about 1/2 inch from being flush to the round part of the flashing. So, I just roof tared the gap. Lastly, I did what I though I would do, I did not leave room for the removal of the flue pipe. However, I can move the chimney u so is it okay to remove it like this or do I need to buy a telescoping piece of single wall pipe. However, the fit is designed to fit a 2 foot section perfectly? So maybe if I get two one foot sections there will be enough slack or no. My thinking is if it is okay to move the chimney pipe up I do not have to worry about the flue telescoping part? Also, when I went to lock the pipe adapter by turning it I ended up turning the whole chimney again will this mess up that tar around the storm collar I think yes?
My main concern is if I should lift the chimney to put the two foot section of stove pipe in or no just buy a telescoping part ist there one that size though
Sorry for rambling but am new at this!!
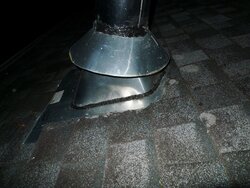
Here are some pics of my install I did a year ago..........Everyone has their way of doing it so this is not an instruction but more like a guideline to help you.
Something that I learned that is really IMPORTANT and wanted to suggest to you:
The top edge of the flashing needs to have a gap between the shingle line and the cone edge (see pic).
I noticed in your video that they filled it in with tar so there was no gap .
The reason for the gap is that when it rains , it allows the water to run off the shingle with no obstruction.
if you fill in the gap or snug the shingle up to the cone then the water can build up on that top edge and create a wicking action with the water which can travel up under the shingle and up under the flashing and into your house through the ceiling and or support box.
I have seen this happen .
Also in your video it says to put roof tar under the loose shingles that you pried up......I would add that when you do that to put just a small marble sized dab up under the loose shingles ( not on the very edge of the shingles and also don't put a line of tar under and across the shingle because again, you don't want to create a wicking action or obstruction to the water run off path .)
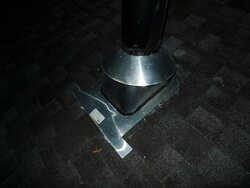
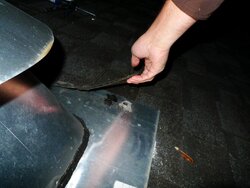
I cut my shingle line lower ( see pic) to fit the flashing better and stabilize it better and allow the flashing to act like one big shingle . Which will further ensure any water wicking underneath the shingles.
I also placed only two screws to attach the flashing to the roof..........One on each bottom side edge of the flashing , up under the shingle. Then dabbed it with high temp sealant to doubly prevent water from entering and to secure the shingle to the flashing ( see pic )
The reason the support box should come up to the top edge of the roof is that it acts as the heat shield to ALL combustibles
Hope some of this helps ..........I tried to send this last night but lost all my text twice , ughhh !
P.S Please Ignore the thick coat of high temp silicone on the storm collar.........Heh heh......It rained right after I applied it and had to redo the next day. ( It rains a lot here
") )
)Attachments
Last edited:
cableman
Minister of Fire
I assume you aren't using Super-Vent then? Because it will not fit through the flashing with the pipe support clamp on it. Unless you can get into the attic to put it on, it won't work this way.
Ya it supervent, I did it this way cause I wasn't done sheetrocking, much easier not having to cut the hole and hang it all yourself lol. It was also gonna be warm that day and much colder after. Ill put it in from the bottom by supporting the length up inside and then putting the support box in place. When I did the flashing I leveled everything out but just removed the box/chimney.
What about the roof tar going up the circular part of the flashing? should I remove that and the roof tar going around the circle part of the flashing?
Also, is alforit it right should I not have filled in that gap on the flashing between the shingles and the circular part of the flashing. since I did should I remove it?
Also, is alforit it right should I not have filled in that gap on the flashing between the shingles and the circular part of the flashing. since I did should I remove it?
Last edited:
Filling that gap is a good idea. There is no reason to remove it.What about the roof tar going up the circular part of the flashing? should I remove that and the roof tar going around the circle part of the flashing?
Also, is alforit it right should I not have filled in that gap on the flashing between the shingles and the circular part of the flashing. since I did should I remove it?
okay, so putting roof tar on the flashing to fill the gap between the flashing and shingles is no problem. Is it okay that I filled this gap all the way around the flashing down to where I pulled the shingles up? Lastly, what about the roof tar going up on the circular part of the flashing since this is metal should I put the silicone there? Or is the silicone just when you need metal to metal to stick to each other? Thanks again all so much this is my first flashing that I have done. Overall it went very well just a small bump of the silicons ooops. It is going to rain tonight. Should I try the stove before I go up to remove the tar on the collar?
A good quality silicone adhesive/sealant like GE Silicone II is what I have used.Thanks man last question is does the caulking have to be any silicone type based or is there a special one I need?
cableman
Minister of Fire
04 hemi, your flashing didnt come with a silicone type sealant already around the base and going up the seam? Im not putting anything going up cause mine did have it already!
Mine did come with the sealant already there but I read somewhere that you should put extra as this leads to problems years down the road. Is the tar okay there and around the circle part of the gap between shingles. Just want to check will be on roof soon. Thanks again.
We can't see what you are seeing. If you can take some pictures and post them here that would help.
A little might be ok around the base, a lot of tar, probably not, especially if it acts as a water dam. If the tar is on the vertical seam I would remove it too and redo with silicone while doing the storm collar.
A little might be ok around the base, a lot of tar, probably not, especially if it acts as a water dam. If the tar is on the vertical seam I would remove it too and redo with silicone while doing the storm collar.
Okay I also have tar around where the bottom of the flashing is sitting on top of the shingles. I was going to go up and remove the tar and put silicone but my dad had a good point. The silicone takes 24 hours to cure and we are getting rain tonight and the next three days. So hoping for no leaks will post pic soon as I get a second.
Also, how long does it take roof tar to cure went up this morning from doing it last night and it is still soft?
Also, how long does it take roof tar to cure went up this morning from doing it last night and it is still soft?
cableman
Minister of Fire
My pl roof and flashing sealant was still soft the next day too! I recommend this stuff!

My house is held together with pl products!
My house is held together with pl products!
Okay cool I just wanted to make sure the black jack was suppose to be soft. Also, was it a good idea to wait till after these few days of rain. Also, will the tar on the rain cap be an immediate problem or is it something that can wait till next summer. I was under the impression that the roof tar around the collar would lead to a long time problem like in 2-5 years or can it be an immediate problem just though I should ask thanks again. I think this thread has all the info a newbie like me needs.
cableman
Minister of Fire
Ya id wait till after the rain. You could prolly leave it on there for good and not see any problem, but over time the warm chimney and uv rays will prolly make it crack. This is why a silicone or polly sealant works better.
Just put some roofing cement around the top portion of the flashing boot. I have had issues with leaves and debris getting stuck there if its left open. After a few years silicone pulls away but good roof cement stays put.Mine did come with the sealant already there but I read somewhere that you should put extra as this leads to problems years down the road. Is the tar okay there and around the circle part of the gap between shingles. Just want to check will be on roof soon. Thanks again.
- Status
- Not open for further replies.
Similar threads
- Replies
- 2
- Views
- 257
- Replies
- 21
- Views
- 535
- Replies
- 8
- Views
- 445
- Replies
- 1
- Views
- 596