Chimney top question

  • Active since 1995, Hearth.com is THE place on the internet for free information and advice about wood stoves, pellet stoves and other energy saving equipment.

    We strive to provide opinions, articles, discussions and history related to Hearth Products and in a more general sense, energy issues.

    We promote the EFFICIENT, RESPONSIBLE, CLEAN and SAFE use of all fuels, whether renewable or fossil.
Status
Not open for further replies.

jgcable

Member
Jan 24, 2010
62
Milford, CT
I have a question regarding the top plate installation on a masonary chimney.
I have a masonary chimney that has 2 flues in it. One is for the gas fired hot water heater and furnace that is in the basement and the other is for the fireplace which is in the first floor.
It appears that my chimney has 2 openings on the top. There must be some kind of clay tile liner in each one because there is a light tan rectangular protrusion coming out of each opening. These protrusions look to be around 4-6" high.
The top plates that I have seen are basically flat pieces of stainless around 13" x 13" and they have a round hole in the middle of them to accomodate the 3" flexible liner that needs to stick out 6" from the top of the chimney. Here is my question...
Because of the protrusions... there is no way to silicone the top plate to the surface of the top of the chimney. If I place it on the top of one of the flue openings it is suspended almost 6" from the top surface of the chimney. Are there custom top plates for this?
I look around my neighborhood at the other houses and they all seem to have the same light tan protusions coming from the tops of their chimney flues.
 
Climb up & take a measurement of the flue tile you wish to use for your appliance.
Add a 1/4" to the dimensions - just for grins - & layout the dimensions CENTERED on
the underside of your plate with a Sharpie marker.
Next, layout a second set of lines, again with the Sharpie, ONE INCH outside of the
original layout lines.
Next, layout 1" X 1" notches at the 4 corners.
Should look kinda like this:
_____________
_I_____________I_
I I I I
I I I I
I I I I
I I I I
I I I I
I_I____________I_I
I____________I

Clip the 4 corner notches with snips & cut along the outside of the outer layout lines.
With a hand seamer or a small brake, bend along the inner layout line
to form a "return" & make a cap to fit around the top of your flue tile.
Silicone this cap in place.
Clear?
 
DAKSY said:
Climb up & take a measurement of the flue tile you wish to use for your appliance.
Add a 1/4" to the dimensions - just for grins - & layout the dimensions CENTERED on
the underside of your plate with a Sharpie marker.
Next, layout a second set of lines, again with the Sharpie, ONE INCH outside of the
original layout lines.
Next, layout 1" X 1" notches at the 4 corners.
Should look kinda like this:
_____________
_I_____________I_
I I I I
I I I I
I I I I
I I I I
I I I I
I_I____________I_I
I____________I

Clip the 4 corner notches with snips & cut along the outside of the outer layout lines.
With a hand seamer or a small brake, bend along the inner layout line
to form a "return" & make a cap to fit around the top of your flue tile.
Silicone this cap in place.
Clear?

In other words, create an offset flange and silicone it to the top of the chimney. Sounds like my guy will be doing some on the spot fabricating with the top plate. I would do it but there is no way on earth that I would climb up on my roof.
 
THIS IS NOT MY CHIMNEY. THIS IS A PICTURE OF A CHIMNEY THAT LOOKS JUST LIKE MINE!!!! Mine has been pointed, flashed and cleaned. I need to install a flexible liner for my pellet stove fireplace insert into the right hand flue. How do I install a top plate on a chimney like this??? I also currently have a rain cap that covers both flues that I will need to remove.

badchim.jpg
 
jgcable said:
THIS IS NOT MY CHIMNEY. THIS IS A PICTURE OF A CHIMNEY THAT LOOKS JUST LIKE MINE!!!! Mine has been pointed, flashed and cleaned. I need to install a flexible liner for my pellet stove fireplace insert into the right hand flue. How do I install a top plate on a chimney like this??? I also currently have a rain cap that covers both flues that I will need to remove.
badchim.jpg

Mine is set-up exactly the same way. Technically you don't have to remove the rain cap. You can cut a 3" or 4" hole (depending on the diameter of the flex liner) in the top of the rain cap, and run the flex liner from your stove, up the chimney, and exit through the hole in the rain cap. Put a wind/rain cap on the end of the flex liner (which will sit on top of your rectangular chimney rain cap). Just make sure the installers use some high temp silicone around the hole in the chimney rain cap to keep out water/snow. I'll see if I can take a picture of my set-up tomorrow.
 
jgcable said:
THIS IS NOT MY CHIMNEY. THIS IS A PICTURE OF A CHIMNEY THAT LOOKS JUST LIKE MINE!!!! Mine has been pointed, flashed and cleaned. I need to install a flexible liner for my pellet stove fireplace insert into the right hand flue. How do I install a top plate on a chimney like this??? I also currently have a rain cap that covers both flues that I will need to remove.

badchim.jpg

My chimney is exactly like that and my brother installed the top plate
on the flue for the pellet stove. He used small concrete anchoring
screws to secure the plate to the top of the flue. Yes there is not a lot of thickness
to work with. I did not go up on the roof with him and I don't do roofs
so I can't climb up and take a picture but basically he first trimmed
the plate with some sort of metal cutters, then very carefully drilled
starter holes into the lip of the flue, then put on the plate with the
concrete anchoring screws he had me buy at the hardware store.

The other way I had suggested we obviously didn't go with, but
I had mentioned maybe cutting the four corners of the plate
so it would sort of fold down over the flue and put the screws
through the sides instead of trying to drill into the tiny area
around the top lip.

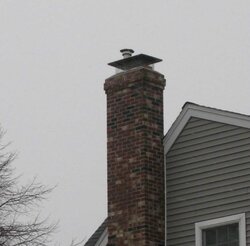
I didn't go on the roof and he didn't take a camera up so this
is the best picture I have at the moment of the cap but the top
plate isn't even visible in the pic.
sscap.jpg
 
You could just have the installer cut the flue tile off flush at the top of the chimney install the liner and top plate and the re-install the multi-flue chimney cap to cover it. That way the tile is sealed with the top plate like it should an the s.s liner is covered with a cap like it should.
 
We were going to go with Fluemasterjr's way if the tile
broke while drilling the holes for the anchoring screws
but it didn't break and the plate is sealed flush to the
top of the flue just like in the illustrations we followed.
bar.gif


Whichever way you do it, I would suggest using the concrete
anchoring screws to secure it in addition to silicone.
 
Status
Not open for further replies.