Fireview Install Documentary and Review of Performance

  • Active since 1995, Hearth.com is THE place on the internet for free information and advice about wood stoves, pellet stoves and other energy saving equipment.

    We strive to provide opinions, articles, discussions and history related to Hearth Products and in a more general sense, energy issues.

    We promote the EFFICIENT, RESPONSIBLE, CLEAN and SAFE use of all fuels, whether renewable or fossil.
Status
Not open for further replies.

Tim IA

New Member
Nov 9, 2006
59
Central Iowa
Hi all.

I wanted to share my install with you and review its performance compared to several other stoves I have owned over the years. First of all, this site is great! Haven't posted much but enjoy reading all of the posts. I figured I should post my project to maybe inspire others in their pursuit of the perfect stove install!!!

Little background. Graduated college and bought a house in 1997 in November. House had zero clearance steel fireplace. Worthless for heating right?? Pretty much! Installed Quadrafire 2100i into it and turned it into a heating machine! What college kid dreams of a wood burning stove?? Me I guess.

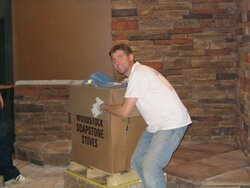
Moved in 2003 into another house that had a zero clearance fireplace. Had maybe two fires in it and went to wife saying its gotta go!!! Enter quadrafire 7100 FP. Awesome stove/fireplace! Cranked the heat and looked good while doing so. After a few years, I started thinking about doing something different. Deep down I had always wanted a free standing stove. I found this site and just lurked.... for a few years. Discovered the Woodstock line of stoves and liked what I heard about heat retention, burn times, and just the overall high ratings that people gave it. Plus I really liked the way it looked. Pretty unique looking in my opinion. So I started planning..... Sprung the idea on the wife over pizza in Ames, IA. She was all in (she's a keeper) and began demo. Just prior to this, I was fortunate enough to actually see a fireview in person. I saw a review done by someone in Des Moines IA and gave them an email shout. He let me take a peak at it. As for you out there wondering about it's heating power, this person lives in a 3000+ house that is wide open with 20 + feet ceilings so volume wise it is more like 4500 sq feet in my best estimation in Iowa. He heats primarily with this stove and uses the furnace a little in the mornings and evenings to bring it back up to temp. Impressive IMHO.

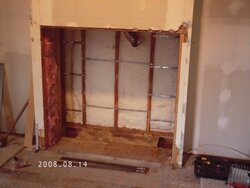
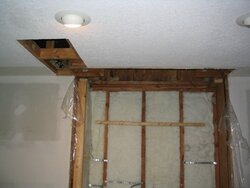
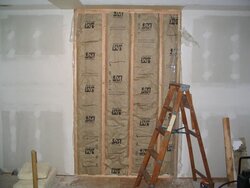
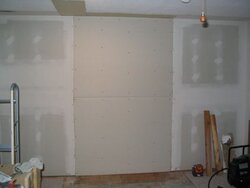
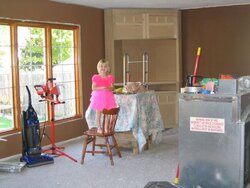
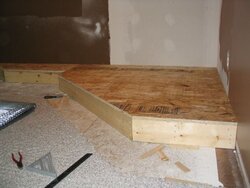
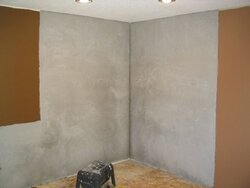
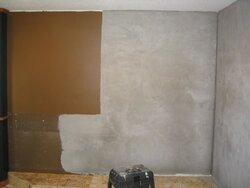
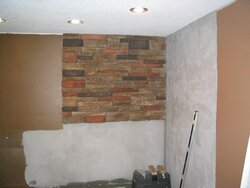
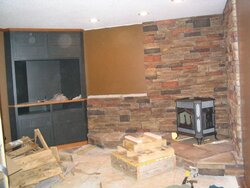
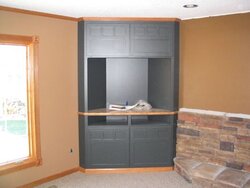
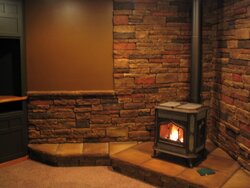
My install included basically redoing our entire family room from floor to ceiling including a new window. As if installing just a stove is not enough!

Back just a year ago when I started my install, there were a few posts hear and there about Woodstock Stoves and coming back this fall, seems like there are more and more of us out there! Over the next few days I will post a few pictures of my install and end this post with a 1 year review of what I think of this stove. Stay tuned!! I hope you enjoy!!

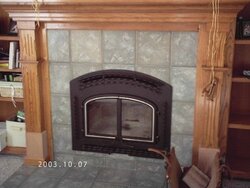
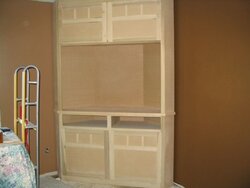
Here is a picture of the Quadrafire 7100fp before I got started:
 

Attachments

  • DCFN0029small.JPG
    DCFN0029small.JPG
    36 KB · Views: 780
The best way to begin a demo project is to hand one of your children a hammer and safety glasses and tell them "See that tile over there? Go bust it up with this hammer!!" It worked! She ripped out the tile and Durrock and removed all of the screws with the drill. Before the tile demo, we ripped out all of the old oak bookcases and paneling that covered the end wall of the family room.
 

Attachments

  • DCFN0004small.JPG
    DCFN0004small.JPG
    41.9 KB · Views: 764
  • DCFN0007small.JPG
    DCFN0007small.JPG
    35.4 KB · Views: 742
We removed the tile around the 7100fp and removed the "bumped out" portion of the wall. The goal was to get this end wall back to being a flat wall. I removed the framing, made sure the insulation was intact, removed the existing chimney, and also removed a little drywall on the ceiling where the tape was coming loose. I think I did most of the demo including removing the existing fireplace on a Saturday. Demo goes much faster then construction. The actual construction started in late August and was finished in early December if I remember correctly.
 

Attachments

  • DCFN0009small.JPG
    DCFN0009small.JPG
    33.9 KB · Views: 748
  • DCFN0010small.JPG
    DCFN0010small.JPG
    27.8 KB · Views: 747
  • IMG_7455small.JPG
    IMG_7455small.JPG
    25.2 KB · Views: 737
Framed out the new wall, insulated, and did the drywall work.
 

Attachments

  • IMG_7462small.JPG
    IMG_7462small.JPG
    28.7 KB · Views: 737
  • IMG_7463small.JPG
    IMG_7463small.JPG
    16 KB · Views: 723
Look what arrived!! Picked it up at the freight terminal. Only about 1 mile from my house so that was nice. I love the sticker they put on the crate...the 500+ lbs heavy sticker. I used two planks to unload the chimney package into the garage. That is the big crate in the truck. It slid down easily. I then backed my truck around to the back of my house. The deck there was about the same height as my truck. I used the same two planks and rolled the stove off the back of my truck onto the deck using an appliance dolly. It was incredibly difficult getting the dolly wheels up that 1 1/2 inch on to the planks. One wheel at a time and had the wife help. Dang this thing was heavy. Wheeled it into the family room where it sat in the way of the rest of the project for the next few months. Covered it with an old sheet. I was tempted to open the crate numerous times but resisted to keep it safe.
 

Attachments

  • DCFN0028small.JPG
    DCFN0028small.JPG
    64.5 KB · Views: 744
We had a cabinet maker make us a corner entertainment center. I was affraid of the cost but turned out to be cheaper than the ones you buy at the furniture stores and better quality. My wife wanted one painted with wood accents so that is what she got!! You can see my yougest daughter standing in front of the resting place for the woodstock stove. She likes dressing up. On the right side is the quadrafire sitting there waiting to be moved into the garage. My new window was installed too.
 

Attachments

  • IMG_7548small.JPG
    IMG_7548small.JPG
    17.9 KB · Views: 731
  • IMG_7550small.JPG
    IMG_7550small.JPG
    56.7 KB · Views: 763
Time to build the raised hearth. I used 2x6's on edge covered with 3/4 osb. They were spaced 12" apart. Covered that with Durrock before doing the hearth stones. Funny things happen during construction don't they. See that crowbar? It is still there. I forgot about it when I put the osb on. A few days later I was looking for it and it hit me like a ton of bricks!!
 

Attachments

  • IMG_7557small.JPG
    IMG_7557small.JPG
    31.1 KB · Views: 721
  • IMG_7559small.JPG
    IMG_7559small.JPG
    29.6 KB · Views: 708
By this time we had the walls painted and were ready for the stone work. First the scratch coat and then the stone. The stonework picture is what I did the first day. Not very fast at it I guess!! I'm not a mason though either so maybe I was doing ok....
 

Attachments

  • IMG_7570small.JPG
    IMG_7570small.JPG
    15.9 KB · Views: 721
  • IMG_7571small.JPG
    IMG_7571small.JPG
    17.8 KB · Views: 707
  • IMG_7573small.JPG
    IMG_7573small.JPG
    23.5 KB · Views: 724
great post so far.......

Can't wait to see the rest! :cheese:
 
Getting ready to lift the stove onto the hearth. Those planks I used earlier to get the stove in the house came in handy. I built a box and put some left over osb on top of it and positioned it in front of the hearth. Then used the dolly to get the stove up on it. Jut got the front edge of the crate on top and then with the help of a friend, we tipped it up so that the whole crate was up there. Figured we then only had to lower it into place instead of lifting it. We used 2 strips of osb to set the stove on so we wouldn't scrape up the hearth. Then wiggled it back to its final resting spot. Do I look excited in the picture? The end was near. You might wonder why I was putting it up on the hearth when the grout was not done?? Well, carpet was coming the next day so I didn't have a choice. Wasn't finished yet but already bumped the date back once and it was getting cold out!! The crown molding and baseboard was installed around the room and over the entertainment center, but not up to where the stone was yet. I did have the 3 new can lights up though.
 

Attachments

  • IMG_7575small.JPG
    IMG_7575small.JPG
    48.2 KB · Views: 715
  • IMG_7576_1small.JPG
    IMG_7576_1small.JPG
    38.5 KB · Views: 729
  • IMG_7577_1small.JPG
    IMG_7577_1small.JPG
    55.5 KB · Views: 725
Carpet was in and the room was starting to take shape. Still needed to finish some grout and cap stone along the half wall. The trim around the window was finished though.
 

Attachments

  • IMG_7578_1small.JPG
    IMG_7578_1small.JPG
    65.5 KB · Views: 719
  • IMG_7579small.JPG
    IMG_7579small.JPG
    23.9 KB · Views: 702
Looking good... Seems to be short a chimney though :) Waiting to see that come in too....
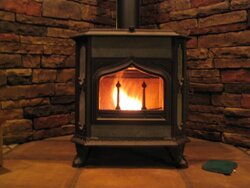
 
The time has come. My first break-in fire!! I love this stove!!! Everything was finished up in the room. Finished the cap stones and grout. Just waiting for the furniture. Hope it gets here for the holidays!
 

Attachments

  • IMG_7584small.JPG
    IMG_7584small.JPG
    42.1 KB · Views: 715
The finished project!! What do you think? Not bad for a beginner huh? I hope this was helpful to someone out there. I will do my review of the stove and my prior stoves sometime in the near future.... hopefully tonight.
 

Attachments

  • IMG_7586small.JPG
    IMG_7586small.JPG
    91.7 KB · Views: 744
So you just glued that stone right to the sheetrock? No screws with that wire lathe? I need to do some stonework and love seeing these jobs turn out.
 
There is wire lath and then a scratch coat of mortar over the drywall. The lath was put up with several pounds of roofing nails into the studs. 2 inchers if I remember. Its not going anywhere :) The stones themselves were then back-buttered and slapped up on the wall with mortar. Fairly simple but I was pretty slow at it. Start at the top and work your way down so the mortar does not get all over the stones that were already in place. I did the hearth stones last.
 
In case anyone is wondering. The stove is using the rear heat shield and 3 ft of pipe shield so it didn't have to be out in the middle of the room :) Single wall inside the room and 12' of class A out the roof and ceiling.
 
Way to go Tim, great job! Looks like a good time for a fire this weekend.
 
Tim, you did a fabulous job on the install. That was a significant project for an interior renovation, but the result was worth it.

The only thing I would suggest is installing a damper in the stovepipe. It sounds like you have a pretty tall chimney and if my interpretation is correct you are in Iowa, so can expect pretty low winter temperatures. Given both of those factors, you are quite likely to have excessive draft. I fought draft in my install all through last winter with a barely controllable stove (Pacific Energy T5 and before that a Morso 7110) and this fall added a $2.50 damper from Menards as far up the single wall as I could reach without removing the stove pipe. The damper certainly adds a lot of control to the draft, which I already notice now when the temperature gets in the 40's.

Last winter I tried to throttle the stove at all the inlets but it is tough. On my stove the primary still has an opening of nearly 1/2sq inch when closed against the stop. And the secondary air inlet is an additional 3/4 sq inch and then there is the glass "airwash" in the front of the stove that is the size of a 5c piece. If you start restricting all of these openings the air would whistle through the cracks that are left and airflow though imperfect areas like the ash dump door and around the main door gasket would be increased. Now with the damper, the source of all the "suction" is being addressed and the stove can be permitted to work the way it was designed.

Best of luck...
 
I have about 5 months of burning under my belt from last winter and so far it has been easy to control. I can pretty much shut it down if need be so I think I am good. I probably have about 16' of chimney pipe. I know of others that have had to install the dampers because they were not able to control the draft. I'll keep my eye on it this winter.
 
That is a beautiful job. And I still hate you guys that can do that stuff. Shoving a liner down a chimney was about the most home improvement skills I ever had in my life.

Enjoy. Great job and stove!
 
Thats as nice as a pro could do. Excellent job.
Not picking, but how much hearth do you have sticking out in front of the stove?
Looks great man!!!! Your not slow, I'm doing stonework also, Its tedious. I'm doing dry stack southern ledge stone.
I average about 12 hours per 15sf. LOL, we are both slow ;)

One other question.
Why did you get rid of the 7100? They appear to be nice units.
And although your new step up is gorgeous. The old one didn't look very shabby either.
 
OK, time for my review.

I have owned 3 stoves now: Quadrafire 2100i insert, the quadrafire 7100fp, and now the Woodstock Fireview. First the quadrafires:

The quadrafire 2100i was the largest insert I could get into the small zero clearance fireplace that we had at the time. It was put into a room that had 17' ceilings that flowed into the other main room on the first floor that also had 17' ceilings. A very open floor plan. I knew it would not heat the whole place and new it would not last through the night on a load of wood. It had less than a 2 cu ft box and once a little ash built up in there, it became tiny! Now, having said that, I believe it was well built and very easy to control. The window would get sooted up fairly easy when trying to do the low burns, but not completely blocked view. I always tried to keep some flame at the top of the box to keep the secondary burn alive. Sometimes this proved challenging. Might have been the wood moisture content too. Not too wet, but maybe not as dry as it should have been. Fairly happy with what I had to work with. Definitely allowed the furnace to run less.

Quadrafire 7100fp.

My wife liked the fireplace look so we gave this one a try in our next house. It also had a zero clearance fireplace. We ripped it out and installed the 7100. Needless to say, this one was much larger than the 2100i (much much larger). I'm not sure about the claims of 16 hour burn times. I never saw them. Seemed to me that because the firebox was so large that it was harder to keep it hot enough for the clean burn. I always try burning cleanly. Don't want the neighbors to even know I'm burning anything. So if I choked it down too much, there would be coals in the morning to reload, but could tell it did not burn the cleanest. I think it did best buring on medium low. Just purred along, but not very easy the next morning. I should point out that I was not burning real hard dense woods or anything. Lots of soft maple and elm and that type of wood. You know, what ever you get for free! Even pine (gasp). This fireplace was put in our family room that was 15X20 with regular 8' ceilings. You would have though we would have been roasted out of there, but we were actually able to control it fairly well. It would get fairly warm every once in a while, but normally pretty comfortable. It was fairly open to the kitchen/eat-in area so that helped. Over all, pretty satisfied with it, but always wondered about the fireview claims about burn times and soft heat and clean glass....yada yada. The seed was planted in 2006 when I discovered them on this site.

Woodstock Fireview -
I signed up for woodstocks mailings in 2006. Read the reviews on this site and just listed to what others had to say (ok, I read them, not listened) . Finally put one in the fall of 2008. I give it high marks just as the others. It does what the manufacturer claims. I definitely like the looks. Very unique. The glass really does stay clean. The double pane glass does the trick I'm sure. Over time, it does collect fly ash and get a thin white film on it, but never anything dark. Just a quick clean and it is good for another month. I like how quiet it is. NO fans and no noise. I usually ran my fans on the others more to make sure the box in the wall stayed cool enough more than anything else. The fans definitely boosted the hot air out of them but you could hear them. Of course I didn't have to run them. It heats our 1900 sq ft 2 story house completely. Definitely cooler upstairs, but the heat does find its way up there. I did an experiment. Tried to not run the furnace at all from Jan 15 - Feb 15th (one utility billing cycle). This is when we have some of the coldest weather here in Iowa. One of these nights hit -19 and many nights below zero. Granted my daughter and I slept down by the fire at -19 to keep it burning hot all night and to pretend we were camping out. Hey we did it though. In that one month, we ran the furnace for 2 hours total I estimate. Some neighbors had 400+ gas bills and ours was about $40. So this thing can heat.
The soapstone does hold the heat. Still warm even 20 hours later. Now after 20 hours, it is still warm, but not really giving off usable heat. But my other stoves would have been like ice cubes. Very gentle heat, just like everyone says. Heats the whole house, but the room it is in is not over powered. Pretty nice.
Burn times - lets just say you have to try hard to not have enough coals the next morning to easily get it going again. Seriously, once in the main heating season, you light it and that is it. Very easy (even simple) to keep it going all the time. As for the shoulder season, I find one small load gets the mass heated up enough so that the next larger load you are ready for the catalytic burn.
Speaking of Catalytic burning. (his is where the arguing comes in) I've had both now and I prefer the catalytic by far for 2 reasons. I find that after a load is burning for 10 - 15 minutes, I can set my air on 1/2 or 3/4 mark (0 - 5 range) and engage the cat and that is it for the duration of the burn. No fidiling to keep the secondary going. Once the cat is lit, that is it. It stays lit and never see any smoke. Non cats I always had to fidle to make sure the secondarys did not go out. The second reaon is that you can burn cat stoves so much slower, basically smoldering, and keep the clean burn going. 600 stove top temp with 250 stack temp (surface single wall). Seems like the flow slows way down and keeps the heat in the stove, not up the chimney. So clean burn and longer burn times with no fidling. Always easy to reload in the morning and the glass is perfectly clean. Wife loads it once or twice during the day and she loves it too. Very simple. Main heat source now. Furnace stays off except when out of town or bitterly cold out.

Love it!!! Thanks for reading!
 
it looks great.

i know this probably is a stupid question but i am new to this. Does the raised hearth obtained from the 2x6's count as dead air space with regards to the r-rating that some stoves require? also what does "OSB" stand for?
 
Status
Not open for further replies.