Hearth extension is not supported nor attached?

  • Active since 1995, Hearth.com is THE place on the internet for free information and advice about wood stoves, pellet stoves and other energy saving equipment.

    We strive to provide opinions, articles, discussions and history related to Hearth Products and in a more general sense, energy issues.

    We promote the EFFICIENT, RESPONSIBLE, CLEAN and SAFE use of all fuels, whether renewable or fossil.
You can get a cheap endoscope on ebay or elsewhere and drop it down the chimney to check the flue for cracks. missing mortar etc. This way if it's bad you know what you have to do. If it's good then u can keep the conversation going i guess.

That is not a bad idea, I always wanted to buy this for other reasons, like plumbing, or tiles around the house. The reason I haven't bought was that they always have terrible reviews. So, if you happen to know a decent one for Android phone worth buying that doesn't break the bank, please do share.
 
An insert with an insulated liner solves all 3 issues regarding clearances. It was unclear that this was the final plan. Sorry if I missed this. I was thinking the plan was to restore this to full fireplace operation.
 
  • Like
Reactions: SpaceBus
I have a cheap one that i used for plumbing. The cameras are remarkably good for such cheap prices. i think i paid $15-20? But the problem with most of them is the lighting. You could tape a small flashlight to it and i would bet that will get the job done. Of course you could tape your cell phone camera to a rope and try that, but unless it's being replaced soon i'd just get any endoscope with a 30 ft cord and add a light to it.
 
And i used the usb one to see the live video on my computer. So much (bigger) & better to look at than a phone.
 
That is not a bad idea, I always wanted to buy this for other reasons, like plumbing, or tiles around the house. The reason I haven't bought was that they always have terrible reviews. So, if you happen to know a decent one for Android phone worth buying that doesn't break the bank, please do share.
I taped my iphone itself (not a remote camera) onto a tree pruning pole, and sent it up and down the chimney. Once up and down facing each of the four interior faces of the chimney. Then I watched the videos after I had finished. Cheap, but effective, assuming your chimney is wide enough to not violate the minimum focal distance of the camera on your phone.
 
  • Like
Reactions: bigealta and TomasB
Do you suggest going through the neighborhood and demoing each and every fireplace because none of them have 1" spacing?

Besides, the fireplace upstairs, has an additional roughing wall that is separating firebox from outside wall,

Besides #2: once the insert is in, how many more walls are there for the fire to breach?

So, really, I'm not going to lose any sleep over this.
With an insert and insulated liner all clearances are taken care of assuming the chimney is built with 4" block or brick
 
And the condition of the existing liners no.longer matter if going that route no need to scan it really
 
With an insert and insulated liner all clearances are taken care of assuming the chimney is built with 4" block or brick
Just came down from the roof, the linear at the narrow part is 6.25", so adding insulation around 6" steel vent is going to be fun. But I will do. I guess, it will get insulated at least 80% on the sides, which is still much better than nothing,
BTW, the mason did mention insulation, suggested to use loose rockwool, and not waste the money on that stuff that you make wet and then drop it down. I don't remember how it's called, but if you know, you know what I mean. (it's vermiculite)

I'll probably run a cell phone attached to a tree pruning pole (© @Ashful) to inspect how the existing liner condition is after I clean the chimney, just to satisfy my curiosity.
I usually use two cellphones, and video call. Works pretty well.
 
  • Like
Reactions: Ashful
Just came down from the roof, the linear at the narrow part is 6.25", so adding insulation around 6" steel vent is going to be fun. But I will do. I guess, it will get insulated at least 80% on the sides, which is still much better than nothing,
BTW, the mason did mention insulation, suggested to use loose rockwool, and not waste the money on that stuff that you make wet and then drop it down. I don't remember how it's called, but if you know, you know what I mean. (it's vermiculite)

I'll probably run a cell phone attached to a tree pruning pole (© @Ashful) to inspect how the existing liner condition is after I clean the chimney, just to satisfy my curiosity.
I usually use two cellphones, and video call. Works pretty well.
Don't listen to.your mason. Use an ovalized liner wrapped in 1/2" listed liner insulation. You don't have room for pour in
 
Don't listen to.your mason. Use an ovalized liner wrapped in 1/2" listed liner insulation. You don't have room for pour in

Nice. Learning things by a minute. Using this space to collect info, in case someone stumbles and finds that useful.

Oval liners:


Wrap insulation:


Loose insulation (interestingly, much cheaper option, but not as convenient, I guess):
 
Last edited:
The trouble with pour-in, I believe, is that you can't gaurantee you're hitting required insulation thickness, without some way to keep liner centered in the bore. Wrapped insulation guarantees there's never liner touching the flue.
 
Nice. Learning things by a minute. Using this space to collect info, in case someone stumbles and finds that useful.

Oval liners:


Wrap insulation:


Loose insulation (interestingly, much cheaper option, but not as convenient, I guess):
Pour in needs to be 1" thick all the way around
 
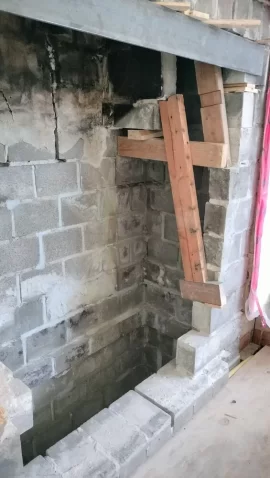
Hearth no more. Reached the bottom on the left, still standing. I was not scared to get rid of the left side, since on the left chimney dividing wall is supported properly with ash cleanup sloped wall. One of the bricks at the back is stuck pretty well, leaving that alone.

As it all opened, it became less scary.
The ledge inside now is accessible nicely, could use that to support cement boards, then, drill some holes and put rebar above cement boards, and pour concrete to the level of old cement bricks. That would be quite thick pad, though.
I could lay 2x4 flat, would help to support cement boards, later, remove them through ash dump/air intake hole.

Not sure how, people who know what they do, approach this.
If I were to do this myself (undecided yet) I'd pour fireplace bottom and hearth in one go, would be a continuous concrete slab. I would taper slightly the hearth's front (i.e. making it thinner at the front), but would make it thicker at the point where it connects to the fireplace, thus putting rebars in tension this way, and the back bottom of the hearth in compression, thus a little thicker concrete there.

In the picture:
Red: remove those bricks, will be replaced by a slab.
Blue: cement board supported from underneath
Green: rebars, extending to hearth.

IMG20230629215745.jpg
 
Last edited:
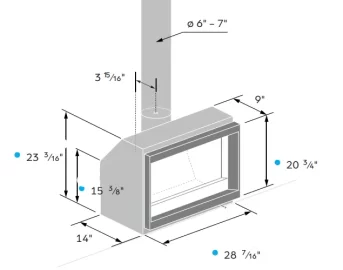
Oh, and another thing. Considering that we will be installing an insert (Stuv-6 76-60 is what's on our mind) what are the requirements for the rebuilding firebox? Should the firebox be rebuilt, or not?

1688147368227.png

The width of the fireplace we have in mind is 28.5", while the back of the fireplace rough-in wall (cement bricks, before we put firebricks back) is 30". So if we rebuild how it used to be, we might run out of space. I'm thinking, we should have more than enough space for rebuilding back, and I'm inclined to do so. Maybe not rolling forward, but just straight wall, so that at least we have some sort of either air gap, or even put some insulation between that and outside wall. What are the requirements for materials? ie firebricks vs regular red or maybe even cement bricks?
BTW, I'm aware of those "the fireplace was modified" stickers.
 
Last edited:
Oh, and another thing. Considering that we will be installing an insert (Stuv-6 76-60 is what's on our mind) what are the requirements for the rebuilding firebox? Should the firebox be rebuilt, or not?

The width of the fireplace we have in mind is 28.5", while rough in is 30". So if we put how it was/better, we might run out of space. I'm thinking, we should have more than enough space for rebuilding back, and I'm inclined to do so. Maybe not rolling forward, but just straight wall, so that at least we have some sort of either air gap, or even put some insulation between that and outside wall. What are the requirements for materials? ie firebricks vs regular red or maybe even cement bricks?
With fire brick you need 8" of masonry until the nearest combustible material. With non firebrick you need 10"
 
With fire brick you need 8" of masonry until the nearest combustible material. With non firebrick you need 10"
There is wayyyyyyyy more than 10" to nearest combustible. I have 40cm aka 16" from the edge of the current opening to the side of the fireplace, then +1 inch of space to the nearest stud.
I'm thinking, what if I leave partial sidewalls of firebricks, and fix the roughing, something like that:
1688163932020.png


I will propose that to the mason, see how that affects the pricing.
BTW, I still would like to have some separation from outside wall.. Maybe not necessarily out of bricks, but could do using cement board with rockwool bat behind, as well? Maybe? Just makes sense to me to have that insulated, let me know if I'm nuts.
As well, put R20 rockwool bat on top, and close the top just above the insert as well.
 
Last edited:
There is wayyyyyyyy more than 10" to nearest combustible. I have 40cm aka 16" from the edge of the current opening to the side of the fireplace, then +1 inch of space to the nearest stud.
I'm thinking, what if I leave partial sidewalls of firebricks, and fix the roughing, something like that:
View attachment 313596

I will propose that to the mason, see how that affects the pricing.
BTW, I still would like to have some separation from outside wall.. Maybe not necessarily out of bricks, but could do using cement board with rockwool bat behind, as well? Maybe? Just makes sense to me to have that insulated, let me know if I'm nuts.
As well, put R20 rockwool bat on top, and close the top just above the insert as well.
But do you have 10" thick masonry between the combustibles and the inside of the masonry
 
But do you have 10" thick masonry between the combustibles and the inside of the masonry
Cement block put on narrow side, so it's 3.5" + 8" of airspace between walls + another cement block on it's side: 3.5"
If that's not enough, I don't know what will be.

We are talking about an insert, though, aren't we?

From https://free.bcpublications.ca/civix/document/id/public/vbbl2014/ep001029.22

9.22.3. FIREPLACE WALLS​

9.22.3.1. Thickness of Walls​

1) Except as provided in Sentence (2), the thickness of the back and sides of a fireplace, including the thickness of any firebrick liner, shall be not less than 190 mm where a metal liner or a firebrick liner less than 51 mm thick is used.
2) When a steel fireplace liner is used with an air circulating chamber surrounding the firebox, the back and sides of the fireplace shall consist of
a) solid masonry units not less than 90 mm thick, or
b) hollow masonry units not less than 190 mm thick.

Am I reading this wrong, but in my case, since we are installing an insert, it seems that 90 mm is the actual requirement?
 
Last edited:
Cement block put on narrow side, so it's 3.5" + 8" of airspace between walls + another cement block on it's side: 3.5"
If that's not enough, I don't know what will be.

We are talking about an insert, though, aren't we?

From https://free.bcpublications.ca/civix/document/id/public/vbbl2014/ep001029.22

9.22.3. FIREPLACE WALLS​

9.22.3.1. Thickness of Walls​

1) Except as provided in Sentence (2), the thickness of the back and sides of a fireplace, including the thickness of any firebrick liner, shall be not less than 190 mm where a metal liner or a firebrick liner less than 51 mm thick is used.
2) When a steel fireplace liner is used with an air circulating chamber surrounding the firebox, the back and sides of the fireplace shall consist of
a) solid masonry units not less than 90 mm thick, or
b) hollow masonry units not less than 190 mm thick.

Am I reading this wrong, but in my case, since we are installing an insert, it seems that 90 mm is the actual requirement?
Your insert will require a code compliant fireplace to be placed in. What you are reading about is a heat form firebox.

Now would Your setup be safe? Probably. But will it meet code requirements? Not in the us. I don't know canadian code enough to say for sure
 
  • Like
Reactions: TomasB
Little update.
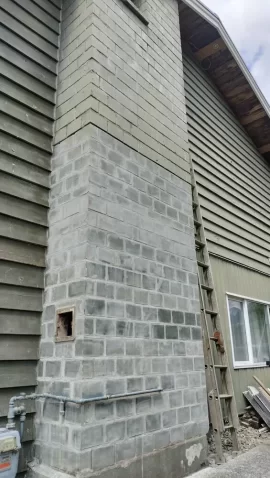
Repointed half of the outside. The goal is to repoint all. Will do more work in between of work on the inside. We'll clean bricks later. You can see a few cleaner bricks in the middle, that my wife tried to clean with a sponge. Another option, to grind all that paint. I tried on a few bricks - smells, and quite a bit of work, but it's possible. Then apply some water repellant (as opposed to a sealer). But all that can wait for now.

IMG20230722120026.jpg

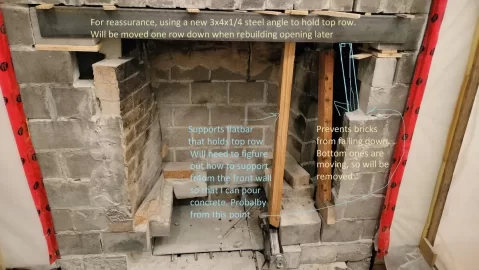
More demo in the inside, and it is still standing! I'll try to keep that way going forward. The most scary part is in the past, I think.
IMG20230722000245.jpg
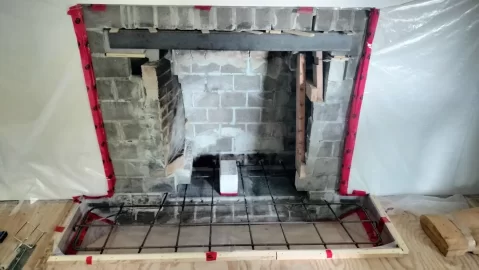
The fireplace floor is covered with cement boards that are supported by 10mm rebars spaced every 4".
Next stop - clean all and build a form for hearth extension, rebars and pour concrete.

I need advice on rebar spacing for the floor + hearth extension.
The plan is to use 10mm rebars, and form a grid of 6x6 or so.
Please do chime, because I haven't looked into what is required, and I hope you can save me quite a bit of time - take a lot of effort to find relevant info.

The only requirement I'm aware is that the rebar that supports the hearth should be closer to the top surface of concrete (that will put rebar in tension).
So, 1.5" from top, since the plan is to pour 5" deep. 1.5" will put rebar in top third layer of concrete.

As well, the plan is to drill 1.5" deep into bricks, and use epoxy to secure them in place (good / bad idea?).
 
Last edited:
🤞 it will hold
IMG20230722143603.jpg

From:
"For the reinforcing, place half inch reinforcing bars on a 12" grid in the concrete with the bars going from front to back on top, about one inch from the surface of the concrete, since the top of the cantilevered hearth extension will be in tension. Additional thickness, rebar or mesh can't hurt."

So, 8" grid it is then.
 
Last edited:
Cement board to close fireplace, 3/4" plywood for hearth extension, level frame around extension, will use that as a guide.

IMG20230729190245.jpg

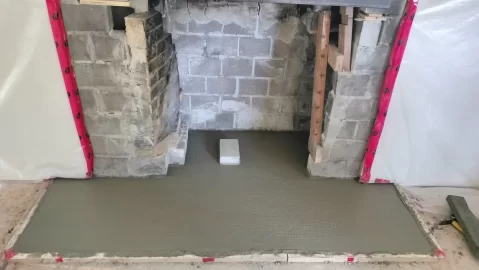
...22 bags of sacrete 6000psi 25kg/bag later:
IMG20230730151524.jpg

We had 2 wheelbarrows, mixing in one while another being unloaded.

Learn from our mistakes: down't mix 2 bags at a time, it takes too much effort to do this. It's easier and faster to mix one bag in a wheelbarrow.
Used a steel angle with a level to scrape and level the surface.
For compacting, we used bosh drill hammer set into hammer only mode, and 2x4 flat attached to a bit. When compacting, I found that it's better to run in short bursts in very low rpm.
Covered everything with plastic (not in the picture) will keep for 3 days like that so that water doesn't escape and can do the curing.
 
Cement board to close fireplace, 3/4" plywood for hearth extension, level frame around extension, will use that as a guide.
This certainly works, but it's not code. Any fireplace must be done as if it were to be used again as an open fireplace, not just to the requirements of the stove you'll be placing inside it, so the hearth extension and associated underlay should be non-combustible material.

Now, if you were to rename said fireplace to an "alcove", I guess that requirement might be dropped?
The wood can probably be removed from underneath the extension
 
The wood can probably be removed from underneath the extension
This certainly works, but it's not code. Any fireplace must be done as if it were to be used again as an open fireplace, not just to the requirements of the stove you'll be placing inside it, so the hearth extension and associated underlay should be non-combustible material.

Now, if you were to rename said fireplace to an "alcove", I guess that requirement might be dropped?
Correct, the plywood underneath is just a form, and it WILL be removed.
The same goes for the raised frame around.
There are plywood spacers all around the extension perimeter that will be removed as well, leaving the gap between the extension and joists around it.

---

Side note, since I can't modify the earlier post: I'm monitoring the temperature of the slab, trying to keep it under +30C (86F).
I think the recommended range is +50 °F ... +90 °F (+10C...+32C)
Concrete heats up during the curing process. I uncovered plastic, so that the concrete cools down as water evaporates, and I keep spraying with water, so that the hydration process is continuous.
For a reference, the floor next to the slab was +24C, and the slab was as high as +32C after 8h from pouring.
After 16h or so, I was able to cover with plastic after seeing concrete temperature going down to +27C on the surface.

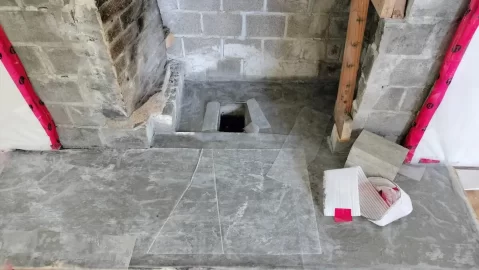
On some other good news, making a hole using bricks wrapped in Foam Sill Plate Gasket worked like a charm. I used 2 hot glued bricks so that it's sticking out of concrete, and was able to remove them since the foam gave a little wiggle room.

IMG20230731150309.jpg
 
Last edited:
  • Like
Reactions: Ashful and bholler