Jags splitter build - pic heavy

  • Active since 1995, Hearth.com is THE place on the internet for free information and advice about wood stoves, pellet stoves and other energy saving equipment.

    We strive to provide opinions, articles, discussions and history related to Hearth Products and in a more general sense, energy issues.

    We promote the EFFICIENT, RESPONSIBLE, CLEAN and SAFE use of all fuels, whether renewable or fossil.
Status
Not open for further replies.

Jags

Moderate Moderator
Staff member
Aug 2, 2006
18,488
Northern IL
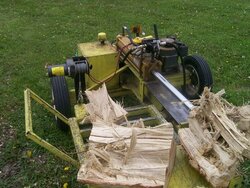
So there I was - beautiful river flowing behind me. Me swinging at a round like I was trying to kill a rabid beaver - sweating, ticked off, tired. Heck, I am only making camp fire wood. "Screw this - I am building another splitter for the cabin", entered my mind.

SOoooo....

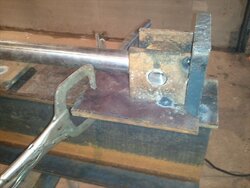
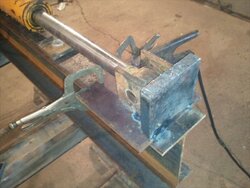
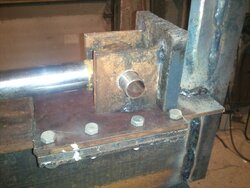
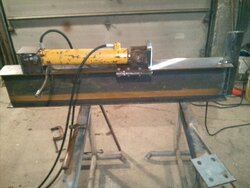
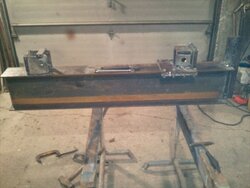
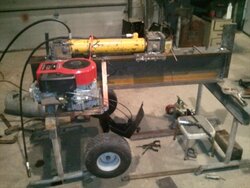
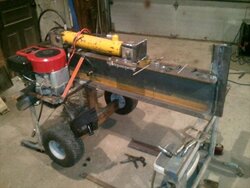
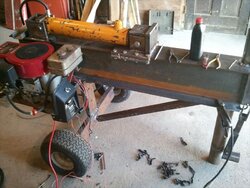
The idea was a smaller, lighter duty machine with good speed and I didn't want to spend a bunch of bean pods on it. There were a couple of items that I needed to buy, but mostly I could repurpose some steel/wheels, hoses that I have around anyhow. I literally have bins full of bolts, nuts, washer, etc. The most exotic piece of equipment I used for this build was a die grinder. I roughly have about 20 hrs in the build and I don't have plans. This is farmer style. Looks good, tack it on. :lol:

First person to pick on my welding gets banned from the island. ;-)

Specs:
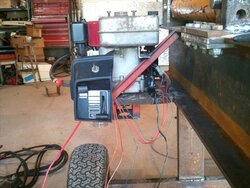
14.5 HP briggs electric start. (donor from a lawn mower with locked up diff.)
3.5" - 16" stroke ram. (had laying on shelf) splitter has 2 inched between foot and wedge for total log length of 18"
16 gpm speeco 2 stage pump
non detent control valve.
Repurposed air tank from semi tractor.

Purchased parts:
I-beam - $100
pump - $107
half of a lovejoy and spider - $20
A few pieces of 1" pipe - $5
It is not complete yet, but I don't believe I will need any other purchased parts. Maybe a hose if I don't have the proper size already hanging on the wall.

I will start from the beginning.
 
  • Like
Reactions: QuadraFire
The first part to design was the shoe or shuttle. This will be a wedge on beam splitter. It will also be a fairly tall splitter as I don't see this getting rounds any bigger than 18-20".
 

Attachments

  • pushplate.jpg
    pushplate.jpg
    65.3 KB · Views: 2,164
  • pushplate2.jpg
    pushplate2.jpg
    66.9 KB · Views: 2,078
Continuing stages of shuttle and of the wedge. Again - I aim to be cheap on this build, hence the built wedge.
 

Attachments

  • footwedge.jpg
    footwedge.jpg
    76.7 KB · Views: 1,904
Mocking up the fit of the cylinder and building the rear mount:
 

Attachments

  • mockup2.jpg
    mockup2.jpg
    70.5 KB · Views: 2,016
  • rearmount.jpg
    rearmount.jpg
    64.7 KB · Views: 2,004
Burning some rod. This was some heavy penetration on the welds. I don't promise "pretty", but I do promise that they will hold.

Edit - I didn't have quite a large enough drill bit, so I finished the holes with the die grinder. 1-1/4 rod for pins.
 

Attachments

  • mounts.jpg
    mounts.jpg
    56.6 KB · Views: 1,967
  • rearmount2.jpg
    rearmount2.jpg
    66.9 KB · Views: 1,899
Mockup of motor mount/pump mount, axle position and checking weight distribution:
 

Attachments

  • mockup4.jpg
    mockup4.jpg
    68.8 KB · Views: 2,170
  • mockup3.jpg
    mockup3.jpg
    66.6 KB · Views: 2,027
Controls are mounted (this is a better pic of the pump mount, as well). As you can see, this was part of the dash from the donor mower. The wheels were also repurposed from the same mower. Gas tank mounted. And a pic of it sitting on its own wheels and leg. Note the draw bar hanging from the front of the splitter. I built it to be removable for a couple of reasons. One - eliminates a tripping hazard and two - it makes this sucker tough to steal. You can't hook it up to anything to tow it if the tow bar isn't there.
 

Attachments

  • controls.jpg
    controls.jpg
    90.4 KB · Views: 2,068
  • allthree.jpg
    allthree.jpg
    89.2 KB · Views: 2,103
At this point in time, the motor is mounted and running and its time to start plumbing and mounting the control valve. I probably need about 4 more hours to get that done (and battery mount, too). So to tally so far - and including a 5 gallon bucket of hydro fluid, I am around $250 bucks. This thing is built to specs that should give me performance of the Iron and Oak 15 ton horizontal machine. I am using a much heavier beam and a 2" shorter ram and a bigger motor, but It should be a 6-8 second full cycle time.

The tongue weight is VERY reasonable, but I plan on mounting a small outfeed table that will add a few pounds (and that is probably a good thing).

waddaya think so far? It is quite stable for being taller than most. This will have a beam height about the same as the Super splitters, for ease of production of rounds. I am sure I missed some stuff. Feel free to poke, prod and cuss. :lol: I have a few more pics if anybody is interested and more will be taken as the project comes to completion.

My ultimate hope is that this will yield me more quality beer time in front of a fire. There are a few cabins (4) in line, and we all like fires. The next door neighbor also has an epa stove that takes 18" splits, so I think this will get some hours on it.
 
I love it. It looks great.
How much more time before she's up and running?

Did you build the buggy in your avatar?
Pretty cool!
 
infinitymike said:
I love it. It looks great.
How much more time before she's up and running?

Did you build the buggy in your avatar?
Pretty cool!

I am guessing about 4 more hours and it will be ready to split wood. I just MIGHT put a coat of paint on it if it works. %-P

Oh - I didn't build that crawler. I don't even know who did. If I win the lottery, I will. Maybe even an electric version.
 
Looks to be a high speed one. Smaller shorter ram should make for fast cycles.
Nice build!! Good craftsmanship !
Nice shop !!! :)
Ever think about towing it the other way? So the split fall of the end & you just need to pull it a little ahead (backwards) & your out of the pile of splits.
Take some thinking for a tongue, may have to push it down to hook it to the ball, & make sure the foot is down before un-hooking, (chin safety ); maybe more user friendly.

Some nice looking welds ;)
Color gonna be ? Most welder I know love the color of rust or "Rudy brown primer" :) LOL

Looking good, keep us posted
 
bogydave said:
Ever think about towing it the other way?

Color gonna be ? Most welder I know love the color of rust or "Rudy brown primer" :) LOL

Thanks, Dave. I DID think about the tongue on the other end, but it would have complicated the build a bit. I doubt that this thing will get much for piles in front of it. It will probably be...split for a bit, beer, stack, beer, split for a shorter time, beer, stack, beer...you get the idea.

As for color? Dunno, it will probably be what ever is rattling around my shop. Maybe plaid?
 
Brogan007 said:
Awesome project. You're a star to take it on. I'm impressed.

Its my third. All three are different styles. My big boy:

My first was gone before hearth dot com and camera phones were invented. Thanks for the kind words.
 

Attachments

  • 100_1028sm.jpg
    100_1028sm.jpg
    74.8 KB · Views: 2,218
Jags, That sure looks like some fun splittin there in your last pic. (on the yellow splitter)
 
Nice job Jags. No conversations being carried on over the big Briggs? They're usually god-awful loud! :coolgrin:
 
I am suitably awed, and those welds look like they'll outlast us all.

Are you going to buy your milk crate or make your own?
 
711mhw said:
Jags, That sure looks like some fun splittin there in your last pic. (on the yellow splitter)

That there be Elm. That big boy splitter makes short work of difficult wood.
 
MasterMech said:
Nice job Jags. No conversations being carried on over the big Briggs? They're usually god-awful loud! :coolgrin:

Believe it or not, this one is fairly quite. It has a pretty large muffler on it.

And Snow, ain't no stinkin' milk crate gonna get anywhere near my splitter. This is horizontal only. My ancestors have been bipedal for many years, and I don't want to reverse that trend. The pics may not show it well, but this has a deck height that lends itself to a very comfortable work height.

And those welds - gorgeous, aren't they?? ;-)
 
Jags said:
At this point in time, the motor is mounted and running and its time to start plumbing and mounting the control valve. I probably need about 4 more hours to get that done (and battery mount, too). So to tally so far - and including a 5 gallon bucket of hydro fluid, I am around $250 bucks. This thing is built to specs that should give me performance of the Iron and Oak 15 ton horizontal machine. I am using a much heavier beam and a 2" shorter ram and a bigger motor, but It should be a 6-8 second full cycle time.

The tongue weight is VERY reasonable, but I plan on mounting a small outfeed table that will add a few pounds (and that is probably a good thing).

waddaya think so far? It is quite stable for being taller than most. This will have a beam height about the same as the Super splitters, for ease of production of rounds. I am sure I missed some stuff. Feel free to poke, prod and cuss. :lol: I have a few more pics if anybody is interested and more will be taken as the project comes to completion.

My ultimate hope is that this will yield me more quality beer time in front of a fire. There are a few cabins (4) in line, and we all like fires. The next door neighbor also has an epa stove that takes 18" splits, so I think this will get some hours on it.

I think its pretty darn Sweeet....See wear the #'s are at the end and how well it will do, but I would say its in the bag,. :lol:
 
Looks great! Just wondering why wedge on beam instead of wedge on ram?


This is not critisicm of what you did, but isn't it easier to run the splitter if the wedge travels rather then the pusher plate? Large unsplit pieces will stay on top of the beam and are easier to handle instead of being pushed off the end of the splitter and further from the control handle. JMHO


Nice work.

EDIT: I see your first one has a work table that the splits are pushed on to, I guess you are going to add one of those?
 
kettensäge said:
Looks great! Just wondering why wedge on beam instead of wedge on ram?


This is not critisicm of what you did, but isn't it easier to run the splitter if the wedge travels rather then the pusher plate? Large unsplit pieces will stay on top of the beam and are easier to handle instead of being pushed off the end of the splitter and further from the control handle. JMHO


Nice work.

EDIT: I see your first one has a work table that the splits are pushed on to, I guess you are going to add one of those?

Wedge on beam rocks if you split into a tractor bucket, cart, conveyor, etc. Some units have a log table behind the wedge to keep splits from dropping right away.
 
Yep, a log table/work table will be added to this. The one reason I don't like wedge on ram is that if a split gets away from you, its on your feet. The other advantage to wedge on beam is that you can continue to push wood off the end and simply allow it to pile up. For the most part, only verticle/horizontal machines are the only ones with wedge on ram - and that is because they HAVE to, not because of superiority of design.
 
hey jags meant to ask, where did that honkin motor come from? looks like elec start - but I wouldnt expect anything less.
 
Status
Not open for further replies.