I’ve been lurking on the site for a year and a half and finally decided to join and submit my first post. I’ll start by saying thank you to everyone who contributes because your advice has been invaluable. I very much respect the hard work ethic, love of the outdoors, and the drive to be self sufficient that everyone on this site represents. I have read hundreds of posts here and have taken your advice and experience and put it into practice in my own life. It’s been fun and I’m looking forward to many more years of this new hobby, passion, addiction.
Before last winter I wanted to update our hearth and surround and the plan was to go from gas logs, which we never used, back to open fire. I went to a local fireplace store looking for a new gas shutoff valve, because I liked the idea of keeping gas as a starter, and the lady game me a Jotul catalog. It was like getting my first Red Rider BB gun. She said Jotul was the best, that there was a $1500 tax credit, and I was hooked from that point. I did a search, found this site, and narrowed it down to the Rockland 550. I wanted big and flush, so that seemed the best choice. I read every thread on the Rockland that existed, and now that I’m burning it for the second season I agree with what everyone said were the pros and cons. No stove is perfect, each has its own learning curve, and I can now make some mean heat.
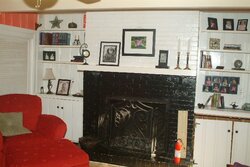
Our fireplace is on an external wall with a 2 story 20’ brick chimney. Before the stove install the interior was brick surround to the ceiling and brick hearth. The former owner had painted the brick black on the bottom and white on the top. We hated the brick that way, didn’t want to strip or sandblast so we sheetrocked it in. We also tore out the paneling, shelves and cabinets to the left and right. No exterior insulation at all in this house so we insulated those sides and replaced the paneling with sheetrock too. We wanted it to look a little more modern. I may be the only guy here with sheetrock around and above the stove. I did the work and used wood furring strips nailed with 22 cal into the grout lines to mount the sheetrock to. Used hollow metal 2x4s around the opening to attach the sheetrock, and cement board to avoid fire. The plan let me run the blower power cord behind the wall, so that is nice. Looking back, I probably should have done stone or stone veneer because of the radiant heat but oh well, we like it. Nothing is forever.
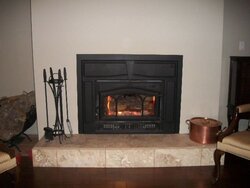
Had the stove installed by a local company. They cleaned the chimney, tore out a few bricks and the damper, and put in a 6†non insulated SS liner. Should have gone with insulated but didn’t know at that time. They blocked off the top but not the bottom so sometime I will put in a lower blockoff plate. My fireplace opening was big and I didn’t want to rock it smaller so I forked out the extra cash for the Jotul extension facing. I haven’t seen anyone else with the same stove on here who has one. So if you are thinking about it then this is what it looks like. It’s cool but the blower makes it rattle and vibrate sometimes. Other projects have kept me busy so I haven’t put in new built-ins and cabinets yet. No mantle yet either. One step at a time.
My next post will be “Tornado Scrounge†when I decided to never buy wood again.
Before last winter I wanted to update our hearth and surround and the plan was to go from gas logs, which we never used, back to open fire. I went to a local fireplace store looking for a new gas shutoff valve, because I liked the idea of keeping gas as a starter, and the lady game me a Jotul catalog. It was like getting my first Red Rider BB gun. She said Jotul was the best, that there was a $1500 tax credit, and I was hooked from that point. I did a search, found this site, and narrowed it down to the Rockland 550. I wanted big and flush, so that seemed the best choice. I read every thread on the Rockland that existed, and now that I’m burning it for the second season I agree with what everyone said were the pros and cons. No stove is perfect, each has its own learning curve, and I can now make some mean heat.
Our fireplace is on an external wall with a 2 story 20’ brick chimney. Before the stove install the interior was brick surround to the ceiling and brick hearth. The former owner had painted the brick black on the bottom and white on the top. We hated the brick that way, didn’t want to strip or sandblast so we sheetrocked it in. We also tore out the paneling, shelves and cabinets to the left and right. No exterior insulation at all in this house so we insulated those sides and replaced the paneling with sheetrock too. We wanted it to look a little more modern. I may be the only guy here with sheetrock around and above the stove. I did the work and used wood furring strips nailed with 22 cal into the grout lines to mount the sheetrock to. Used hollow metal 2x4s around the opening to attach the sheetrock, and cement board to avoid fire. The plan let me run the blower power cord behind the wall, so that is nice. Looking back, I probably should have done stone or stone veneer because of the radiant heat but oh well, we like it. Nothing is forever.
Had the stove installed by a local company. They cleaned the chimney, tore out a few bricks and the damper, and put in a 6†non insulated SS liner. Should have gone with insulated but didn’t know at that time. They blocked off the top but not the bottom so sometime I will put in a lower blockoff plate. My fireplace opening was big and I didn’t want to rock it smaller so I forked out the extra cash for the Jotul extension facing. I haven’t seen anyone else with the same stove on here who has one. So if you are thinking about it then this is what it looks like. It’s cool but the blower makes it rattle and vibrate sometimes. Other projects have kept me busy so I haven’t put in new built-ins and cabinets yet. No mantle yet either. One step at a time.
My next post will be “Tornado Scrounge†when I decided to never buy wood again.