Pics of the install and finished product-

  • Active since 1995, Hearth.com is THE place on the internet for free information and advice about wood stoves, pellet stoves and other energy saving equipment.

    We strive to provide opinions, articles, discussions and history related to Hearth Products and in a more general sense, energy issues.

    We promote the EFFICIENT, RESPONSIBLE, CLEAN and SAFE use of all fuels, whether renewable or fossil.
Status
Not open for further replies.

iceisasolid

New Member
Jan 3, 2011
110
North Central Idaho
I have had my Englander 24 AC running 24/7 for going 8 days. It is a heater and thus far, it has kept my upstairs and downstairs warmer than I ever ran the house with the diesel furnace- 74 F up/warmer down. Thanks to some of the input I received and read, I had a bit more confidence about a basement install than I had prior. I also learned that if I would have read a little more and looked at some of the articles, I would have had some of my questions answered. I had lots of questions and most have been answered. In the end, my insurance dictated that a licensed contractor do the install. The advice I got helped have most of the info needed to keep T&M to a minimum.

The idea was to use as little new materials for accents as I could and try and use as much of the old materials that have been laying around my property for decades. I bought the place in 2009- in the past it has been a ranch/pig farm/grain farm/organic farm.

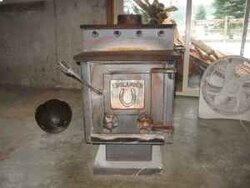
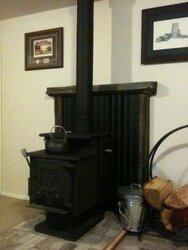
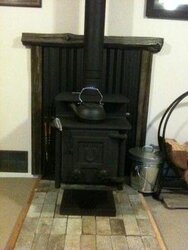
Pic #1- I purchased a used Englander 24 AC from Craigslist and refurbished it- new paint (rustoleum high heat in black)/combustor/impingent plate/new carriage bolts (Cutting the spot welds was a pain but the dremel worked nicely)/door and flue collar gaskets. I purchased a factory heat shield for 6 inch clearance but gave myself 9 inches anyway so that I could add some heat protection for the wall anyway. The blower on the back of the stove gave me 4 inches of clearance from the wall.

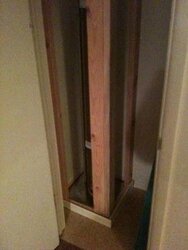
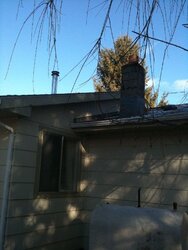
Pic#2- The chase (open)- The picture only shows the frame. I ran in a closet and was able to save most of the closet space. Currently, it needs to be finished with mud and tape.

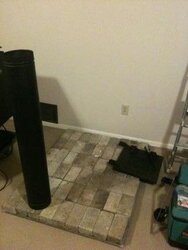
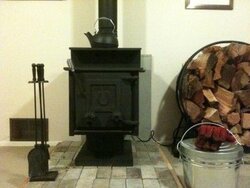
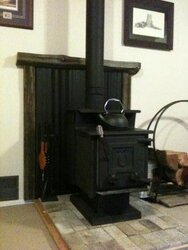
Pic #3- the simple hearth made of patio bricks and wood from the barn. I plan to replace this later this summer with a nicer hearth of rock or old red brick to raise it a bit higher and make it nicer. THe floor hearth was put together quickly to facilitate getting the stove in.

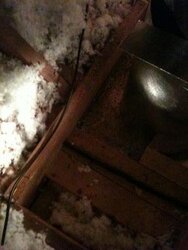
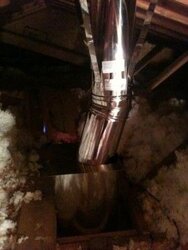
Pic #4- the ceiling joist was cut and a header applied.

Pics 5-10 next posts
 

Attachments

  • unfinished stove.jpg
    unfinished stove.jpg
    6.5 KB · Views: 776
  • build_1.jpg
    build_1.jpg
    15.7 KB · Views: 752
  • chase.jpg
    chase.jpg
    15.4 KB · Views: 733
  • header_cut_ceiling_joist.jpg
    header_cut_ceiling_joist.jpg
    18.2 KB · Views: 737
Pic #5- initial set up
Pic#6- we had a local HVAC company cut the metal for an insulation barrier and 2 floor stops for the cost of $13 v the cost of the selkirk products for about $90 for all three. I used 15 degree offsets for the chimney pipe.
Pic #7- The old furnace chimney needs repair. The new stove chimney looks good and was running with this pic. Cats working well so it seemed.
 

Attachments

  • 15_degree_offset.jpg
    15_degree_offset.jpg
    18.3 KB · Views: 757
  • chimney.jpg
    chimney.jpg
    72.9 KB · Views: 731
  • initial_install.jpg
    initial_install.jpg
    21.4 KB · Views: 765
Pic #8-10- the additional heat shield with accents. We used 1 inch conduit (ran vertically) found in the basement and screwed it to the wall. We had 2 part sheets of durarock from a previous application so we put them together on the conduit. I bought corrugated roof tin as the stuff in the barn was used for the dog house. I used Stove Bright Satin Black for the tin. The mantel wood was a hand cut cedar fence post I pulled up yesterday, and the vertical trim is nominal dimension 2x4 from a fence I took down this summer. I have open studs on the otherside of the wall as the other side of the wall is an unfinished potion of the basement, so all wood fasteners are screwed in from the back side. I have 4 lag screws holding the mantle in place. Suprisingly, the mantel sits level on the heat shield, so we only needed to anchor it to the wall. The cost of heat shield was about $35 in materials. The mantel/wood/bricks came with the house, some out in a pasture, some in the barn. My brother and I put up the heat shield, mantel and trim this morning. I have 6 inches of clearance from the mantel to the double wall stove pipe. Since the clearances are met with the heat shield and the double wall pipe I was less concerned making space between the mantel and the heat shield. Given a hand cut piece of aged wood, there is enough space between the mantel and heat shield to dissipate heat. It's a pretty simple heat shield set up. I like the Jed Clampett look.

Thanks. I hope that you enjoy the pictures, my kids and I will enjoy the heat.

-Ray
 

Attachments

  • stove_1.jpg
    stove_1.jpg
    18 KB · Views: 746
  • stove_2.jpg
    stove_2.jpg
    19.5 KB · Views: 773
  • stove_3.jpg
    stove_3.jpg
    19.1 KB · Views: 775
Looks like you've done well. It's an original look, very clean. How is the stove working out for you?

PS: technically there should be a sheet of metal between the hearth bricks to prevent ember contact with combustibles. Filling the cracks with sand should be suffice.
 
Wow, what a difference a coat of paint makes! I love the horseshoe on the door...very nice!
 
I had one of those about 15 years ago. It was a good stove. I had the glass insert for the door and it just stayed black most of the time. That catalyst will plug so you'll need to brush it off fairly often. Mine did anyway. Great job on that stove.
 
BeGreen said:
Looks like you've done well. It's an original look, very clean. How is the stove working out for you?

PS: technically there should be a sheet of metal between the hearth bricks to prevent ember contact with combustibles. Filling the cracks with sand should be suffice.

I didn't mention that I placed a 36x48" piece of durarock under the bricks. The stove is doing Ok so far. Today, however, I noticed that I have been having some back puffing today when the door is open. This is new, but today was windy, so maybe it's related. Other than that, it I am still figuring out the burn times but I can wake up with usable coals.
-Ray
 
realstihl said:
That catalyst will plug so you'll need to brush it off fairly often. Mine did anyway. Great job on that stove.

How often is fairly often? and how did you clean it? Did you need to remove the impingment plate?
 
Cool looking stove and nice looking hearth! Is that horseshoe plate brass? Man that would so nice shined up.. I have a serious shiny brass fetish LOL.. It all started in the Navy I think back in 1975 :)

Ray
 
raybonz said:
Cool looking stove and nice looking hearth! Is that horseshoe plate brass? Man that would so nice shined up.. I have a serious shiny brass fetish LOL.. It all started in the Navy I think back in 1975 :)

Ray

No, it's steel plate. I was considering ways to make just the name and horse shoe stand out. I haven't come up with a good solution as of yet that doesn't require more paint.
-Ray
 
iceisasolid said:
raybonz said:
Cool looking stove and nice looking hearth! Is that horseshoe plate brass? Man that would so nice shined up.. I have a serious shiny brass fetish LOL.. It all started in the Navy I think back in 1975 :)

Ray

No, it's steel plate. I was considering ways to make just the name and horse shoe stand out. I haven't come up with a good solution as of yet that doesn't require more paint.
-Ray

I wonder how well gold leaf would hold up on a hot surface? That would look awesome on the horse shoe!

Ray
 
iceisasolid said:
realstihl said:
That catalyst will plug so you'll need to brush it off fairly often. Mine did anyway. Great job on that stove.

How often is fairly often? and how did you clean it? Did you need to remove the impingment plate?

It's been a long timebut I think it was about every two weeks. Yes, on mine I had to remove the plate. Just let the stove cool and use a paint brush. Worked for me anyway. I also used wing nuts on the plate so it was easier to acess.
 
Status
Not open for further replies.