
It is cool. The center section when rotated about 30 degrees lifts about an eighth of an inch so that it just gets radiant heat. It says it's a simmer plate. I'll post a close up pic tomorrow.That's beautiful!! It is shaping up nicely.
What is that fancy left front burner cover about? Does it have a built-in damper for direct flame contact?
Restoring a Cook Stove
- Thread starter Jbels
- Start date
-
Active since 1995, Hearth.com is THE place on the internet for free information and advice about wood stoves, pellet stoves and other energy saving equipment.
We strive to provide opinions, articles, discussions and history related to Hearth Products and in a more general sense, energy issues.
We promote the EFFICIENT, RESPONSIBLE, CLEAN and SAFE use of all fuels, whether renewable or fossil.
You are using an out of date browser. It may not display this or other websites correctly.
You should upgrade or use an alternative browser.
You should upgrade or use an alternative browser.


I'm surprised to see this over the firebox. When I wanted simmer I just move the pot or pan to the right side, far away from the fire.
Yes, that makes sense.It will probably end up front and center, and the double nesting one at left rear will end up left front, so you don't have to reach to the back for a smaller pan or kettle over the small hole.
So, I fired it up for the first time today. Went well. I used just wood as I was just curing the sealant. I did notice some smoke leaking which brought my attention to the front left corner. I noticed that the screw which holds the top to the side of the stove had no nut. Thus there was a 3/8" gap there. Once I replaced the nut and tightened it down it caused the whole complex of pieces that make up the four left burners to no longer be flat. There is now a peak in the center, and it doesn't look like the support for the center has any adjustments. Any thoughts?


Qvist
Burning Hunk
Looks like that support might be in wrong? In your other picture shows the support right against those two cast iron "pins" in the top of the oven, and it looks different. I'm not sure how it's constructed if there's two pieces to the support etc. But the way the top of that support is angled up in the air looks strange. I'm thinking it should be flat? Maybe the support is in upside down and the bottom side is what rests on the cooktop, and the bottom sits on the swivel like piece in the old picture? Not sure.
Attachments
With the top pieces removed put a straight edge across the top in different directions to see if the center support is high, or the edge with no bolt is low. Is the center support bolted down like it hasn’t moved? Is the piece it sits on flat, or does that look raised in the center as well?
Could be if it was never put together properly, they left the corner loose. Is there any sign of cement or gasket material being there? Obviously either the side is low or the center is high. Level base first, then checking with level and straight edge, should show what’s out of whack. If all else fails you may need to remove center support and make a temporary piece of wood the right height to make it solid and flat. Then grind the center support to the correct height? You’ll probably find something else not quite right causing one to be high or low.
Could be if it was never put together properly, they left the corner loose. Is there any sign of cement or gasket material being there? Obviously either the side is low or the center is high. Level base first, then checking with level and straight edge, should show what’s out of whack. If all else fails you may need to remove center support and make a temporary piece of wood the right height to make it solid and flat. Then grind the center support to the correct height? You’ll probably find something else not quite right causing one to be high or low.
I've removed the center piece and have cleared some debris that were keeping it propped up. I'll still need to grind the top down a little too get it to sit perfectly flat.
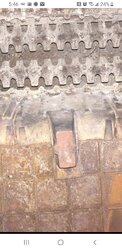
In the mean time found that when the center part is removed it allowed me to remove the panels on the right side of the fire box and clean around it and then to remove the front panel that blocked the front loading door. Would it be okay to leave that panel out so I can use the front door if my plan is to only use it as a wood burner?


In the mean time found that when the center part is removed it allowed me to remove the panels on the right side of the fire box and clean around it and then to remove the front panel that blocked the front loading door. Would it be okay to leave that panel out so I can use the front door if my plan is to only use it as a wood burner?
I know what you mean, but the stove was originally sold with in the wood or coal versions. The door is clearly there, it seems to me to have been used for the wood version and has a layer of refractory material on it. They used the same for for both models I would assume the front piece then was there mainly to funnel the coal down to the grate and to add additional thermal protection. Here's a pic of the door.I wouldn't be comfortable running the stove with that panel removed.

SpaceBus
Minister of Fire
To me that plate in the front is for coal so you can load it from the side chute and not worry about it laying against the door. I think for wood burning use that you would be fine without it, but do what you think is best.
Just to clarify. Are you talking about running the stove without the refractory panel? My concerns with that would be the protection of the metal from the higher heat and evenness of the oven temp if there was a hot spot in that location.
It would be the one front refractory panel that blocks the front door. The front door also has a built in refractory panel as well. Here's two pics without the panel.Just to clarify. Are you talking about running the stove without the refractory panel? My concerns with that would be the protection of the metal from the higher heat and evenness of the oven temp if there was a hot spot in that location.


Ah good, I'm glad I asked. The prior pictures showed the front right refractor missing. That was my concern. In this case, I think it probably would be ok. If you felt the door was getting too hot it could be protected with a heat shield.
Insulated doors are also to protect your legs from heat radiation standing in front of them. That’s the big difference using a regular stove to cook and a cook stove. Prolonged time close to the front gets uncomfortable on the upper legs quick. Doors with intake through them use a shield inside to divert incoming air to keep it cool,
SpaceBus
Minister of Fire
Indeed, standing in front of the glass of my cookstove is very hot. The rest, even the oven, is fine.Insulated doors are also to protect your legs from heat radiation standing in front of them. That’s the big difference using a regular stove to cook and a cook stove. Prolonged time close to the front gets uncomfortable on the upper legs quick. Doors with intake through them use a shield inside to divert incoming air to keep it cool,
Yes, I was thinking a 3/16" steel plate could be cut and bolted to fit the inside of that door using the 4 door screws with short spacers.
That’s why I never upgraded the Kitchen Queen to glass. The air intake through door has a shield inside that directs air between the door panels to a primary slot across bottom, and a few secondary holes near the top. The Queen also uses full thickness firebrick across the front under the door keeping the front cool.Indeed, standing in front of the glass of my cookstove is very hot. The rest, even the oven, is fine.
The problem is when canning, you wouldn’t be able to keep the canner over the firebox opening, and stand close enough to lift jars with tongs. Canning produce from the garden is one of the reasons for choosing my stove.
The thought of doing this over a wood cookstove is not appealing. We do a lot of canning in the mid to late summer. It's about 80% done by now and outside temps are still in the 60s and 70s.That’s why I never upgraded the Kitchen Queen to glass. The air intake through door has a shield inside that directs air between the door panels to a primary slot across bottom, and a few secondary holes near the top. The Queen also uses full thickness firebrick across the front under the door keeping the front cool.
The problem is when canning, you wouldn’t be able to keep the canner over the firebox opening, and stand close enough to lift jars with tongs. Canning produce from the garden is one of the reasons for choosing my stove.
I have a commercial range hood over the big Garland stove right next to it. Variable speed. Open windows the farthest away and crank it up. Fresh air moving through the house keeps it the same. Kids have moved on, so we only need to can every 3 years or so. I give a lot to the Chinese I work with at their restaurant (for themselves) and they give me the real thing from their trips to Chinatown.
40’s nights, upper 50’s days. Frost warning tonight. Time to pull the onions.
Overnight fires for the last week.
40’s nights, upper 50’s days. Frost warning tonight. Time to pull the onions.
Overnight fires for the last week.
Last edited:
Qvist
Burning Hunk
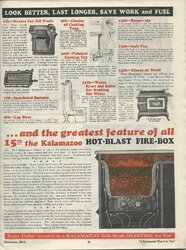
This might help. Kalamazoo add for their stoves states that ends of firebox can be removed when burning wood to make the box longer. Drawing looks to list that door as a wood pocket?
 woodcookstovecooking.blogspot.com
Wood Cookstove Cooking
This is a blog about cooking on a woodburning cookstove. Here you will find recipes, methods, other uses, and miscellaneous information about using a woodburning range. I've searched the net for any and all information about cooking on one of these amazing appliances, and I've found a lot of...
woodcookstovecooking.blogspot.com
Attachments
SpaceBus
Minister of Fire
That's a great blog! The author is pretty good about answering questions as well.This might help. Kalamazoo add for their stoves states that ends of firebox can be removed when burning wood to make the box longer. Drawing looks to list that door as a wood pocket?
Wood Cookstove Cooking
This is a blog about cooking on a woodburning cookstove. Here you will find recipes, methods, other uses, and miscellaneous information about using a woodburning range. I've searched the net for any and all information about cooking on one of these amazing appliances, and I've found a lot of...
SpaceBus
Minister of Fire
I have a commercial range hood over the big Garland stove right next to it. Variable speed. Open windows the farthest away and crank it up. Fresh air moving through the house keeps it the same. Kids have moved on, so we only need to can every 3 years or so. I give a lot to the Chinese I work with at their restaurant (for themselves) and they give me the real thing from their trips to Chinatown.
40’s nights, upper 50’s days. Frost warning tonight. Time to pull the onions.
Overnight fires for the last week.
We are passively looking at range hoods for our cookstove to extend the usable season. Our house is facing south directly into the predominant winds so ventilation is great.
Similar threads
- Replies
- 7
- Views
- 714
- Replies
- 6
- Views
- 288
- Replies
- 6
- Views
- 508
- Replies
- 2
- Views
- 704